Practical significance of Gaussian Blur and Color Dodge in Photoshop

It is to draw a perfect sketch of any person or object by hand has always been considered a great art. But whenever we look around, such sort of artists are very rarely found. But we can see such sketches in books and newspapers  almost everyday . These sketches might be real and drawn by real artists with art on their finger tips but at the same time they might not. As it has long since been possible to convert a photograph whether it be a colored one or a black and white, into a sketch that seems perfectly hand-drawn, news papers and other publishing companies have stopped bothering themselves finding such artists. Though there are many other photo-editors which are used to convert a photograph into a sketch or line-drawing, but the most popular and easy to use is none other than Adobe Photoshop.

How to make a perfect sketch out of a colored photograph?

In order to turn a picture into a line drawing or a sketch, first of all open a picture in Adobe Photoshop by hitting CTRL + O or by getting inside the File Menu and clicking Open. 

colored-photograph
Image: Initial look
Then get inside the Window Menu and put check right beside the option Layers. 

layers-in-photoshop
Window Menu :Is used to open different windows in Photoshop
 As soon as you will do that, a small window will be appeared at the right side of your Photoshop window. In that window, the option Layers will be selected by default.  Further the picture you have opened to work at, will clearly be visible in that window as locked-background.

Layers-channels-paths-window
The Option Layers is selected by default in in the layers window

How to unlock a locked  layer?

The next thing you are supposed to do is to unlock the locked layer. For that purpose, put the pointer of your mouse on the Background (layer which contains the picture you have recently opened to turn into a line drawing) and press the left button of your mouse twice. As soon as you will perform that action, a small window will be appeared called New Layer.
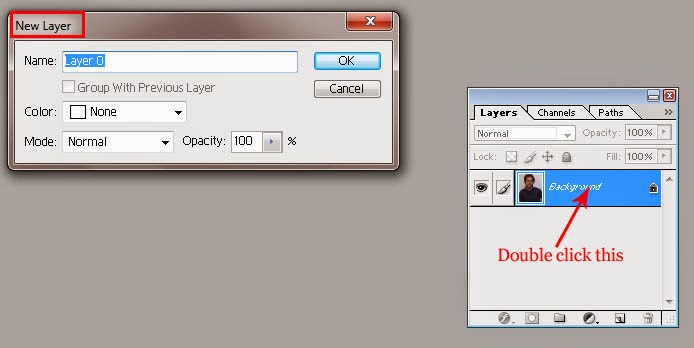
option-group-with-previous-layer-is-not-active
New Layer: Type the name for unlocked layer and set mode and opacity
 In that window there will be seen two boxes including Name and Group with previous. Type the name of the layer in the name box while do nothing with the second option that is Group with previous (that option will not be active in this case because we  have not created any  layer previously). Apart from these two boxes, the New Layer window contains three more options.These are called Color, Mode and Opacity. 
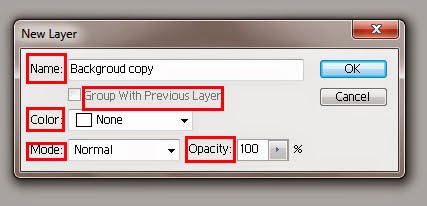
Selection-of-mode-and-opacity-for-new-layer
Color setting in New Layer window is not necessary
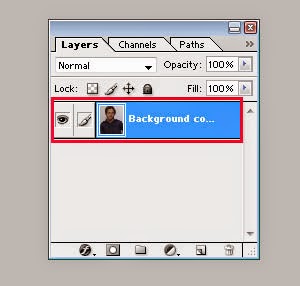
Set the Opacity of the layer upto 100% and out of the Mode Menu select Normal.  As far as the menu called Color is concerned,  if you select red or green or blue or white or totally ignore that menu, it will not make any difference at all. After necessary setting, click OK. As soon as you will click OK the New Layer window will disappear and the name of the layer will be changed from 'Background' to the one you have typed in the New Layer window’s name box,  and the picture of lock will disappear out of the layer, meaning, layer will be unlocked and freely movable .
movable-unlocked-layer
Layer name has been change from Background to Background copy

How to create a duplicate  layer?

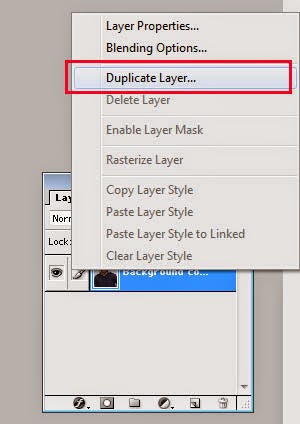
 Then put the pointer again on that unlocked layer and hit the right button of your mouse once. With that right click a menu will be appeared, out of that menu select the option Duplicate Layer.
Duplicate-layer
Select the option Duplicate layer to open Duplicate Layer Window
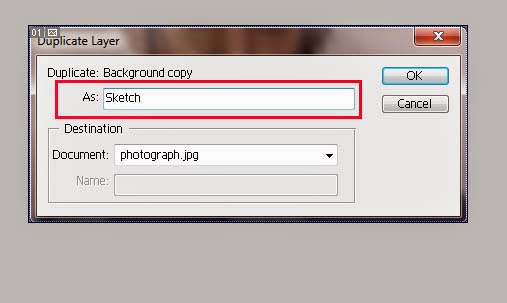
 As soon as you will select that option , another window will be appeared called Duplicate Layer.
creation-and-setting-of-duplicate-layer
Duplicate of  Background copy is about to be made
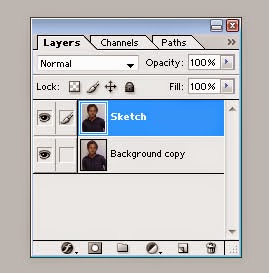
 In that window type the name of the duplicate layer in the box called As. While there is no need to set the Destination of the duplicate layer, so you can leisurely ignore it. After that click OK and you will find the two identical layers with different names (depends on what names you have given those layers) in the layer window.
identical-layers-with-different-names
Background copy and Sketch :Two identical layers

How to select Blending Mode?

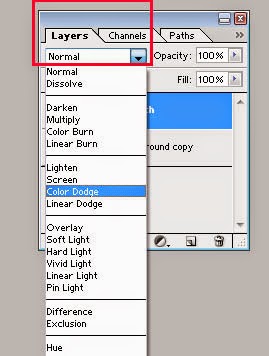
Select the top-most layer out of both and then select the blending mode called Color Dodge out of the drop-down menu that can be seen right beneath the word layers in the layer window.
color-dodge
Drop-down Menu: Contains many blending modes

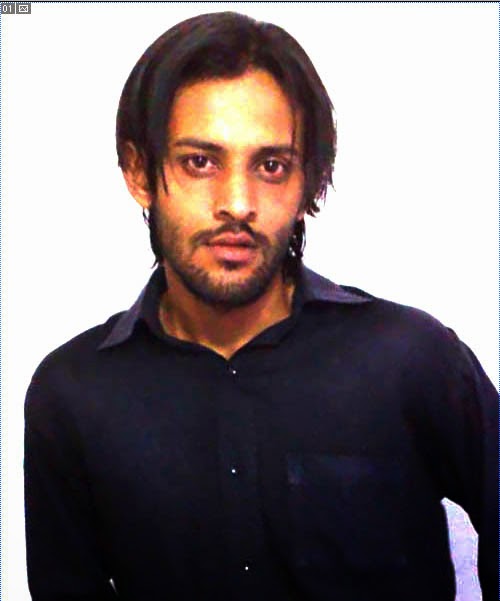
 As soon as you will select that color mode, there will be seen a few but obvious changes in the picture’s color scheme.
effects-of-color-dodge
Image: After the selection of blending mode called Color Dodge

 Invert (CTRL + I)

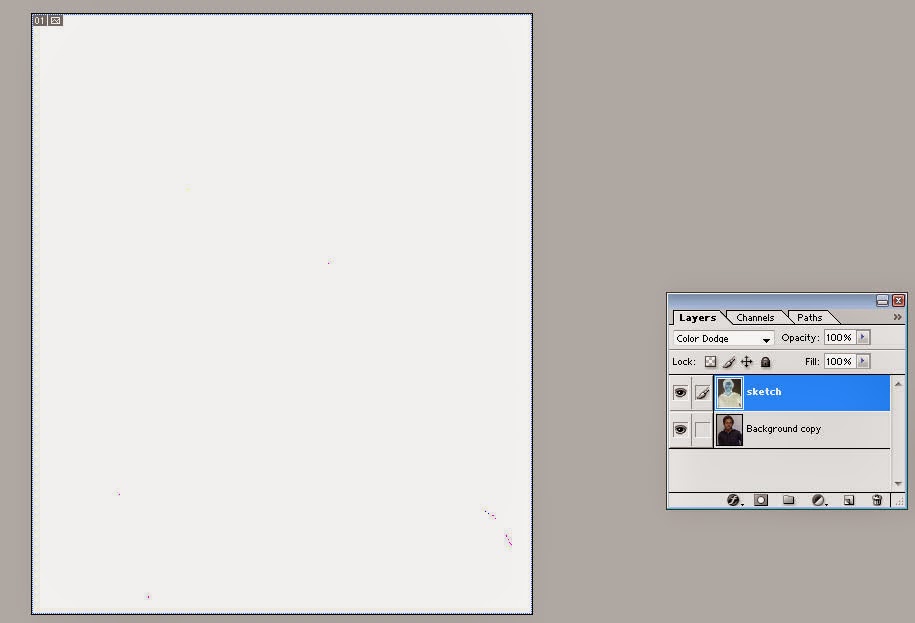
After that, hit CTRL + I. As soon as you will hit the keys , picture will be vanished totally and all you will see, will be nothing but a blank page.
inverted-image
Image: After being inverted

Gaussian Blur

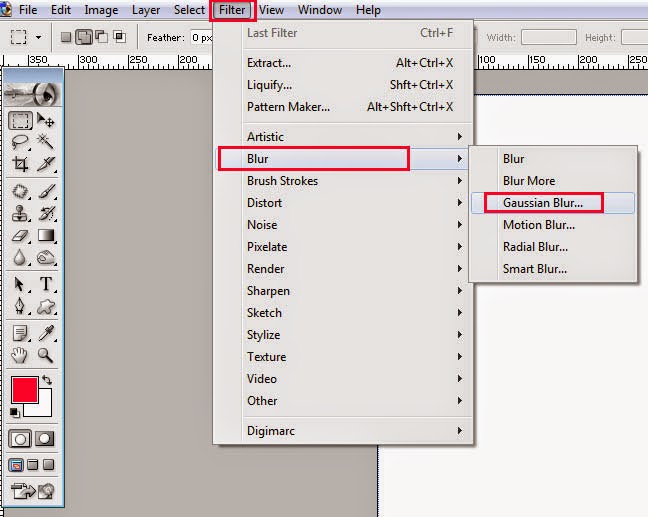
Then get inside the filter menu, select the option Blur and out of the submenu of Blur select the option Gaussian Blur.
Gaussian-blur
Selection of filter out of the filter menu
 As soon as you will select that option, picture will be reappeared on the page along with a window called Gaussian Blur. Here at this point picture will look more like a hand-drawn sketch than a photograph, but your work will not be accomplished at that point.
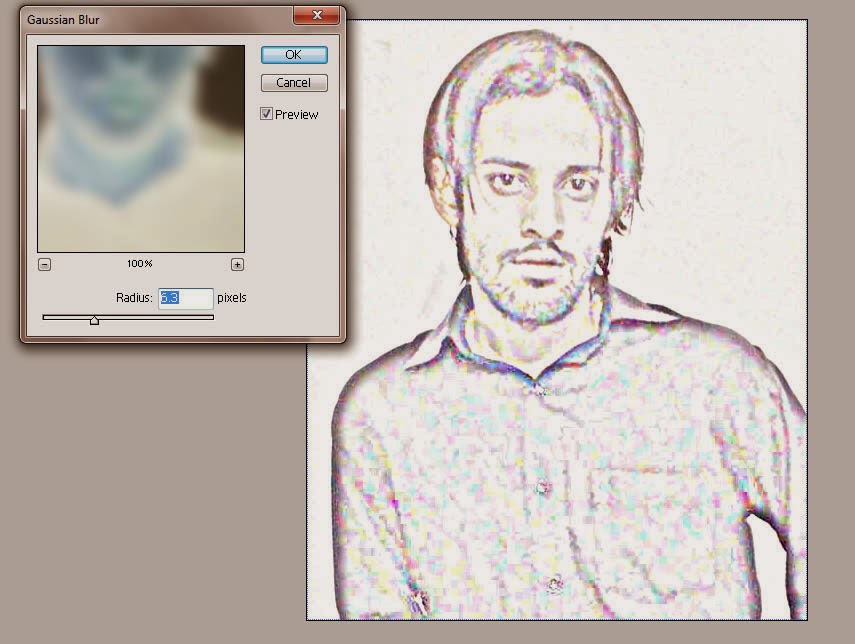

drawing-like-photo
Work nearly accomplished
 In the window that is referred as Gaussian Blur  you are supposed to set the Radius of the Blur.  Before starting,  put check in the check box right beside the word Preview in the Gaussian Blur window. Then set the radius of the blur to set required details in the picture.
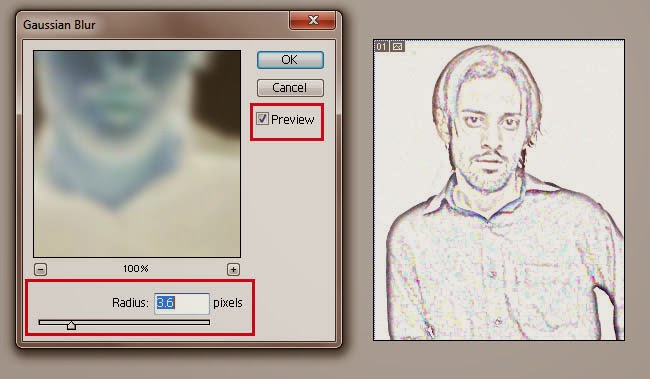
setting-of-radius
Radius :Show as much details in the sketch as you want
 If you set more radius your picture will show more details and if you set  less radius your picture will show less details after being transformed into a sketch. After the setting of required radius, click OK and with that click the window called Gaussian Blur  will be disappeared.

Saturation

The last thing you are supposed to do to accomplish the task is to click the tiny icon that can be seen right beneath the layer window called Create new fill or adjustment layer.
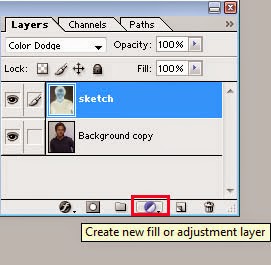
create-new-fill-or-adjustment-layer
That tiny icon will open a new window
As soon as you will click that icon, a menu will be appeared and out of that menu select the option Hue and Saturation.
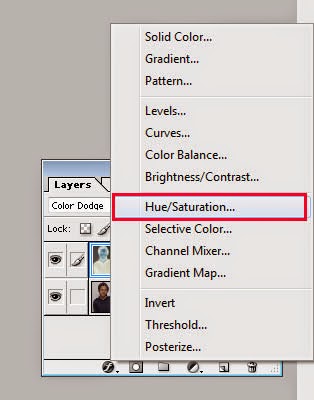
menu-options-of-new-fill-or-adjustment-layer
Menu : That contains many options to manipulate the image look
 After the selection of that option, within an instant, another small window will be appeared called Hue/Saturation. In that window ,you will see three options these are: Hue, Saturation, and Lightness.
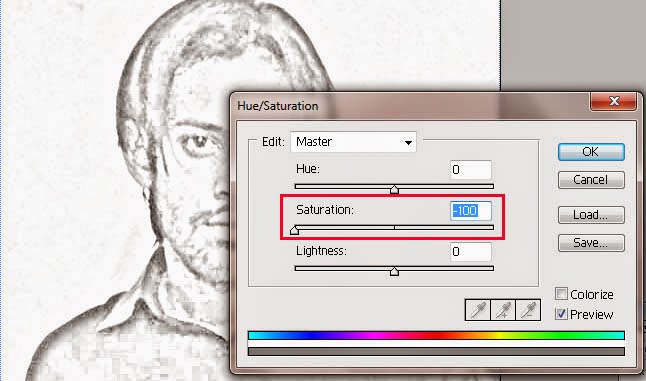
Saturation-setting
There is no need to set Hue and Lightness

Out of these three options, you are not supposed to make any change in Hue and Lightness. The only change you are supposed to make is in Saturation. Set the saturation of the layer equals to -100 and click OK.  With that click you will notice that the picture has lost all it’s photographic qualities and has assumed the form of a hand-drawn sketch.
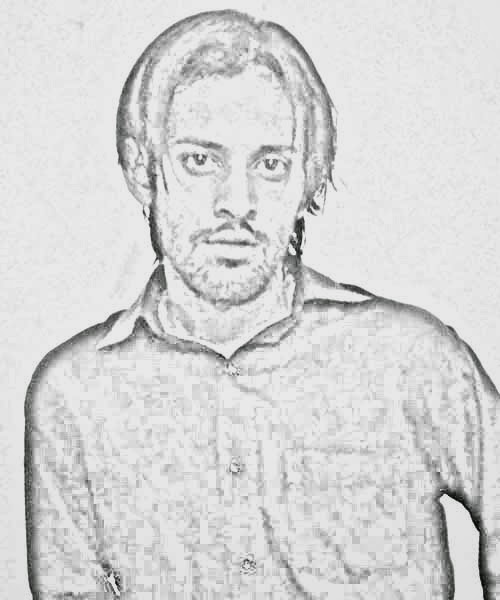
hand-drawn-sketch-like-image
 Image : After complete editing
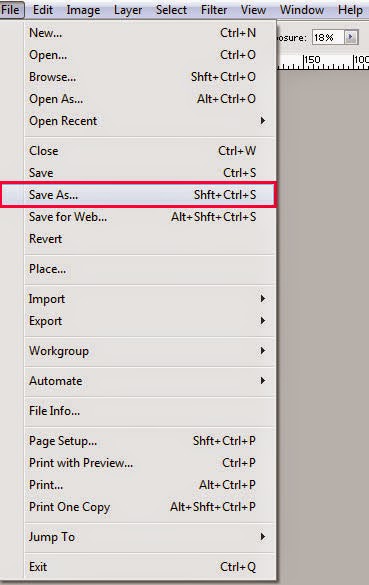
Save the image in your required format by getting inside the file menu and selecting the option Save As or hitting the keys CTRL+ SHFT + S.
 I hope you will find this post useful. If so, please don’t forget to subscribe your comment.


How to remove curls using Photoshop?

Once I needed a few passport size photographs which were supposed to be submitted with my admission form. For that purpose, I had to go to a nearby photo studio, but after approaching there, I had to wait for almost half an hour because photographer cum owner of the studio was engaged in a deep conversation with an elderly couple. Though, I didn't listen intently, but all the same, I couldn't refrain from listening their conversation.  Old gentleman had recently had his photograph developed from the same studio and was continually insisting that there were not as much curls in his hair as were  appeared in the photograph, while the photographer kept on insisting that it was not his fault. They argued and argued and at last, photographer couldn't stand against  the angry old gentleman and promised to do something for his hair style to look better in the photograph.
As a matter of fact, it is to make required changes in hair style is not a bit difficult by the use of Adobe Photoshop and as far as removal of curls out of hair is concerned, it can be done quite easily if you know how to use filter called Liquify and the tool called Burn Tool properly.

Make hair Straight and Shiny

In order to remove curls and make hair straight and shiny, first of all, open a picture of a person with prominently curly hair either by hitting  CTRL + O or by getting inside the File Menu and clicking Open. 


remarkably-curly-hair
image: Before the removal of curls

Filter menu and Liquify Window

After that, get inside the Filter Menu and select the option referred as Liquify given there by clicking on it or by hitting Shift + CTRL + X on the keyboard.

Select-liquify
Liquify : This filter is used to manipulate any part of a picture as easily as a water color brush
As soon as the option liquify will be selected, the image you have opened  will be opened by itself  in another window called Liquify window.

Tool bar of Liquify window
Image : In liquify window 
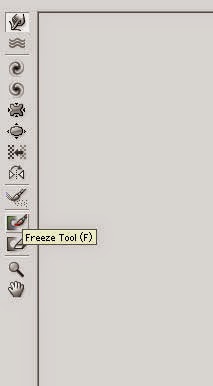
This window has no menu bar at the top but it’s own tool bar that can be seen at the left side of it. Out of that tool bar select the option Freeze Tool or hit F.

selection-of-freeze-tool
Freeze Tool : Saves parts of picture on which you don't want to apply the filter called Liquify

Freeze Tool

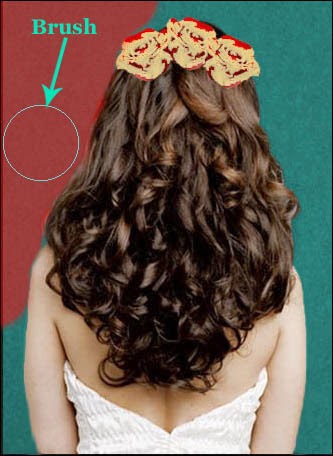
As soon as that option will be selected the pointer of your mouse will assumed the shape of a circle that is called brush. Then put the pointer of your mouse at the picture keep it's left button pressed,  and drag it.

use-of-freeze-tool
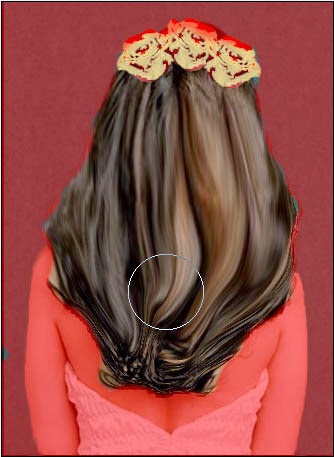
Red color indicate the part on which freeze tool has been applied
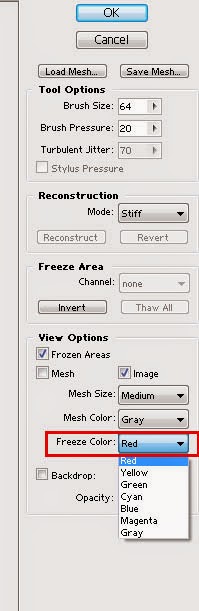
Part of the picture on which you will drag your mouse after the selection of Freeze  Tool, will be covered by red or some other color depends on the color which is selected in the menu called Freeze Color (This menu can be seen at the right side of the Liquefy window).

freeze-color-menu
freeze color doesn't make any difference
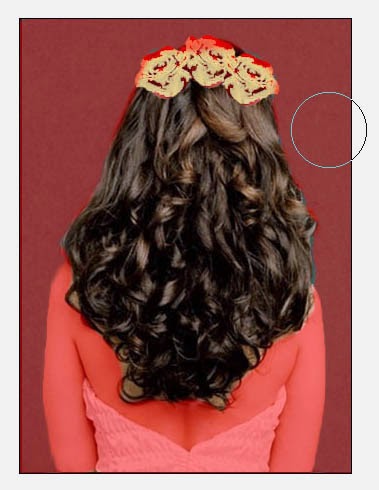
 Leaving the hair, drag your mouse all over the picture. The part of the picture on which you will apply freeze tool will get totally frozen and no tool will work on that part of the picture so it will remain perfectly intact no matter what liquify tool you will apply on hair.
liquify-tools-will-be-inactive-on-red-part
Save from hair, freeze tool has been applied all over the image

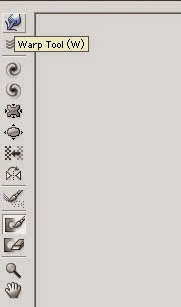
Warp Tool

Then select the option called Warp Tool out of the tool bar window.

selection-of-warp-tool
Warp Tool works on a picture as though it is made up of a liquid
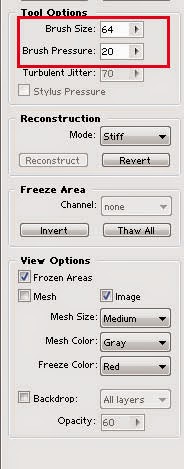
 Set the size of the brush of this tool according to the size of the picture you want to work on, and pressure of it equals to 20.

size-and-pressure
Tool Options can be seen usually at the right side of the window
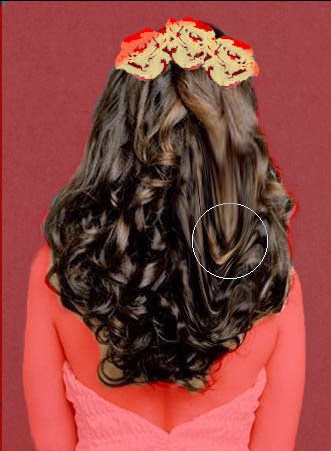
Then put the circle shaped pointer of your mouse at the top of the head, keep the left button of your mouse pressed and drag it downward.

wonderful-warp-tool
Hair is being straighten with each mouse drag
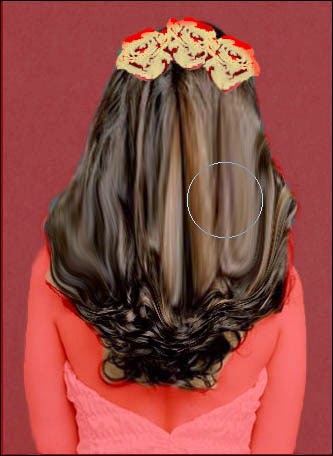
 Repeat the same action again and again and after a few mouse drags the difference will be  clearly visible.
warp-tool-makes-difference
Image : After a few mouse drags
 After  complete straightening , put the pointer of your mouse at the bottom of the hair and set it cautiously,to  give it a natural look. After that click OK.

finished-work-of-warp-tool
Image: After complete removal of curls
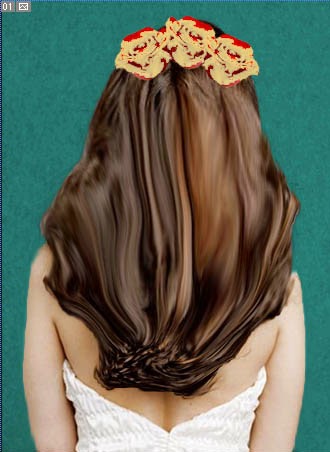
As soon as you will click OK, Liquify window will be closed and you will have your picture with a different hair style opened in the Photoshop window. After the use of the filter Liquify, you will get perfectly straight hair but not as real as it looked  before straightening.

 Hair-with-unnatural-shine
Hair : Unnatural look

Burn Tool

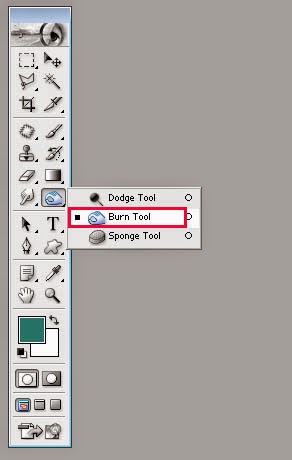
To resolve this issue and to give it a natural look select Burn Tool out of the tool window.

selection-of-burn-tool
Burn tool: very important tool used for image re-touching
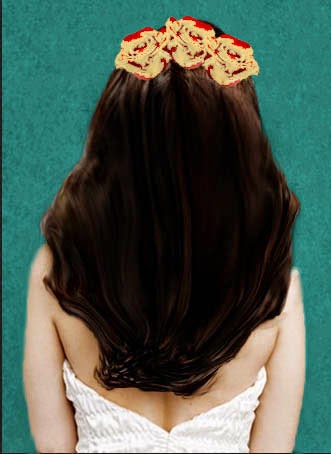
 Then zoom the picture in by hitting CTRL + +. Set the size of the brush according to the size of the picture by hitting   }  (to increase the size of the brush) or  {  (to decrease the size of the  brush). After setting it’s size, put the brush (circle shaped pointer) on the hair, keep the left button of your mouse pressed and drag it all over the hair. With each drag, color of the hair will get darker and it’s unnatural shining will be dimmed. Keep  dragging your mouse till the complete removal of unnatural shine out of the hair.

after-the-use-of-burn-tool
Image: After removal of unnatural shine

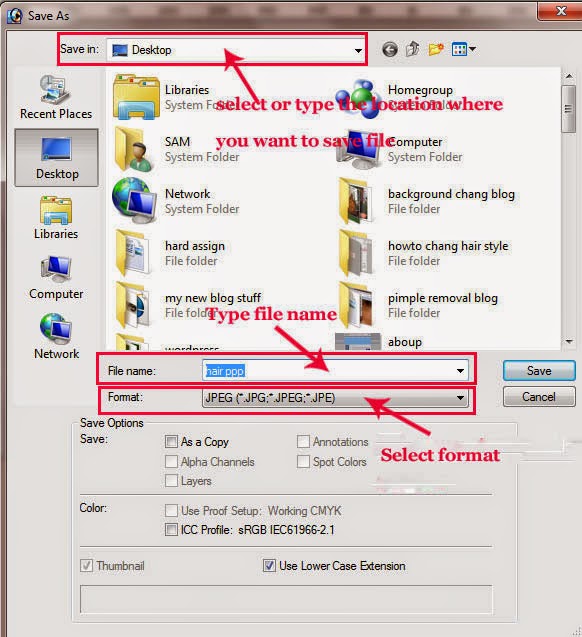
Save As

Then save the picture in your required format by getting inside the File Menu and selecting the option Save As.
option-save-as
Save As: Save your image in any format
As soon as you will select the option save as out of file menu a window called Save As will be opened.
selection-of-location-and-format
Select location and format for your image
In that window, select the location e.g. dive or folder in which you want to save your file in the box called Save in, that can be seen at the top of the window, type the name of your file in the box  called File name and select the format that is required for your newly edited image in the Format box and click save. After that click, task will be accomplished and the image will be ready for use wherever you want.
Kindly don’t forget to subscribe your comments and share your opinion regarding this post.

Healing Brush Tool : Single Click Wizardry

Often we come across different people, especially youngsters, too much worried about their outward looks especially about their uneven skin, dark circles around their eyes and pimples on their faces. They are often found consulting skin specialists and beauticians and spending large amount of time and money. Sometime their issues regarding their looks get resolved  successfully after consulting skin specialists and beauticians, but unfortunately, sometime all their toil dashes to the ground and despite spending time and money appears no positive outcome and that is of course, extremely disappointing .
As I am neither a skin specialist nor a beautician myself, so I have in fact, no idea about how to help these youngsters in getting rid of this extremely sensitive issue (of course, or at least in my opinion, outward looks always matter too much for youngsters as well as the rest of the people) in reality. At the same time, it is always good for everyone to look beautiful in photographs too. But, how can one look beautiful in photographs with a face covered with pimples?

Face-covered-with-pimples
Uneven skin : Covered with pimples
 Fortunately, it is to look beautiful and pimple free in photographs is not as much difficult as it is in reality.

How to remove pimples using Adobe Photoshop?

In order to remove pimples out of a photograph’s face, one is supposed to follow the steps given below:
Open a picture with a face covered with pimples in Adobe Photoshop by selecting the option open out of the file menu or by hitting CTRL + O. 

Select-open
File Menu: In order to open a picture click Open or hit CTRL + O
Zoom that picture in by hitting CTRL + +.

Close-up
Zoom in : Makes editing easier

Healing Brush Tool

After zooming the picture in, select the Healing Brush Tool out of the tool window that can be seen usually at the left side of the Photoshop window. As soon as you will select the Healing brush Tool, the pointer of your mouse will assume the shape of a circle that is called Brush. Set the size of the brush according to the size of picture.

Selection of healing brush tool
Tool Window : Contains very useful Photoshop tools
 Size of this brush (as well as all the other brushes in Photoshop) can be changed according to necessary by hitting  } (to increase the size of the brush) or { (to decrease the size of the brush). Further, size, hardness, spacing, roundness and angle of Healing brush Tool can also be specified by setting Diameter, Hardness, Spacing, Roundness and Angle in Brush Picker window.

Brush-picker-window-for-Healing-brush
Brush Picker Window : Set Diameter,Hardness, Spacing, Angle and Roundness of the brush

 Brush Picker Window

Brush Picker Window appears when you click the arrow that can be seen beside the second option that is called brush in the tool option bar right beneath the menu bar.

Click-Brush-Picker
Brush Picker : To open Brush Picker window click the arrow  called Brush Picker

Hardness and Diameter

If you want to use Healing Brush tool on human skin’s picture it's better to keep the hardness of the brush nearly 100%. As far as Diameter is concerned, size of the brush totally depends on it, Size of the brush gets larger and larger with the increase in diameter.

Healing-Brush-with-considerably-large-diameter
Diameter: Size of the brush with 176 px  diameter
On the contrary, brush size gets shrunk with the decrease in diameter.

Healing-Brush-with-less-diameter
Size of the brush with 66 px diameter

Spacing

The option Spacing has very little or almost no importance while using the Healing Brush Tool. The main purpose of this option is to set the number of spaces between two supposed clicks when we drag our mouse keeping the left button of it pressed. In case you set less spacing e.g.35% and drag your mouse keeping the left button of it pressed, less spaces (35%) from you will be considered by the program (it's mean you have left only 35 spaces empty out of  100).


less-spacing
Less spacing : Result of mouse drag with 35% spacing
 On the contrary, if you select more spacing e.g. 155% and drag your mouse while keeping the left button of it pressed, more spaces from you, definitely 155%, will be considered by the program. More spacing means less clicks while the less spacing means more clicks, that’s the formula.

more-spacing
Result of mouse drag with 155% spacing

Angle

Through the option Angle you can set the angle of your brush and that definitely makes no difference while editing a picture using Healing Brush Tool.

Angle-of-healing-brush-tool
Angle of Healing Brush tool

Roundness

 The option Roundness is used to set the roundness of the brush which is set by default 100%.

completely-round-brush
Circle shaped Healing Brush with 100% roundness
In case you set the roundness less than 100%, the shape of the brush will no longer look like a circle but it will turn into an ellipse.

oval-shaped-brush
Ellipse shaped Healing Brush with 70% roundness
 Well, the shape of the brush whether a circle or an ellipse, doesn't matter at all. As far as its use is concerned, both shapes work equally well. So, there is no need to worry about the Angle and the Roundness of the brush anymore.
In order to remove pimples, all setting which is supposed to be done is to set the hardness of the brush 100% and the selection of the mode Normal out of the Mode menu. We always select  Normal Mode when we want to keep intact all the  original features of the picture save from the one we want to change intently. As here we want to remove pimples intently.


Normal-mode
Normal Mode : Save picture's original  features
After that, select sampled out of the two Source options. We select this option simply because we don't want to replace the pimply part of skin with any kind of pattern but the sample of the pimple free part.
two-source-options- sampled-and-pattern
Sampled: Source option used to create sample of the selected part of the picture at any place.
Then ,finally,  put the pointer of your mouse at the part of the picture’s face where skin looks totally neat and pimple free.


Neat-part-of-skin
Neat part of  skin is used for sampling by Healing Brush tool
 Keep the Alt key pressed and click the left button of your mouse once.Then put the pointer of your mouse at any pimply part of the picture and click once.

Before-mouse-click
Pimple : Before the use of Healing Brush Tool
As soon as you will click the button pimple will disappear.

After-mouse-click
Pimple completely vanished after the use of  Healing Brush Tool
 Apply the same action one by one on all pimples and all of them will get disappeared after a single click and you will have your image totally pimple-free, neat and shiny without any unnatural effect.

accomplished-task
Image: After the complete removal of  pimples
I am looking for your feedback, so please don't forget to subscribe your comments.