Showing posts with label CorelDraw X6. Show all posts

CorelDraw Tutorial : Logo of BMW

 This is my seventh  post about logo designing and in this post I am going to explain the drawing method of the logo of  Bayerische Motoren Werke AG in CorelDraw X6. Bayerische Motoren Werke AG is basically a German organization that manufactures automobiles, motorcycles and engines. This organization was founded in 1916 and most commonly known as BMW. In the following image you can see the logo of BMW drawn by me using CorelDraw X6.

logo-of-bmw
Logo of  Bayerische Motoren Werke AG  (BMW)

While drawing this logo, I have used  some very useful and wonderful tools of Coreldraw X6 including the Ellipse Tool, Convert Outline to Object, Fountain Fill, Power Clip and Fit Text to Path etc. Following are given the steps through which you can draw the same logo within a very short period of time.

How to draw the logo of BMW using CorelDraw X6?

Having created a new document, first of all select the Ellipse Tool either by clicking on it in the Tool Box or by hitting  F7 on the keyboard.
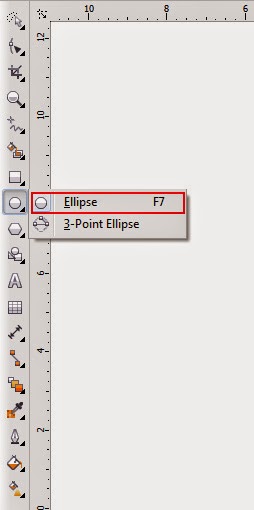
drawing-tool-for-elliptical-shapes
Ellipse Tool in the Tool Box
 As soon as you will select that tool, pointer of your mouse will assume the shape of a plus ( + ) with a tiny shape of an ellipse at the bottom right of it. Then put that plus sign shaped pointer of your mouse anywhere on the document and draw a shape of an ellipse by dragging your mouse in any direction and keeping it’s  left button pressed.
 Having drawn the shape of an ellipse, select it with the help of Pick Tool. As soon as your will select the shape, it’s properties including it’s width, it’s height and it’s Outline width  will be appeared in the Property Bar. In order to convert the selected shape of an ellipse into a perfect circle, set it’s width equal to it’s height ( Width= 8.0, Height= 8.0) in the Property Bar by typing the values in the relevant boxes and hitting the Enter Key. As soon as you will hit the Enter Key, the selected shape will assume the same width and height and will be transformed into a perfect circle. Then fill black color inside that circle by selecting the thumbnail representing black color in the Color Palette with left mouse click and select the outline width for the selected shape equal to 10 pt out of the different options given in the drop-down menu named Outline width according to the picture below.

size-outline-width-and-color-of-a-circle
Black circle with 10 pt wide outline
After that, make a duplicate of that circle by hitting CTRL + D on the keyboard. As soon as you will hit CTRL + D on the keyboard, another circle of the same size ,color and outline width will be appeared on the document. Then select that duplicate black circle with the help of Pick Tool and set it’s width and height equals to 4.5 in the Property Bar by typing the values in the relevant boxes and hitting the Enter Key. As soon as you will hit the Enter Key, the selected duplicate circle will assume the same width and height. Then change it's color from dark black to light grey by selecting the thumbnail representing light grey color in the Color Palette and change the Outline width for the same circle from 10 pt to 8 pt by selecting 8 pt  out of the different options given in the drop-down menu named Outline width according to the picture below.
duplicate-circle-with-altered-properties
Duplicate circle with altered size, color and Outline width
 Then, make another duplicate (this time of the selected grey circle) by hitting CTRL + D on the keyboard. As soon as you will hit CTRL + D, a duplicate of the selected grey circle will be appeared on the document.Then select that newly appeared duplicate circle with the help of Pick Tool and reduce it's width and height from 4.5 to 4.3  by typing the values in the relevant boxes given in the Property Bar and hitting the Enter Key.  After that fill dark grey color in the selected circle’s outline by selecting the thumbnail representing dark grey color in the Color Palette with right mouse click according to the picture below.
duplicate-circle-with-changed-size-and-outline-color
Duplicate grey circle with altered size and outline color
After that select all the shapes on the document by hitting CTRL + A on the key board. Having selected all the objects, the next thing which is supposed to be done right after that is to set them on the same spot. For that purpose, get inside the Arrange Menu and select the option named Align and Distribute. As soon as you will select that option it’s side menu will be appeared containing a few more options( including  Align Left, Align Right, Align Top, Align Bottom, Align Centers Horizontally, Align Centers Vertically, Center to Page, Center to page Horizontally, Center to Page Vertically etc.) .
alignment-of-centers
Side menu of the option named Align and Distribute
Out of these options , select  Align Centers Horizontally or hit E on the keyboard to align the centers of all the selected objects on the document horizontally according to the picture below.
three-circles-with- centers-horizontally-aligned
Three selected shape on the document with horizontally aligned centers
 After that, get inside the Arrange Menu again and again select the option named Align and Distribute by clicking on it. Then, out of the options given in the side menu of Align and Distribute, select Align Centers Vertically by clicking on it or by hitting C  on the keyboard. As soon as you will do so, centers of all the selected objects will be aligned vertically too and you will have all the objects on the document placed on the same spot, according to the picture below.
circles-placed-on-the-same-spot
Circular shapes on the document placed on the same spot
 After  that, select the biggest circle (black circle) on the document by clicking on it with the help of Pick Tool and convert it’s 10 pt wide outline into a separate object by getting inside the Arrange Menu and selecting the option named Convert Outline to Object or by hitting CTRL + Shift + Q on the keyboard. 
Convert-Outline-to-Object
Option named Convert Outline to Object given in the the Arrange Menu
As soon as you will select that option, the outline of the black circle will be converted into a separate object. After that click the small arrow that can be seen at the bottom-right of the Fill Tool in the Tool Box by clicking on it. As soon as you will click that arrow a menu will be appeared containing a few  options regarding fill (including Uniform Fill, Fountain Fill, Pattern Fill, Texture Fill, PostScript Fill, No Fill and  Color). Out of the options given in the menu of the Fill Tool, select Fountain Fill either by clicking on it or by hitting F11 on the keyboard.
Fountain-Fill-and-other-Fill-options
Opened menu of Fill Tool
  As soon as you will do so, a window or dialogue box named Fountain Fill will be appeared. At the top of that window, under the head of Options there will be seen a drop-down menu named Type. Out of the options given in the drop-down menu named Type, select  Linear  by clicking on it. Then set the Angle for the Linear typed Fountain Fill equal to -1200 and set the Edge Pad equal to 8.0 by typing the values in the relevant boxes. Further in the same window, there will be seen two radio buttons named Two Color and Custom  under the head of Color Blend.  By default you will find the radio button named Two Color selected in that window with all it’s setting options visible but here we need to select the other option named Custom.
As soon as you will select the radio button named Custom, the setting options of Two Color will be disappeared and the setting options of Custom will be appeared in the window. These options are consist of a Color Palette, a box named Position (by default inactive), a small rectangle named Current (that shows the color inside the currently selected area), a large rectangle ( used to set the position of different colors in the single object) with two tiny squares at the top left and top right corners of it, and right beneath that rectangle, there will be seen a drop-down menu name Preset.
Further, you will notice that the tiny square at the top left  corner of the large rectangle will be black by default that means that the left part of the selected object remain ready to be filled with any color by default through that window. So fill dark grey color in that part by selecting the thumbnail representing dark grey color in the color Palette given in the same window with left mouse click. As soon as you will select that thumbnail, dark grey color will be filled inside the selected part of the rectangular shape according to the picture below.

Linear-Type
Selected Type, Angle and Edge pad in the window named Fountain Fill
Then, select the tiny square that can be seen at the top right corner of the rectangular shape by clicking on. As soon as that tiny square will be selected, it will turn black and indicate that the right part of the shape is  ready to be filled with any color. Then fill dark grey color in that part of the shape too, by selecting the thumbnail representing dark grey color in the color palette with left mouse click. As soon as the grey color will be filled inside that part of the shape, the shape will turn totally dark grey according to the picture below.

Selection-of-the-grey-thumbnail
Grey color has been filled inside the entire shape
After that, put the pointer of your mouse anywhere inside the dark grey rectangular shape and hit the left button of your mouse twice. As soon as you will do so, a slide will be appeared right above the grey rectangular shape with a tiny black arrow pointing toward  the selected area and the formerly inactive box named Position will become active showing the current position of the recently appeared black arrow in the slide.
Then, set the position of the black arrow equal to 50 by typing the value in the box named Position. As soon as you will type the value 50 in the box named Position, the black arrow will move at the center of the slide pointing toward the central area of the rectangular shape. Then fill light grey color inside the central part of the rectangular shape by selecting the thumbnail representing light grey color in the color Palette with left mouse click. As soon as you will select that thumbnail, light grey color will be filled inside the central part of the rectangular shape according to the picture below.

Position-setting-in-the-window-named-Fountain-Fill
Central part of the shape with light grey color filled inside
 After that click OK to apply that setting on the outline of the black circle according to the picture below.
shaded-outline
Black circle with light and dark grey outline
After that, select the black part of the biggest circle on the document by clicking on it and once again open the window named Fountain Fill either by clicking on the option named Fountain Fill given in the menu of Fill Tool or by hitting F11 on the keyboard as I have explained earlier. Having opened the window named Fountain Fill, first of all, select Radial as the type of Fountain Fill out of the options given in the drop-down menu named Type. As soon as you will select the option named Radial, the formerly inactive boxes named Horizontal and Vertical under the head of Center Offset will get active and, at the same time, the formerly active box named Angle will get inactive. Then, set the Edge pad for the radial typed Fountain Fill equal to 20, set Center offset (Horizontal) equal to 90 and set Center offset (Vertical) equal to -95 by typing the values in the relevant boxes according to the picture below .

Radial-Type-Fountain-Fill
Radial as selected fill Type in the window named Fountain Fill
 After that, in order to apply that setting on the selected black circle, either click the button named OK given in the same window or hit the Enter Key on the keyboard. As soon as you will click the button named OK or hit the Enter Key, the required setting will be applied on the black circle according to the picture below.
glistening-black-circle
Black circle with glistening surface
After that, select the small light grey circle with the help of Pick Tool and change it’s color from light grey to pure white by selecting the thumbnail representing white color in the Palette.
white-circle-with-grey-outline
Selected smaller circle with white fill inside
 After that, select the Rectangle Tool either by clicking on it in the Tool Box or by hitting F6 on the keyboard.
Tool-used-to-draw-rectangles-and-squares-in-CorelDraw
Rectangle Tool in the Tool Box
 As soon as you will select that tool, the pointer of your mouse will assume the shape of a plus ( + ) sign with a tiny rectangular shape at the bottom right of it. Then put that plus sign shaped pointer of your mouse anywhere on the document and draw a rectangular or square shaped object there by dragging your mouse in any direction while keeping it’s left button pressed.
 Then select that newly drawn shape with the help of Pick Tool and in order to convert it into a perfect square, set it’s width equal to it’s height in the Property Bar by typing the values ( width=3.0, Height= 3.0) in the relevant boxes and hitting the Enter Key.As soon as you will hit the Enter Key, the selected shape will assume the same width and height and will be converted into a perfect square. After that, select  the outline width for the selected square equal to 8.0 pt out of the different width options given in the drop-down menu named Outline width and fill dark grey color in that 8 pt wide outline of the selected square by selecting the thumbnail representing dark grey color in the color Palette with right mouse click according to the picture below.
Perfect-square
Perfect square with 8.0 pt wide grey outline
 After that hit F11 on the keyboard to open the window named Fountain Fill again as I have explained earlier. Then in that window select Linear out of the different options given in the drop-down menu named Type, set the Angle equal to 139.9o and  set the Edge pad equal to 24 by typing the values in the relevant boxes.  Then out of the different color options given in the two apparently hidden Color Palettes  named From  and To, select dark cyan color and light cyan color respectively according to the picture below.
From-and-To-in-Fountain-Fill-window
Type, Angle, Edge pad  and hidden color palettes named From  and To in the window named Fountain Fill
After that click OK to apply this setting on the selected square with 8.0 pt wide outline. Then, make a duplicate of that cyan square either by getting inside the Edit Menu and selecting the option named Duplicate or by hitting CTRL + D on the keyboard. As soon as you will do so, another cyan colored square will be appeared on the document. Then with the help of Pick Tool set both the squares in a way that the bottom- right corner of the first square could touch the top-left corner of the duplicate square according to the picture below.
Two-identical-circles
Two squares on the right place
 After that, select the duplicate square with the help of Pick Tool and convert it’s outline into a separate object by getting inside the Arrange Menu and selecting the option named Convert Outline to Object or by hitting CTRL + Shift + Q on the keyboard. Then select the cyan part of the same square by clicking on it reduce it’s width and height from 3.0 to 2.8  by typing the values in the relevant boxes given in the Property Bar and hitting the Enter Key. As soon as you will hit the Enter Key the selected part will assume the same size and white page will begin to peer from the empty area  generated by the reduced size of the selected square according to the picture below.
reduced-size-of-the-square
Selected square with reduced size and outline converted into a separate object
After that, hit F11 on the keyboard to open the window named Fountain Fill one more timeHaving opened that window, the only thing which is supposed to be done is the selection of colors out of the different color options given in the two hidden Color Palettes named  From and To.  So select dark blue color out of the options given in the hidden Color Palette named From and select dark cyan color out of the options given in the hidden Color Palette named To according to the picture below.

Fountain-Fill-Color-blend-Two-color-From-To
Select dark blue as From and dark cyan as To
After that in order to apply that setting upon the selected shape click the button named OK . As soon as you will click the button named OK, the required setting will be applied on the selected shape according the picture below.
cyan-and-blue-shaded-square
Two squares on the document with different colors filled inside
 After that, select both the squares and  the outline of the second square with the help of Pick Tool by clicking on each object one by one while keeping the Shift Key on the keyboard pressed. Having selected these three objects, group them together either by getting inside the Arrange Menu and selecting the option named Group or by hitting CTRL + G on the keyboard. Then, get inside the Effects Menu and select the option named Power Clip given there.  As soon as you will select that option it’s side menu will be appeared containing a few more options. Out of the options given in the side menu of Power Clip select Place Inside Frame. 

Power-Clip-and-the-Effects-Menu
Option named Power Clip with it's side menu
 As soon as you will select that option, the pointer of your mouse will assume the shape of  a remarkably  thick black arrow.
thick-black-arrow
Mouse pointer has been converted into a remarkably thick black arrow
 Then put that thick black arrow shaped pointer of your mouse anywhere inside the small white circle and hit the left button of your mouse once. As you will do so, the selected group of two squares  and the outline of the second square will be placed inside the small white circle according to the picture below.
Use-of-Power-Clip-in-CorelDraw
Selected group of two squares and the outline of the second square has been placed inside the white circle
If you notice anything wrong about the position of the group inside the circle, you can edit it easily. For that purpose, get inside the Effects Menu again and again select the option named Power Clip. Then out of the options given in the side menu of Power Clip select Edit Power Clip.


Edit-Power-Clip
Option named Edit Power Clip given in the side menu of  Power Clip
As soon as you will select that option, the position of the group inside the white circle will get ready to be edited while rest of the objects on the document will get dimmed. Then with the help of Pick Tool place the group at the right position according to the picture below.

Editing-through-Edit-Power-Clip-in-CorelDraw
Place the group on the right position with the help of  Pick Tool
Having placed the group on the right position, in order to finish the editing , get inside the Effects Menu again and again select the option Power Clip. After that, out of the options given in the side menu of Power Clip select Finish Editing this Level.

Finish-Editing-this-Level-in-CorelDraw
Option referred as Finish Editing this Level given in the side menu of  Power Clip
As soon as you will do so, editing will be finished and the group will be appeared inside the white circle at the appropriate position according to the picture below.
finished-editing
Edited  position of the group inside the white circle
 After that select the Text Tool either by clicking on it in the Tool Box or by hitting F8 on the keyboard.
tool-for-typing-in-CorelDraw
Text Tool in the Tool Box
 As soon as you will select that tool, pointer of your mouse will assume the shape of a plus ( + ) sign with a tiny but prominent letter A at the bottom right of it. Then put that plus sign shaped pointer of your mouse anywhere on the document and type   B M W there (hit the Space Bar once  after typing  each letter). Then select that recently typed text with the help of Pick Tool . As soon as the text will be selected , it’s properties will be appeared on the Property Bar.

Then, select Arial Black as Typeface for the selected text out of the different options given in the drop-down menu named Font List, specify the font size for the selected text equal to 120 pt either by selecting 120 pt out of the different options given in the drop-down menu named Font Size  or by typing the value inside the box. Then fill light grey color inside the selected text by selecting the thumbnail representing light grey color in the Color Palette with left mouse click and fill black color in the selected text outline by selecting the thumbnail representing black color in the Color Palette with right mouse click according to the picture below.

properties-of-the-typed-text
Recently typed text and it's properties
 Having set the properties of the text, get inside the Text Menu and select the option named Fit Text to Path given there.
Text-and-Fit-Text-To-Path-in-CorelDraw
Option referred as Fit Text To Path given in the Text Menu
As soon as you will select that option, pointer of your mouse will assume the shape of a (not so thick) horizontal black arrow with a prominent letter A and a tiny twisted line at the bottom right of it. Then put that pointer of your mouse inside the black circle and set the position of the selected text according to picture below.

Text-and-text-path
Selected text is being placed at the accurate path


Have set the position of the selected text inside the black circle hit the left button of your mouse once to put the text permanently at the same position according to the picture below.

Text-placed-inside-the-logo
Logo image almost ready to be saved
Then select all the objects on the document by hitting CTRL + A on the keyboard and group them together by hitting CTRL + G. Then the logo of BMW will ready to be saved, so save it in CDR format either by getting inside the File Menu and selecting the option named Save or by hitting CTRL + S. In order to save the same logo in any other format (e.g. PNG, JPEG, AI, GIF etc.) select Export out of the options given in the File Menu or hit CTRL + E on the keyboard as I have explained in the my post Illustration of Pakistani flag in CorelDraw X6.

I hope you will enjoy this post, so have fun with it but kindly don’t forget to subscribe your comment.

CorelDraw Tutorial : Logo of Adity Birla Group of Companies

This is my sixth post about logo designing and in this post I am going to explain the drawing method of the logo Aditya Birla Group of Companies. That is an Indian multinational organization founded by Seth Shev Narayan Birla in 1857. This organization  has large business in different sectors e.g.  Metals, Cement, Fertilizers, Chemicals, Carbon Black, branded apparel, Telecom, Financial and I.T services etc. In the following image you can see the logo of Aditya Birla Group of Companies made in CorelDraw X6.

logo-of-Aditya-Birla-Company
Aditya Birla Group of Companies 
Though the logo in the above image seems a complicated one and of course it is, but you can draw it withing 10 minutes or so, without any difficulty if you follow the instructions given below.

How to draw the logo of Aditya Birla Group of Companies using CorelDraw X6?

In order to draw the logo of Aditya Birla Group of Companies, first of  all create a new document by following the method I have explained in my post named  CorelDraw Tutorial: Logo of Douglas County Bank. After that select  the Rectangle Tool either by clicking on it in the Tool  Box or by hitting F6 on the keyboard. 

rectangle-tool-with-other-tools
Rectangle Tool in the menu
As soon as you will select the Rectangle Tool, pointer of your mouse will assume the shape of a plus ( + ) sign with a tiny rectangular shape at the bottom-right of it. Then put that plus sign shaped pointer of your mouse anywhere on the document and draw a rectangular or square  shaped object there by dragging your mouse in any direction while keeping it’s left button pressed. Having drawn a rectangular or square shaped object on the document, select it with the help of Pick Tool and set it’s width and height equal to 8.0 in the Property Bar by typing the values in the relevant boxes and hitting the Enter Key on the keyboard. As soon as your will hit the Enter Key, the selected rectangular or square shaped object will assume the same width and height and will be transformed into a perfect square.
Perfect-square
Perfect square with equal width and height
 Then , select  the Ellipse Tool  either by clicking on it in the Tool Box or by hitting F7 on  the keyboard.
Selection-of-Ellipse-Tool
Ellipse Tool in the menu
 As soon as you will select that tool, pointer of your mouse will assume the shape of a plus ( + ) with a tiny ellipse at the bottom-right of it. Then put that  plus sign shaped pointer of your mouse anywhere on the document and draw an ellipse there by dragging your mouse in any direction and keeping it’s left button pressed. Having drawn an ellipse on the document, convert it into a perfect circle by setting it’s width equal to it’s height. In order to do so, select the shape with the help of Pick Tool. As soon as  the shape will be selected, all it’s properties including it’s width and height will be appeared on the Property Bar. Then set the width and the  height of the  selected shape equals to 8.0 by typing the values in the relevant boxes and hitting the Enter Key. As soon as you will hit the Enter Key the selected circle will assume the  size defined in the Property Bar.

A-perfect-circle
Perfect circle on the document
Then make a duplicate of that recently drawn circle either by getting inside the Edit Menu and selecting the option named Duplicate or by hitting CTRL + D on the keyboard.

make-duplicate
Option named Duplicate given in the Edit Menu
 As soon as you will select the option named Duplicate given in the Edit Menu or hit CTRL + D, another circle of the same size will be appeared on the document. Then select that newly appeared duplicate circle with the help of Pick Tool and set it’s width and height equals to 4.0 by typing the values in the relevant boxes given in the Property Bar and hitting the Enter Key. As soon as you will hit the Enter Key, the selected duplicate circle will assume the same width and height according to the picture below. 
duplicate-circle-with-altered-size
Two circles with different diameter
After that,  click the small arrow that can be seen at the bottom-right of the Freehand Tool in the Tool Box to open a menu containing a few more tools. Out of those tools select 2-Point Line Tool by clicking on it.
Freehand-tool-and-2-Point-Line-Tool
2-Point Line Tool in the menu
 As soon as you will select the tool named 2-Point Line, pointer of your mouse will assume the shape of a plus ( + ) sign once again with a tiny  two point diagonal line at the bottom-right of it. Then put the pointer of your mouse anywhere on the document and draw a horizontal line by dragging your mouse horizontally either from left to right or from right to left while keeping it’s left button and the CTRL Key on the keyboard pressed at the same time. Then select that recently drawn horizontal line with the help of Pick Tool and set it’s width equal to 10 by typing the value in the relevant box given in the property Bar and hitting the Enter Key. As soon as you will hit the Enter Key that recently drawn selected horizontal line will assume the same width according to the picture below.

Horizontal-line
Horizontal line drawn by the use of 2-Point Line Tool
After that, make a duplicate of that horizontal line either by getting inside the Edit Menu and selecting the option named Duplicate, or by hitting CTRL + D on the keyboard. As soon as you will do so, another horizontal line with equal width will be appeared on the document. Then select that newly appeared duplicate line with the help of Pick Tool and set the Angle of rotation for it equal to 90o by typing the value in the relevant box given in the Property Bar and hitting the Enter Key. As soon as you will hit the Enter Key, the selected horizontal line will be rotated on 90o angle and will be transformed into a vertical line with width and height equals to 0.0 and 10.0 respectively according to the picture below. 
Vertical-line
 Selected duplicate line with altered angle
After that select  all the objects on the document by hitting CTRL + A on the keyboard . Then get inside the Arrange Menu and select the option named Align and Distribute given there. As soon as you will select that option , it’s side menu will be appeared containing a few more options. Out of those options select Align Centers Horizontally by clicking on it or by hitting E on the keyboard.

Align-and-Distribute
Align Centers Horizontally in the side menu of Align and Distribute
As soon as you will select the option named Align Centers Horizontally or hit E on the keyboard, the centers of all the selected objects on the document will get horizontally aligned according to the picture below.
Centers-of-all-the-objects-horizontally-aligned
Selected objects on the document after the selection of the option named Align Centers Horizontally
After that, get inside the Arrange Menu again and again select the option named Align and Distribute given there. As soon as the option named Align and Distribute will be selected,  it’s side menu will be appeared revealing some other options. Out of those options select Align Centers Vertically by clicking on it or by hitting C on the keyboard.

Arrange-menu-and-Align-and-Distribute
Align Centers Vertically in the side menu of Align and Distribute
As soon as you will do so, centers of all the selected objects on the document will be aligned vertically too according to the picture below.
Objects-with-horizontally-and-vertically-aligned-centers
Selected objects on the document after the selection of the option named Align Centers Vertically and horizontally
 After that select the Smart Fill Tool  by clicking on it in the Tool Box.

Smart-Fill-Tool-in-CorelDraw
Smart Fill Tool in the Tool Box
 As soon as you will select that tool, the pointer of your mouse will assume the shape of a plus ( + ) sign again and the tool properties including Fill OptionsFill Color, Outline options, Outline Width and Outline Color will be appeared on the Property Bar. Then,out of the options given in the drop-down menu named Fill Options select Specify,  select any color of your choice out of the many color options given in the  palette named Fill Color, select  Specify out of the options given in the drop-down menu named Outline Options,  select 0.5 out of the options given in the drop-down menu named Outline width and select any color of your  choice out of the different coloring options given in the palette named Outline color  ( as Fill Color  and Outline Color do not create any good or bad effect on tool’s performance so you can leisurely ignore these two menus).

Specify-as-Fill-option-and-Outline-Option-for-the-Smart-Fill
Properties of Smart Fill in the Property Bar
After that put the plus sign shaped pointer of your mouse on the top-left partition (made by the outlines of the top-left sides of the  square and the bigger circle) and hit the left button of your mouse once. As soon as you will do so, there will be created a separate object on that partition, of the same size and shape, and at the same time, the color you would have selected as Fill Color in the Property Bar will be filled inside that newly created object placed on the top-left partition according to the picture below.
top-left-partition
Newly created grey colored object placed on the top left partition
 After that, put the pointer of your mouse on the top-right partition (made by the outlines of the top right sides of the square and the bigger circle) and hit the left button of your mouse again to create a separate object of the same size and shape there  too.Then create the separate objects on the partitions (made by the outlines of the upper-half of the bigger circle, upper -half of the  smaller circle, horizontal line and vertical line) by putting the mouse pointer on each partition one by one and hitting the left button of it once every time according to the picture below.
Four-objects
Four grey colored objects placed on the four partitions
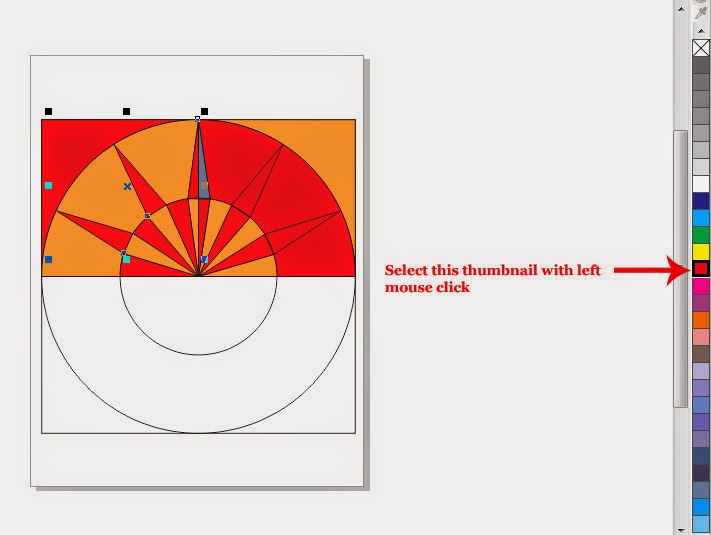
After that, with the help of Pick Tool select the object placed on top-left partition and fill red color inside it by selecting the thumbnail representing red color in the Color Palette with left mouse click according to the picture below.
red-object-on-the-left
Red color has been filled inside the selected object
After that by following the same method:
  • Fill light brown color inside the object placed on the top-right partition made by the outlines of the right sides of the square and the bigger circle.
  • Fill light brown color inside the object placed on the partition made by the horizontal and vertical lines and the  outlines of the right sides of the upper halves of the bigger and the smaller circles.
  • Fill red color inside the object placed on the partition made by the horizontal line, vertical line and the left sides of the upper halves of the bigger and the smaller circles according to the picture below.
colorful-parts
Right way of coloring different objects
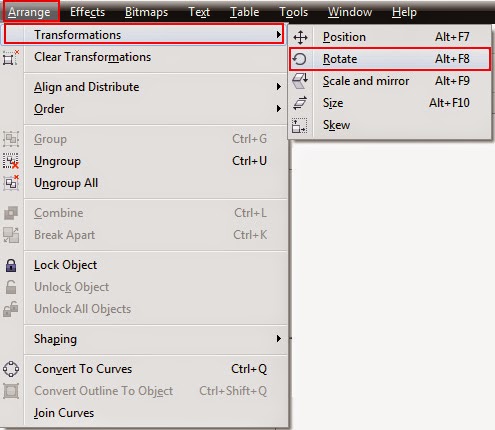
After that select the horizontal line by clicking on it and then get inside the Arrange Menu and select the option named Transformations.  As soon as you will select that option, it’s side menu will be appeared containing five more options including Position, Rotate, Scale and mirror, Size and Skew. Out of those options select Rotate either by clicking on it or by hitting Alt + F8 on the keyboard.
Arrange-menu-and-Transformations
Option named Transformations along with it's side menu
As soon as the option named Rotate given in the side menu of Transformations will be selected,  a large window named Transformations will be appeared  on the right side of CorelDraw window. At the top of that window there will be seen five tabs representing five options of Transformations ( including Position, Rotate, Scale and mirror, Size and Skew). As the window named Transformations would have been opened  by the selection of the option named Rotate, so you will find  the tab representing Rotate selected by default in that  window. Right beneath those tabs there will be seen a box named Angle or Rotation. In that box specify the Angle of Rotation for the selected line equal to 16.3o  by typing the value in the box and hitting the Enter Key. There is no need to make any change in the values given in the boxes named X and Y under the head of Center, so ignore these two boxes and leave the check box named Relative Center unchecked.  Right beneath the check box named Relative Center, there will be seen another box named Copies . Specify the number of copies equal to 10 by typing the value in the box and hitting the Enter Key. Having done that setting, hit the button named Apply that can be seen at the bottom-right of all the options given in the window named Transformations. As soon as you will hit that button, 10 copies of the selected line will be appeared on the document each placed at the angle of 16.3o from it’s predecessor according to the picture below.

Angle-of-Rotation-and-Copies-in-Rotate
Window named Transformations with tab named Rotate selected in it
 After that select the Smart Fill Tool again by clicking on it in the Tool Box and  set all the tool options given in the Property Bar precisely the same way I have explained earlier ( select Specify as Fill Option, select any color of your choice as Fill Color, select Specify as Outline Option, set Outline width equal to 0.5 and select any color of your choice as Outline Color ). Then put the plus sign shaped pointer of your mouse on all the small partitions made by the outline of  the smaller circle and the copies of line in the upper half of the  smaller circle one by one and hit the left button of your mouse to convert each  small colorless partition into a colored object according to the picture below.
objects-in-the-upper-half-of-the-smaller-circle
Newly created objects in the upper half of the smaller circle
Then, with the help of Pick Tool select the object placed on the  left  bottom-most  partition inside the upper half of the smaller circle and fill red color inside it by selecting the thumbnail representing red color in the Color Palette with left mouse click  according to the picture below.

small-red-object-in-the-logo
Object placed on the left bottom most partition of the  upper half of the smaller circle with red color filled inside
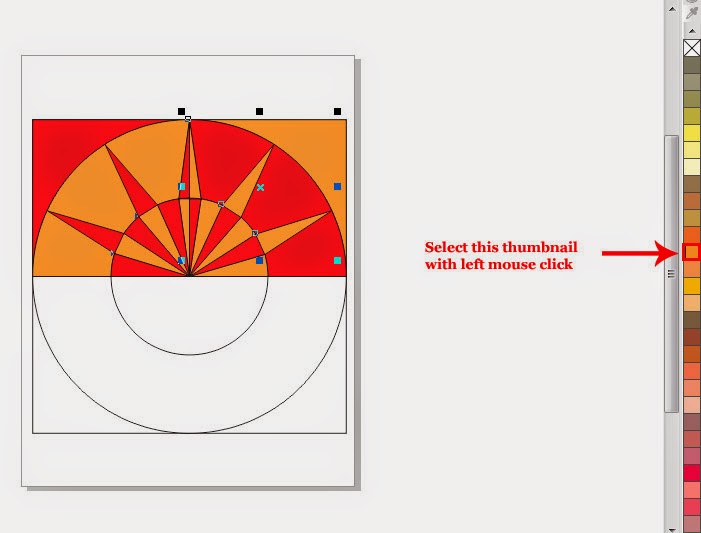
Then, by following the same method, fill red color inside all the objects placed on all the alternate partitions in the upper half of the smaller circle and fill light brown color inside the objects placed on the rest of the partitions  according the picture below.
small-red-and-brown-objects
Small objects placed on the partitions in the upper half of the smaller circle with red and brown colors filled inside
After that select all the lines on the document one by one with the help of Pick Tool and delete them either by getting inside the Edit Menu and selecting the option named Delete or by hitting Delete key on the keyboard.
all-lines-deleted
Image after the deletion of all the lines
Then select all the shapes on the document by hitting CTRL + A on the keyboard and group them together either by getting inside the Arrange Menu and selecting the option named Group of hit by hitting CTRL + G on the keyboard. After that click the small arrow that can be seen at the bottom-right of the Freehand Tool to open a menu containing different other tools. Out of those, select the Pen Tool by clicking on it.
Freehand-Tool-Pen-Tool
Pen Tool in the menu
 As soon as you will select that tool, pointer of your mouse will assume the shape of a pen.Then, with the help of Pen Tool, draw a thorn or spike shaped object  at the top of the smaller circle. For that purpose put the pen shaped pointer of your mouse at the top-left corner of the light brown object placed on the middle partition of the upper half of the smaller circle and hit the left button of your mouse once. As soon as you will do so, a thread issued from the pen shaped pointer will be stuck to that point.Then drag your mouse upward diagonally toward the right side and hit the left button of it on the mid point of the top of the bigger circle. Then drag your mouse downward toward the right side diagonally and hit the left button of it on the top-right corner of the red object placed on the middle  partition of the smaller circle. Then drag your mouse horizontally toward the left side and hit the left button of it at the top-left corner of the light brown object placed on the middle  partition of the smaller circle according the  picture below.
drawing-with-Pen-Tool-in-CorelDraw
Spike shaped object drawn with the help of Pen Tool
After that , select the Pick Tool by clicking on it in the Tool Box. Then put the pointer of your mouse on the recently drawn thorn of spike shaped object and hit the left button of your mouse twice. As soon as you will do so, the spike shaped object will be surrounded by a few black double sided arrows and it’s default rotation point will be highlighted by a small circle.
circle-shaped-rotation-point
Spike shaped object with rotation point set on it's default position
 Then put the pointer of your mouse on that rotation point (pointer will assume the shape of a plus ( + ) sign as soon as it will touch the rotation point) and drag it downward from it’s default position to the middle of the upper half of the smaller circle, and drop it there according to the picture below.
Rotation-point-of-the-spike-on-the-center-of-the-circl
Rotation point of the spike shaped object on altered position
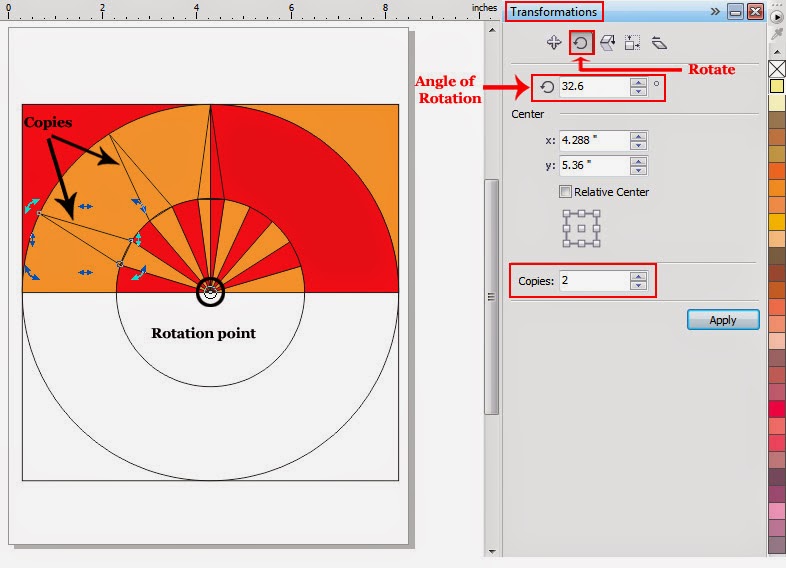
After that hit Alt + F8 on the keyboard to open the window named Transformations again with tab named Rotate selected on it. Then set the Angle of Rotation for the spike shaped object equal to 32.6by typing the value in the relevant box, ignore again the boxes named  X and Y under the head of Center, leave the check box named  Relative Center unchecked and specify the number or copies equal to 2 by typing the value in the box named Copies and hitting the Enter Key. Having done that setting, hit the button named Apply at the bottom right of all the options given in the window named Transformations. As soon as you will do so, two copies of the spike shaped object will be emerged  at the left side of it each at the angle of 32.6o from it’s predecessor.

generation-of-two-spikes
Two copies of the spike shaped object, each placed at the angle of  32.6o  from it's predecessor
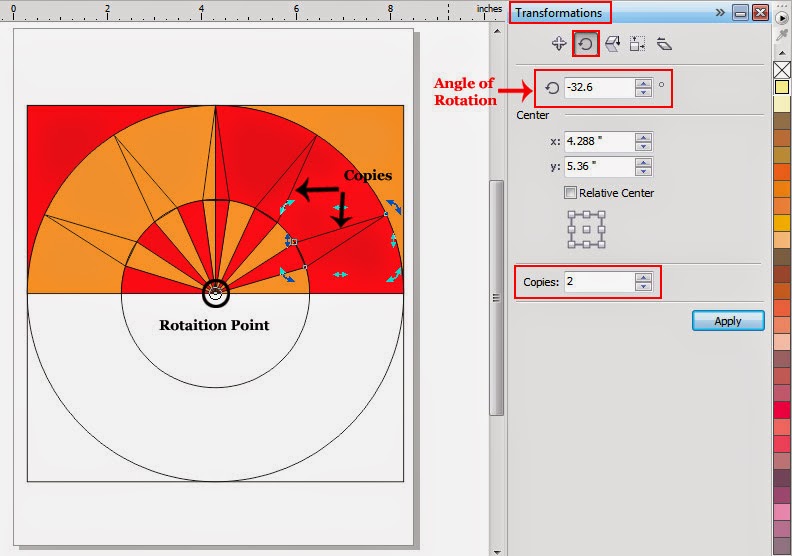
After that put the pointer again on the first  spike shaped object (made by the use of Pen Tool)  and hit the left button of your mouse twice . As soon as you will do so, the spike shaped object will again be surrounded by a few black double sided arrows with rotation point highlighted by a small circle. Then set the Angle of Rotation for that shape equal to -32.6o  by typing the value in the relevant box given in the already opened window named Transformations. Then in the same window, set the number of copies equal  to 2 by typing the value in the box named Copies and hit the button  named Apply as I have explained earlier. As soon as you will hit the button named Apply, two more copies of the spike shaped object will be emerged  on the document, this time, at the right side of the selected shape each set at the angle of -32.6o    from it's predecessor according to the picture below.

two-more-copies-of-the-spike
Four copies of the spike shaped object 
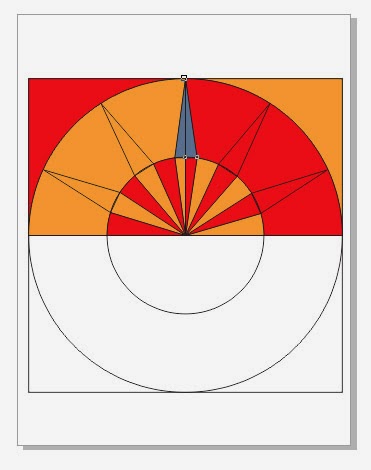
 After that select  the Smart Fill Tool again by clicking on it in the Tool Box and set all it's options in the Property Bar according to the same way I have explained earlier. Then  put the pointer of your mouse on the light brown part of the spike shaped object in the middle  and hit the left button of your mouse once. As soon as you will do so, there will be created a separate object of the same shape.  Then put the pointer on the red part of the same object and hit the left button of your mouse again to create a separate object here too according to the picture below.
middle-spike
Two objects created on  the middle spike ready to be filled with different colors
After that, select the left part of the spike shaped object in the middle and two spikes placed at the left side of it with the help of Pick Tool by clicking on each one by one while keeping the Shift Key on the keyboard pressed. Then fill red color inside all the selected objects by selecting the thumbnail representing red color in the color Palette.
Red-fill-inside-the-left-sided-shapes
left sided spikes with red fill inside
 Then, select the right part of the spike shaped object in the middle and the two spikes at the right side of it with the help of Pick Tool by clicking on each one by one while keeping the Shift Key pressed on the keyboard. Then fill light brown color inside all the selected shapes by selecting the thumbnail representing light brown color in the Color Palette with left mouse click according to the picture below.
red-and-brown
Spike shaped objects place at the right side of the middle spike filled with light brown color
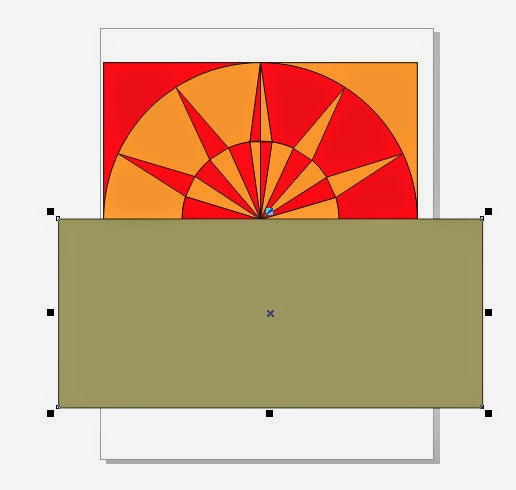
After that select all the object on the document by hitting CTRL + A and group them together by hitting CTRL + G on the keyboard. Then select the Rectangle Tool again either by clicking on it in the Tool Box or by hitting F6 on the keyboard. Then with the help of this tool, draw a large rectangular shape anywhere on the document and, in order to make it clearly visible, fill any color inside it by selecting any thumbnail given in the Color Palette with left mouse click. After that  put that rectangular shape on the lower halves of all the shapes ( lower halves of square, bigger circle and the smaller circle) on the document , so that it could hide those parts of the shapes according to the picture below.
lower-halves-of-the-shapes-hidden
Lower halves of the three shapes hidden behind the rectangle
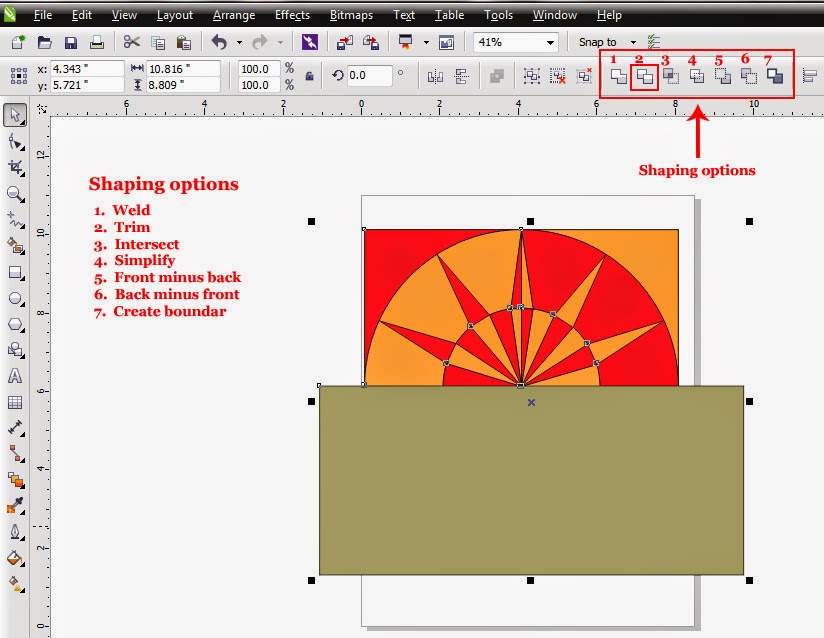
After that  hit CTRL + A again to select all the shapes on the document simultaneously . As soon as you will select all the shapes, shaping options including Weld, Trim, Intersect, Simplify, Front minus back, Back minus front and Create boundary will be appeared on the Property Bar. Out of those options select Trim to have the hidden lower halves of all the shapes nicely trimmed off.

Trimming-of-the-lower-halves
Shaping options named Weld, Trim, Intersect, Simplify,Front minus back, Back minus front and Create boundary
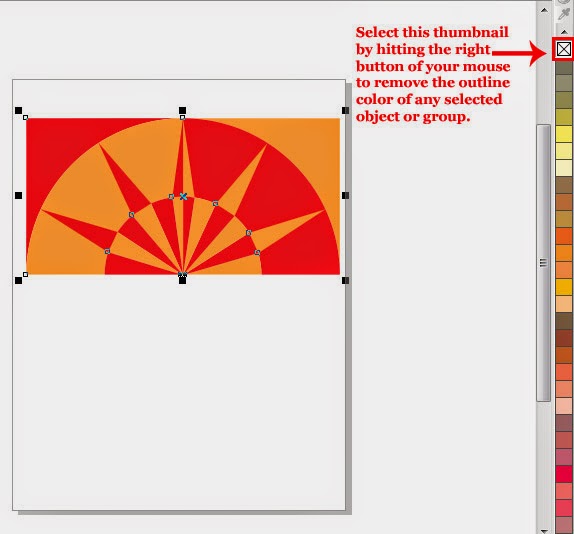
 As soon as the option named Trim will be selected, the hidden parts of all the shapes behind the reclangle will be deleted or trimmed off. After that select the large rectangular shape beneath the almost finished logo of Aditya Birla Group of Companies with the help of Pick Tool and delete it either by getting inside the Edit Menu and selecting the option named Delete or by hitting the Delete Key on the keyboard. After that, select the logo with the help of Pick Tool and remove the color of it’s outline by selecting the thumbnail representing None (No color) in the color Palette with right mouse click. As soon as you will select that thumbnail  black outline of the logo will be vanished from the sight.
No-color-in-the-color-palette
Logo with no visible outline
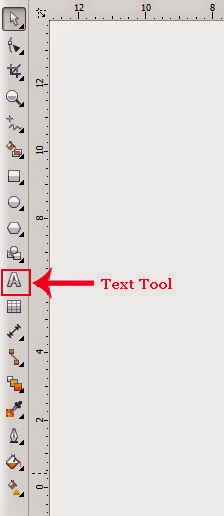
 After that, select the Text Tool either by clicking on it in the Tool Box or by hitting F8 on the keyboard.
Select-Text-Tool-to-type-text
Text Tool in the Tool Box
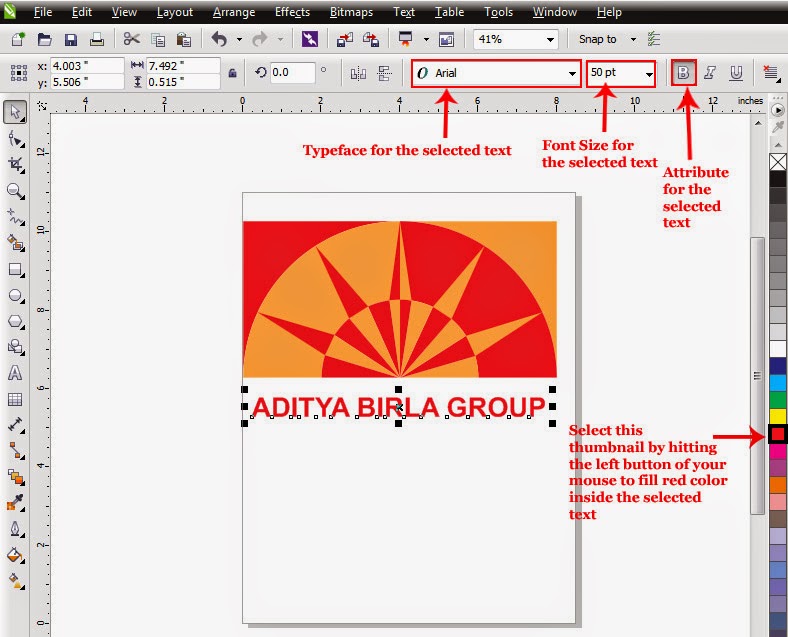
As soon as the Text Tool will be selected, pointer of your mouse will assume the shape of a plus sign ( + ) with a prominent letter A at  the  bottom right of it. Then put that plus sign shaped pointer of your mouse right beneath the logo and type the phrase “ADITYA BIRLA GROUP” there and  select that recently typed text with the help of Pick Tool. As soon as the text will be selected, it’s properties will be appeared on the Property Bar. Then select Arial as Typeface for the selected text out of the many options given in the drop-down menu named Font-List, set the Font Size for the selected text equal to 50 pt by typing the value in the box named Font Size  and hitting the Enter Key and set the attribute named Bold for the text by selecting the box representing that attribute in the Property Bar. Having done that setting, fill red color inside the selected text by selecting the thumbnail representing red color in the color Palette with left mouse click according to the Picture below.
Text-and-it's-properties-in-the-property-bar
Typed text and it's properties in the Property Bar 

 Then the logo of Aditya Birla Group will ready to be saved so save it in CDR format either by getting inside the File Menu and selecting the option named Save  or by hitting CTRL +S on the keyboard. In order to save the same logo in any format other than CDR, select the option named Export  given in the File Menu or hit CTRL + E on the keyboard instead of selecting the option named Save or hitting CTRL + S. Having saved the document use it anywhere you like by putting different suitable backgrounds behind it.
I hope you will find this post simple, easy and helpful, so have fun with it but kindly don't forget to subscribe your comments.