This is my fourth post about logo designing and in this post I am going to to explain the drawing method of one of the most commonly used browsers in the world named Google Chrome using CorelDraw X6. In the following image you can see the logo of Google Chrome made in CorelDraw X6 by the use of it's some very useful tools including Ellipse Tool, Two Point Line Tool, Transparency Tool, option named Rotate given in the side menu of Transformations, shaping options called Trim and Simplify etc.
The method I am going to explain may be a bit lengthy but I am sure no body is going to get bored while reading this post because it's always a fun to play with CorelDraw tools with amazing outcome.
How to draw logo of Google Chrome using CorelDraw X6?
In order to draw logo of Google Chrome, first of all create
a new document by following the method
I have explained in my previous post
CorelDraw Tutorial; Logo of Douglas County Bank. Then select
Ellipse Tool either by clicking on it in the Tool Box or
by hitting
F7 on the keyboard.
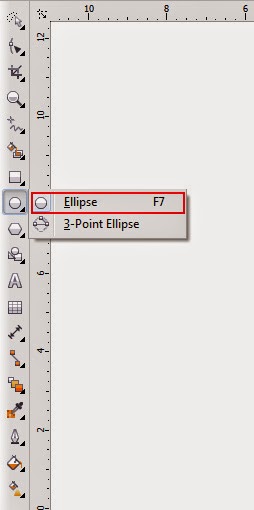 |
| Ellipse Tool in the Tool Box |
As soon as you will select that tool, pointer of
your mouse will assume the shape of a plus ( + ) sign with a tiny shape of an
ellipse at the bottom right of it. Then put that plus (+ ) sign shaped pointer
of your mouse anywhere on the document and draw an ellipse there by dragging
your mouse in any direction and keeping it’s left button pressed. After that, select that recently drawn shape with the help of
Pick Tool.
As soon as that shape will be selected, it’s properties including it’s width and
height will be appeared on the Property Bar.
In order to transform a roughly drawn ellipse into a perfect circle, set
it’s width and height equal to each other ( both equal to
8.0 in this case) in the Property Bar by typing the values in the relevant boxes
and hitting the
Enter Key. As soon as you will hit the
Enter Key, selected
shape will assume the same width and height and it will be transformed into a perfect
circle. Having done so, fill any color in that circle temporarily just to make
it clearly visible by selecting any thumbnail
in the Color Palette with left mouse click.
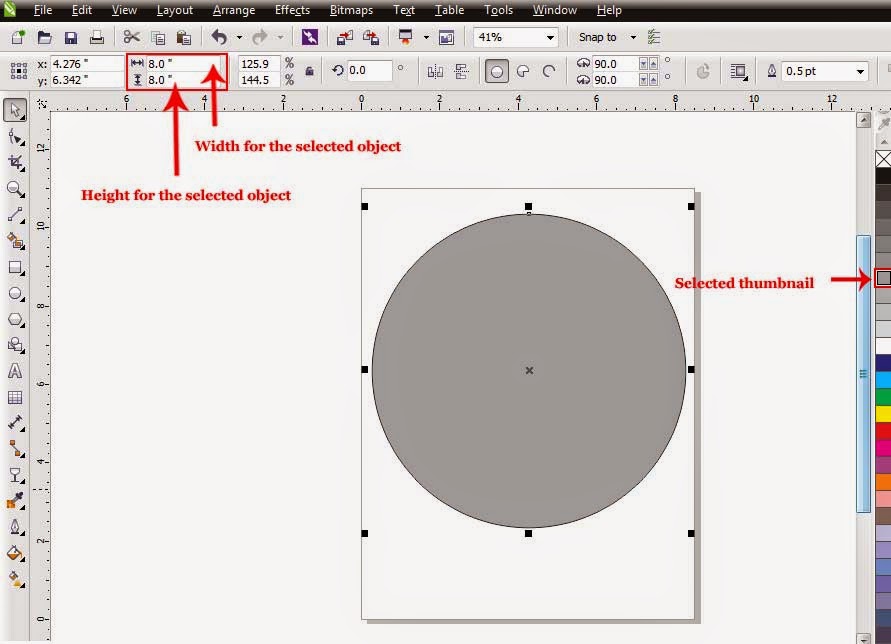 |
| perfect circle with equal width and height |
After that make a copy to
that circle either by getting inside the
Edit
Menu and selecting the option
Copy or
by hitting
CTRL + C on the keyboard.
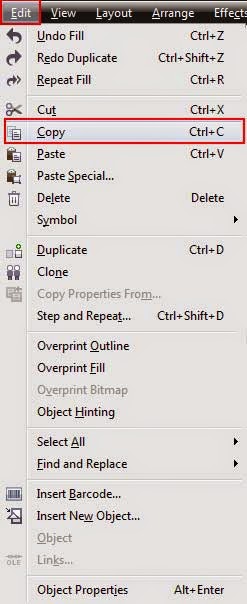 |
| Option referred as Copy in the Edit Menu |
Having made a copy of the selected shape, paste it at the same spot on the first shape either by getting inside the
Edit Menu and selecting the option
Paste or by hitting
CTRL + V on the keyboard.
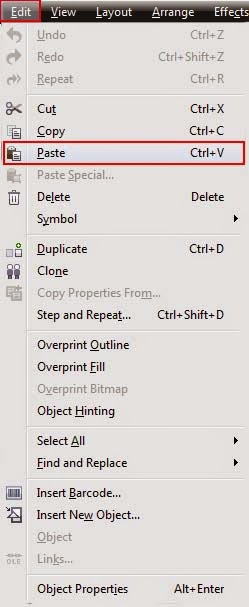 |
| Option referred as Paste in the Edit Menu |
Then select
that recently pasted shape with the help of
Pick Tool and set it’s width and height equals to
3.5 in the Property Bar by typing the values in the relevant boxes
and hitting the
Enter Key. As soon as you will hit the
Enter Key, the recently
pasted selected shape on the first shape will assume the same width and height. Having changed the
width and height of the selected shape, fill bright cyan color inside it by
selecting the thumbnail representing that color in the Color Palette with left mouse click. As soon as you will do so, cyan color will be filled inside the
selected shape.
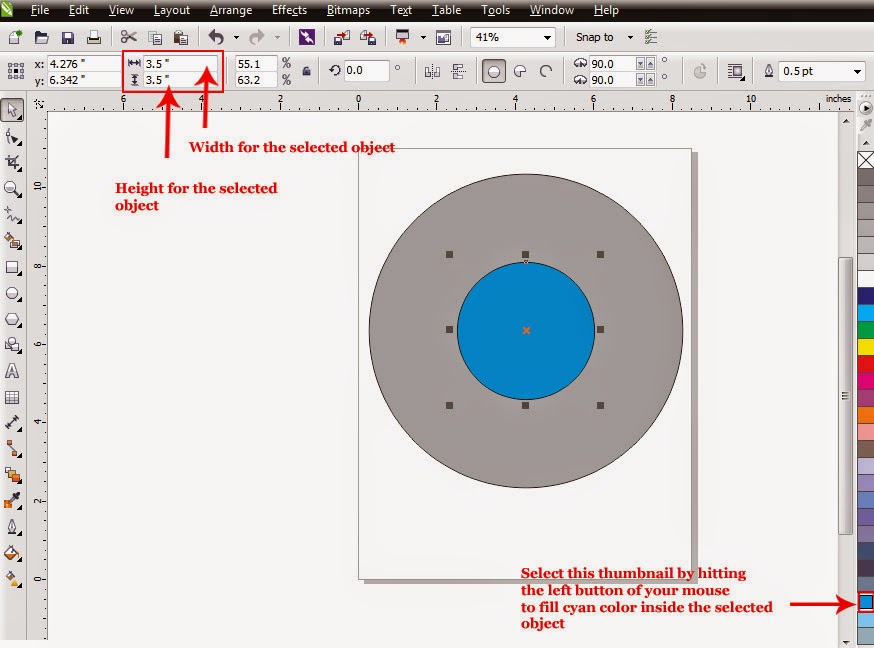 |
| Recently pasted circle with changed width, height and color |
After that, select both the shapes on the document by hitting
CTRL + A on the keyboard. As soon as you will select both the shapes on the
document, shaping options (including
Weld,
Trim,
Intersect, Simplify,
Front
minus back,
Back minus front and
Create boundary) will be appeared on the
Property Bar. Out of those shaping options, the option which is supposed to be selected
here is none other than
Trim. So
select
Trim to have the hidden part
of the bigger circle ( hidden behind the smaller circle) nicely trimmed off.
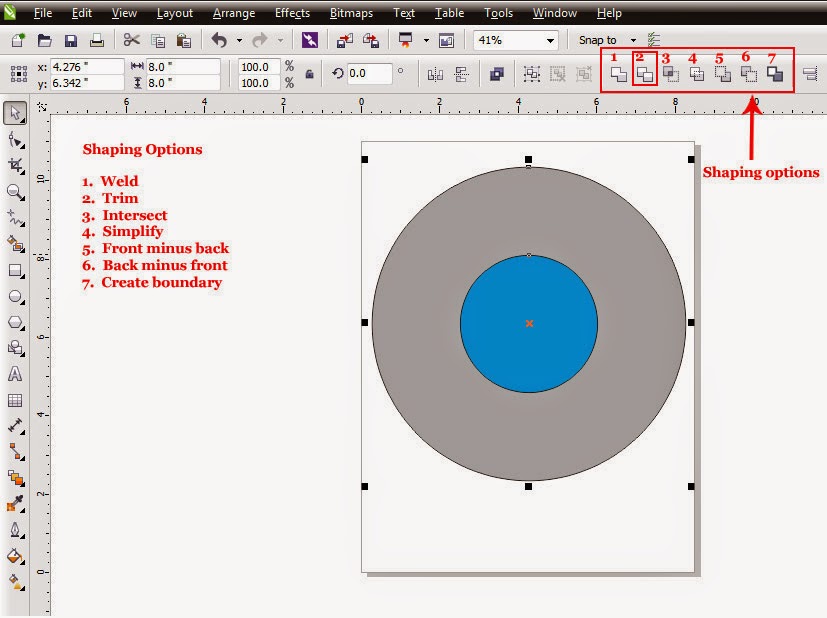 |
| Shaping options in the Property Bar |
Having trimmed the hidden part of the
bigger circle, once again select the smaller cyan colored circle with the help
of
Pick Tool and change it’s width and height from
3.5 to
3.0 by typing the
values in the relevant boxes given in the Property Bar and hitting the
Enter
Key. As soon as you will hit the
Enter Key having typed the values in the relevant boxes, the selected circle will
assume the same width and height and will get smaller and the white page will
start to peer from behind .
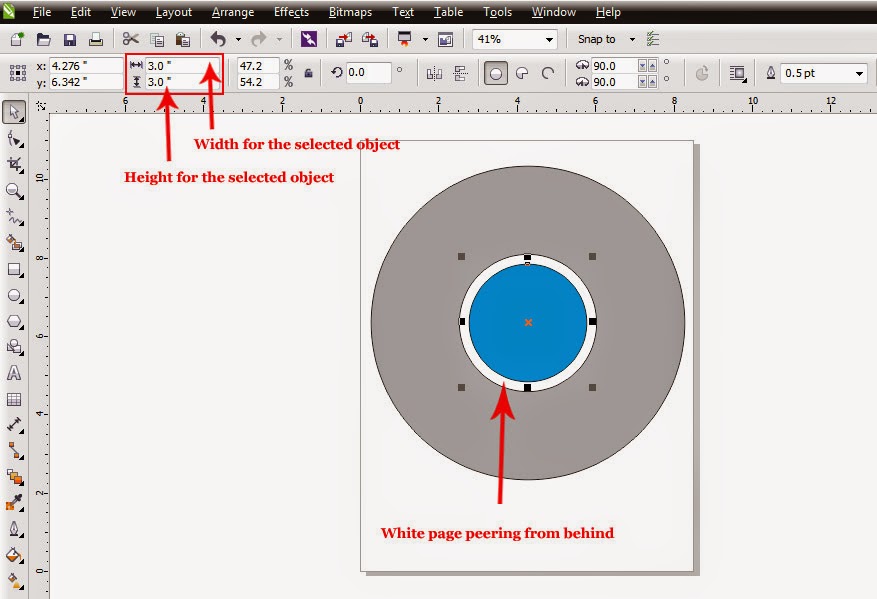 |
| Circle width reduced width and height\ |
After that, click the small arrow that can be seen
at the bottom-right of
Freehand Tool
to open a menu containing different other options. Out of the options given in
that menu select
Two Point Line Tool by clicking on it.
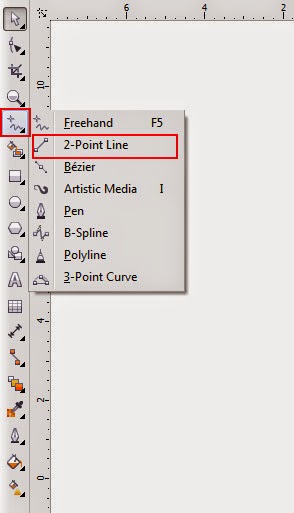 |
| 2-Point Line Tool in the menu |
As soon as you will select
that tool, pointer of your mouse will assume the shape of a plus (+) sign with
a small diagonal line at the bottom-right of it. Then put that plus sign shaped
pointer of your mouse anywhere on the document and draw a long straight
horizontal line by dragging your mouse toward the left or the right side and
keeping it’s left button and
CTRL Key pressed at the same time. After that
put that horizontal straight line on the bigger shape in a way that it’s
left end point could almost (but not really) touch the top of the smaller cyan
colored circle according to the picture below.
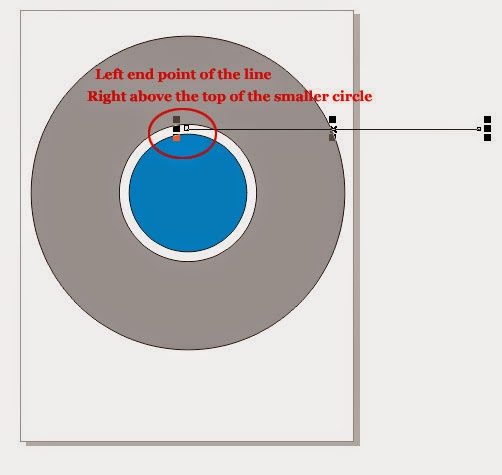 |
| Right place for the line |
After that, put the pointer of
your mouse on the line and hit the left button of it twice. As soon as you will
do so, the line will be surrounded by a few black double sided arrows and a
small circle will be appeared on the middle of the line indicating the rotation
point of the line.
Put the pointer of your mouse on that circle shaped rotation
point of the line (pointer will assume the shape of a plus sign as soon as it
will touch the rotation point),
keep the left button of your mouse pressed and drag and drop the rotation
point of the line on the center of the smaller circle according to the picture
below.
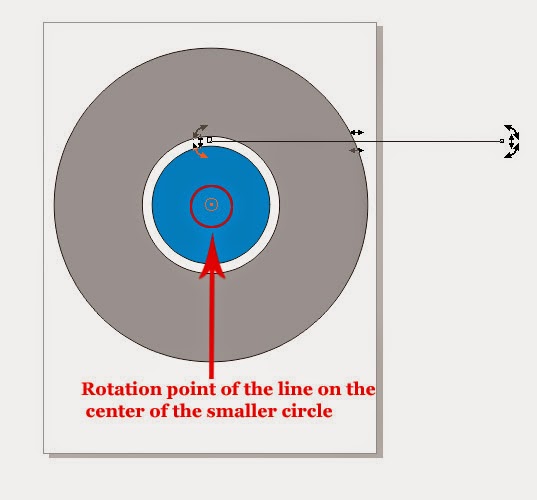 |
| Right place for the rotation point of the line |
After that, get inside the
Arrange
Menu and select the option named
Transformations.
As soon as you will select that option, it's side menu will be appeared
containing different transformation options including
Position,
Rotate,
Scale and mirror,
Size and
Skew. Out of
those options , select
Rotate by clicking on it or by hitting
Alt + F8 on the keyboard.
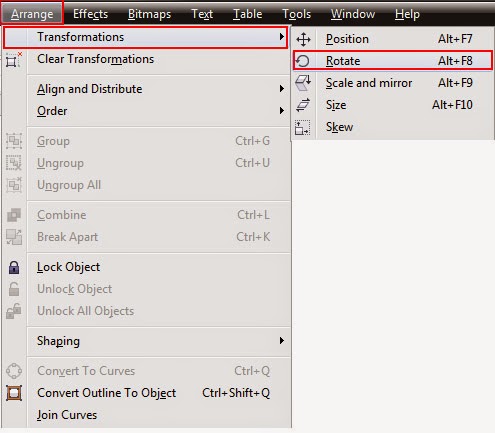 |
| Option referred as Rotate in the side menu of Transformations |
As soon as
you will do so, a window named
Transformations
will be appeared on the right side of the CorelDraw window. At the top of that window there will be seen
five tabs representing the five transformation options named
Position,
Rotate,
Scale and mirror,
Size and
Skew. The tab you will find selected by default in that window will
be none other than
Rotate. Right beneath those tabs, there will be seen a box named
Angle of Rotation. In that box, specify the angle of rotation
equal to
120 by typing the value in
the box and hitting the
Enter Key.
As the boxes named
X and
Y under the head of
Center tell us the position of the
rotation point for the selected object on the document so there is no need to
make any change here.
Finally in the
box named
Copies specify the number of copies equal to
2 and hit the button named
Apply that can be seen at the bottom-right of the window named
Transformations.
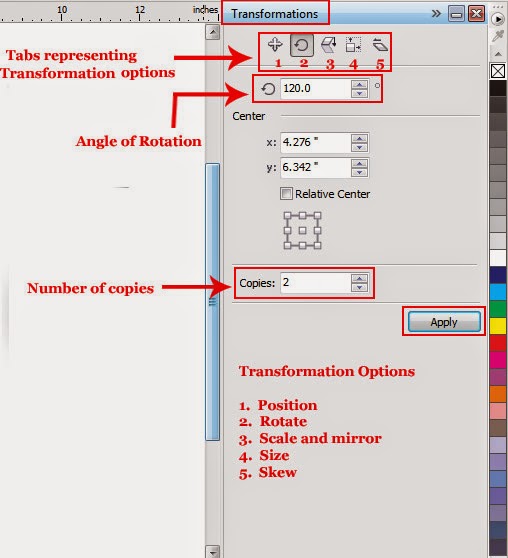 |
| Window named Transformations with Tab referred as Rotate selected |
As soon as you will
hit the button named
Apply there
will be appeared two more lines on the bigger shape, each making
120o angle
from its predecessor.
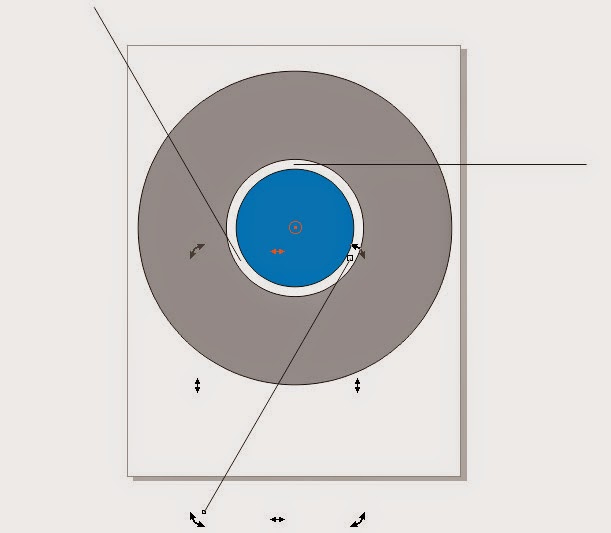 |
| Three lines placed on the right place |
After that, with
the help of
Pick Tool select the bigger shape on the document and the three lines on it by clicking on each one by one holding down
the
Shift Key. As soon as you will
do so , shaping options will again
be appeared on the Property Bar. Out of those options select
Simplify to divide the bigger shape into three equal parts.
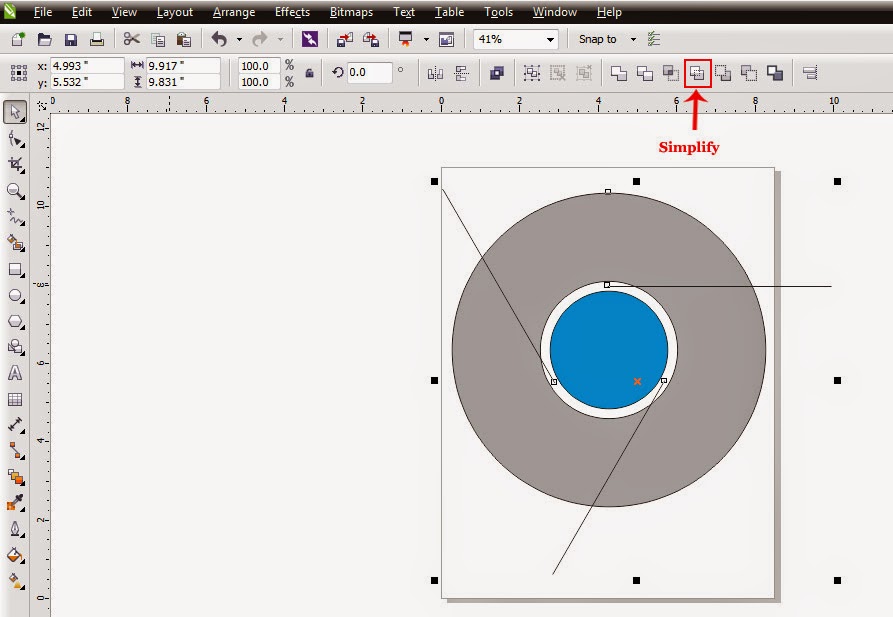 |
| Shaping option referred as Simplify on the Property Bar |
As soon as you will select the option
Simplify the bigger shape on the document will be
cut into three equal parts. Then select
the three lines one by one with the help of
Pick Tool and delete them either by
getting inside the
Edit Menu and
selecting the option
Delete or by
hitting the
Delete Key on the keyboard.
Having deleted the three lines, select the bigger shape with the help of
Pick Tool by clicking on it and then
get inside the
Arrange Menu and
select the option named
Break Curve
Apart or hit
CTRL + K on the
keyboard.
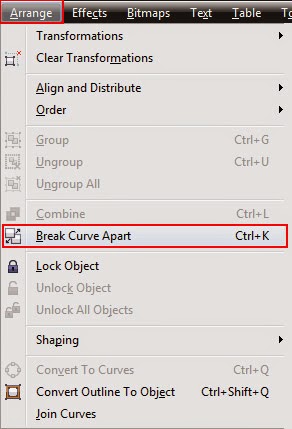 |
| Option referred as Break Curve Apart in the Arrange Menu |
As soon as you will select the option
Break Curve Apart or hit
CTRL
+ K, three parts of the bigger shape will be broken apart ready to be
filled with three different colors. Having broken the three parts of the
shape apart, select the top most part
with the help of
Pick Tool and fill
red color inside it by selecting the thumbnail representing red color in the
Color Palette with left mouse click. Then select the same thumbnail again with
right mouse click to fill red color in the selected shape’s outline.
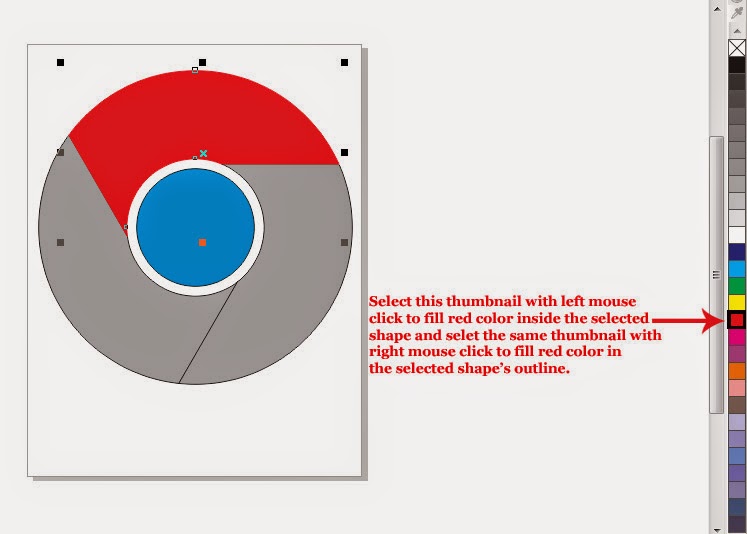 |
| Red color has been filled in the selected shape |
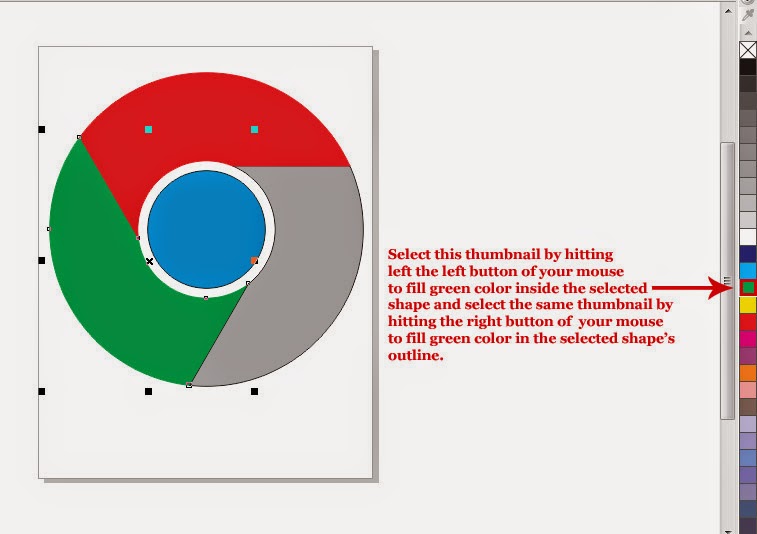
After that
, select the left part of the shape with the help of
Pick Tool and fill green
color inside it by selecting the thumbnail representing green color in the
Color Palette with left mouse click and then select the same thumbnail with
right mouse click to fill the same shade in the selected shape’s outline.
 |
| Green color has been filled in the selected shape |
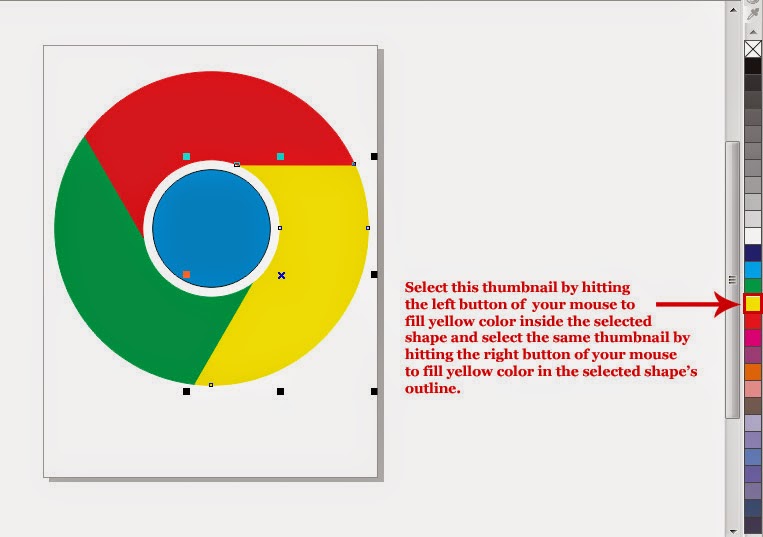
Finally, select the left part of the shape with the help of
Pick Tool and fill
yellow color inside it by selecting the thumbnail representing yellow color in
the Color Palette by hitting the left button of your mouse and then, select the
same thumbnail by hitting the right button of your mouse to fill yellow color
in the selected shape’s outline.
 |
| Yellow color has been filled inside the selected shape |
After that select the red part of the logo
with the help of
Pick Tool and then
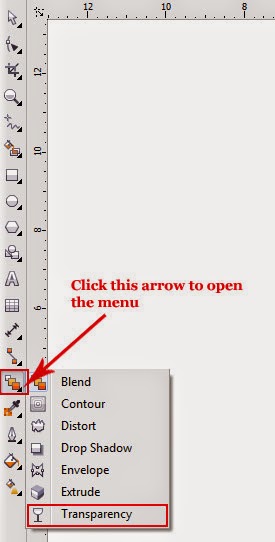
click the small arrow that can be seen at the bottom-right of the
Blend Tool in the Tool Box to open a
menu containing different other tools
including
Blend Tool,
Contour Tool,
Distort Tool,
Drop shadow Tool,
Envelop
Tool,
Extrude Tool and
Transparency
Tool. Out of the tools given in that menu, the tool which is supposed to be
selected here is
Transparency Tool.
 |
| Transparency and other tools in the menu |
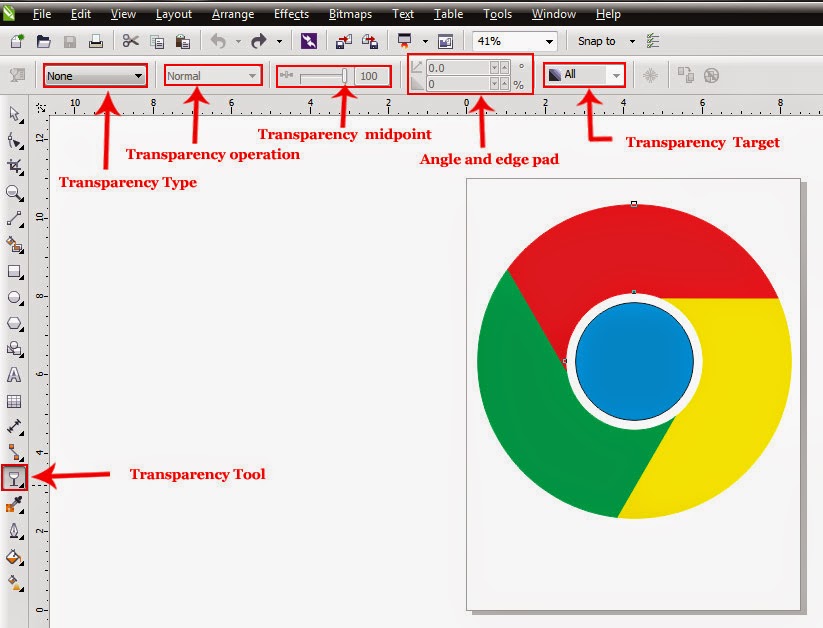
As
soon as you will select the
Transparency
Tool, a tiny shape of something look like a goblet will be appeared at the bottom-right of the arrow shaped black pointer of your mouse and the tool
properties will be appeared on the
Property Bar including three drop-down menus called
Transparency Type,
Transparency
Operation and
Transparency Target,
a slide named
Transparency midpoint and two boxes named
Angle and edge pad.
 |
| Transparency Tool and it's properties |
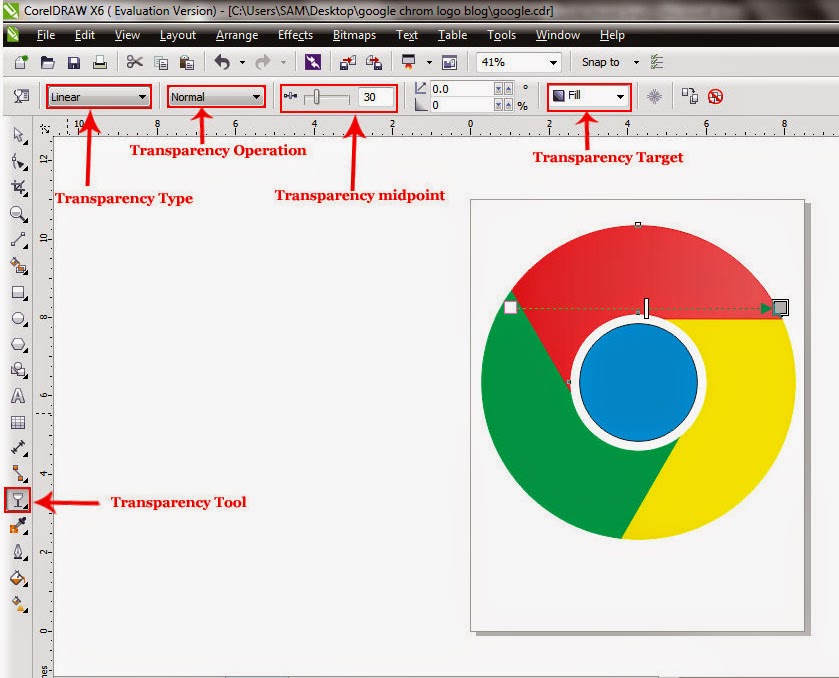
Out of the options given in the drop-down menu
named
Transparency Type, select the
option
Linear. As soon as you will
select that option, the red part will turn noticeably white and all the
previously inactive properties on the Property Bar will be activated. Select
Normal out of the options given in the
drop-down menu named
Transparency
operation, set the
Transparency
midpoint equal to
30 by typing
the value in the relevant box and hitting the
Enter Key and select
Fill out
of the options given in the drop-down menu named
Transparency Target.
 |
| Setting of Transparency for the red part of the logo |
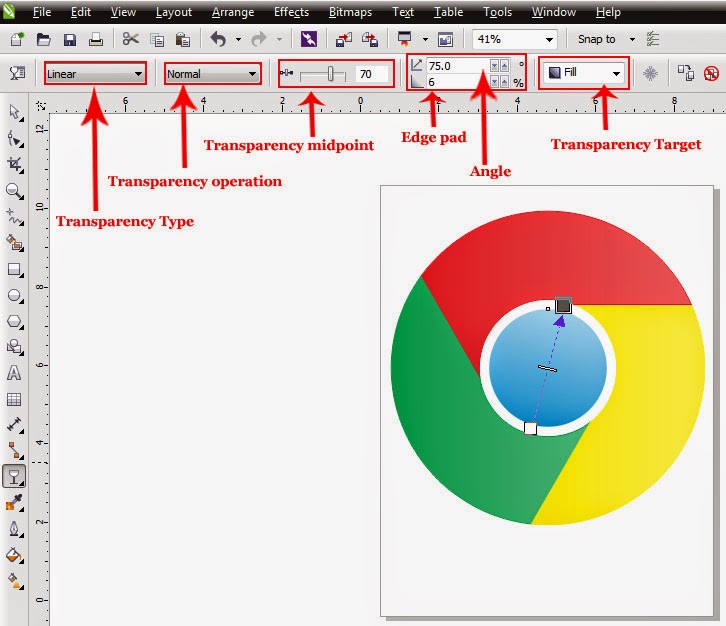
Then do the same transparency setting for the green and yellow parts of the logo after selecting them one by one. After that. select the
cyan circle by clicking on it and select the option
Linear once more as
Transparency
Type, select
Normal as
Transparency operation, set the
Transparency midpoint equal to
70, set the
Angle for
the edge of transparency equal to
75o,
set the
Opacity Effects equal to
6% and select
the option referred as
Fill out of
the options given in the drop-down menu named
Transparency Target.
 |
| Setting of Transparency for the smaller shape in the logo |
Then, select all the shapes on the document by hitting
CTRL + A and group them together by hitting
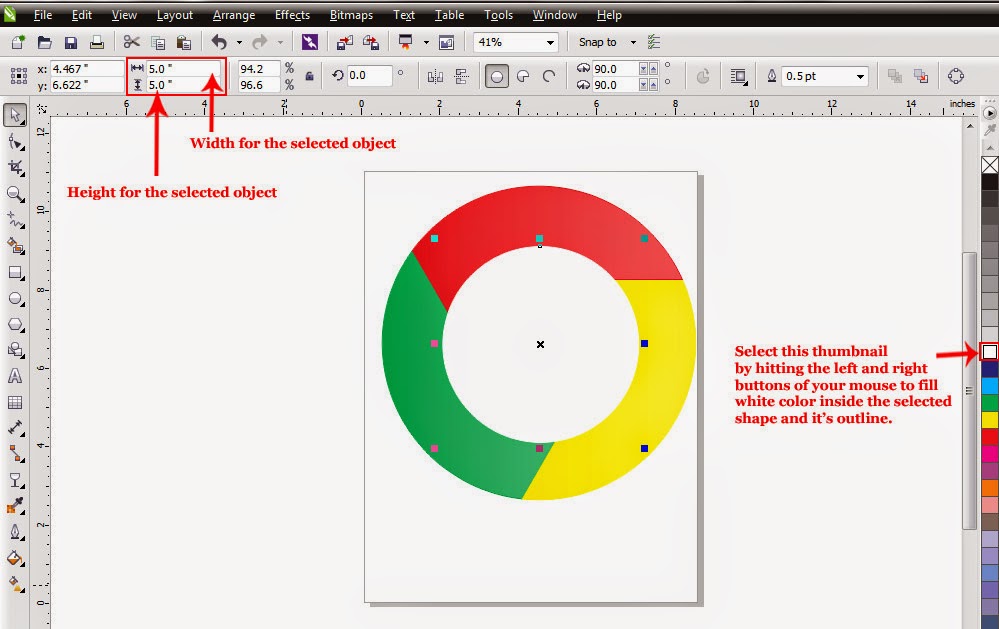
CTRL + G. Having made a group of all the shapes, the empty space around the cyan circle is needed to be filled so that the logo could be used with colorful backgrounds. For that purpose, select the
Ellipse Tool again by clicking on it in the Tool Box or by hitting
F7 on the keyboard.Then draw an ellipse
anywhere on the document by dragging your mouse in any direction and keeping
it’s left button pressed. After that , select that newly drawn ellipse shape with
the help of
Pick Tool and set it’s width and height equal to
5.0 by typing the values in the
relevant boxes given in the Property Bar and hitting the
Enter Key. As soon as you will hit the
Enter Key, the selected shape will assume the same width and height. After that, with the help of
Pick Tool, put that shape on the center of the logo and
fill white color inside it and in it’s outline by selecting the thumbnail
representing white color in the Color Palette with left and right mouse clicks
respectively.
 |
| White circle on the center of the logo |
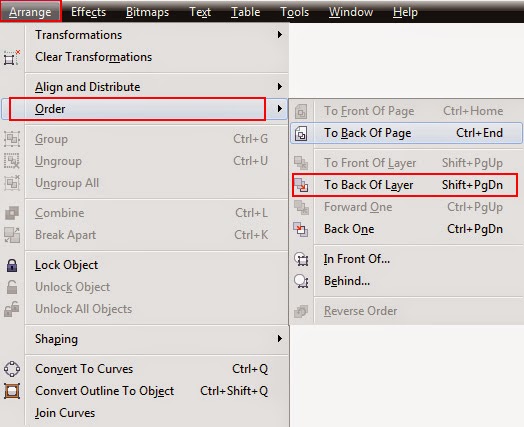
After that, get inside the
Arrange
Menu and select the option named
Order given in the menu. As soon as you
will select that option, it’s side menu will be appeared containing different
other options. Out of those options select
To Back of Layer or hit
Shift +
pg dn on the keyboard.
 |
| To Back of Layer in the side menu of Order |
As soon as you will do so, white selected circle
will be shifted behind the logo. Then
select the
Text Tool out of the Tool Box by clicking on it or by hitting
F8 on
the keyboard.
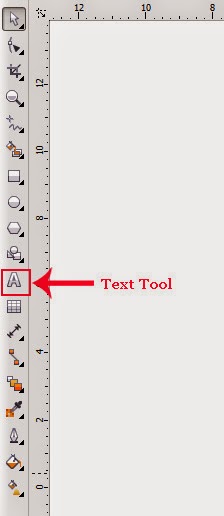 |
| Text Tool in the Tool Box |
As soon as you will select that tool, pointer of your mouse will
assume the shape of a plus ( + ) sign with a prominent letter
A
at the bottom-right of it. Then put that plus sign shaped pointer of your
mouse right beneath the logo and type the word
” Google” there.Then select that word with the help of
Pick Tool to have it’s properties on the Property Bar. Then select
Arial as typeface out of the options given in the drop-down menu
named
Font List and select
200 pt as font size for the selected text out of the options given in the
menu named
Font Size.
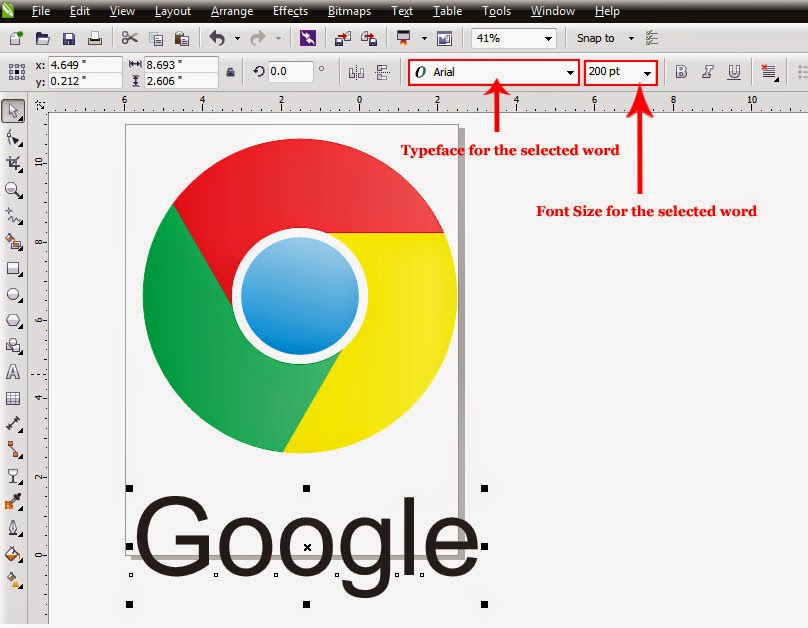 |
| Properties of selected text in the Property Bar |
Then get inside the
Arrange Menu and select the option named
Break
Artistic Text Apart or hit
CTRL + K on the keyboard.
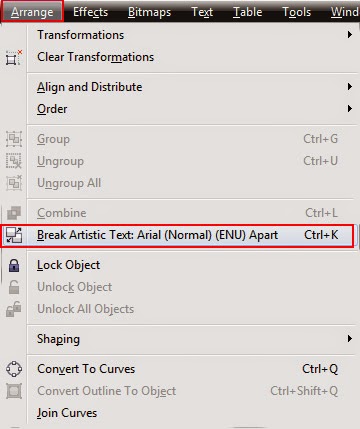 |
| Option referred as Break Artistic Text Apart in the Arrange Menu |
As soon as
you will do so, all the letters in the selected word will be broken apart and
ready to be filled with different colors. Then, select the word
G with the help of
Pick
Tool and fill cyan color in it by selecting the thumbnail representing cyan color in the Color Palette
.
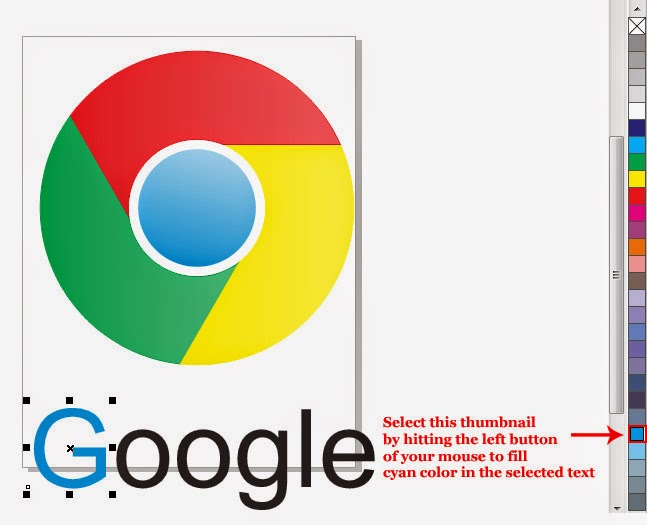 |
| Separately selected letter with cyan color filled inside |
Then
select all the letters in the word one by one with the help of
Pick Tool and
fill different color in each according to the picture below.
 |
| Differently colored letters of broken apart text |
After that select all the
objects including shapes and text on the document by hitting
CTRL + A and group them together by
hitting
CTRL + G on the keyboard.
Then the logo of
Google Chrome will ready to be saved, so save it in CDR format by getting inside
the
File Menu and selecting the option
Save or by hitting
CTRL + S on the
keyboard. But if you want to save the same image in any format other than CDR ,
select the option
Export given in the
File Menu or hit
CTRL + E on the keyboard instead of selecting the option
Save
or hitting
CTRL + S.
I hope you will find this post interesting, easy and helpful. If so kindly let me know by subscribing your valued comments.


5 comments:
This is an interesting blog that you have posted.logo designers service providers Hyderabadyou shares a lot of things..
logo designing in hyderabad
logo design companies in hyderabad
logo designers in hyderabad
I enjoys the designed called Google chrome
Pretty great post. I simply stumbled upon your blog and wanted to mention that I have really loved surfing around your blog posts. Great set of tips from the master himself. Excellent ideas. Thanks for Awesome tips Keep it
corelcad-build-crack
tableau-desktop-crack
kindlian-crack
autodesk-sketchbook-pro-crack
gilisoft-audio-toolbox-suite-crack
As soon as you will select the option called Duplicate or hit CTRL + D , a duplicate shape will be appeared on the document near the first shape.
marketing
I've bookmarked your blog. Looking forward to more insightful content.
Top Logo Design Company In Bangalore | Corporate Logo Design Bangalore
Post a Comment