This is my fifth post about logo designing and in this post I have decided to explain the drawing method of the the logo of a very well-known and well-reputed organization named Adidas in CorelDraw X6 . Adidas is a German multinational company that designs and manufactures sport goods e.g. sport shoes, clothing and other accessories. Though the logo of Adidas is a beautiful one, but at the same time, it is very simple and easy to draw.
In order to draw logo of
Adidas, first of all create a new document by following the method I have explained in my post named
CorelDraw Tutorial: Logo of Douglas County Bank. Having created a new document, first of all select the
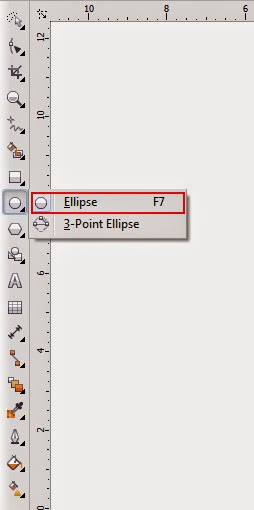
Ellipse Tool by clicking on it in the
Tool Box or by hitting
F7 on the keyboard.
 |
| Ellipse Tool in the menu |
As soon as you will
select that tool, pointer of your mouse will assume the shape of a plus ( + )
sign with a tiny shape of an ellipse at the bottom-right of it. Then put that
plus sign shaped pointer of your mouse anywhere on the document and draw an
ellipse by dragging your mouse in any direction while keeping it’s left button
pressed.
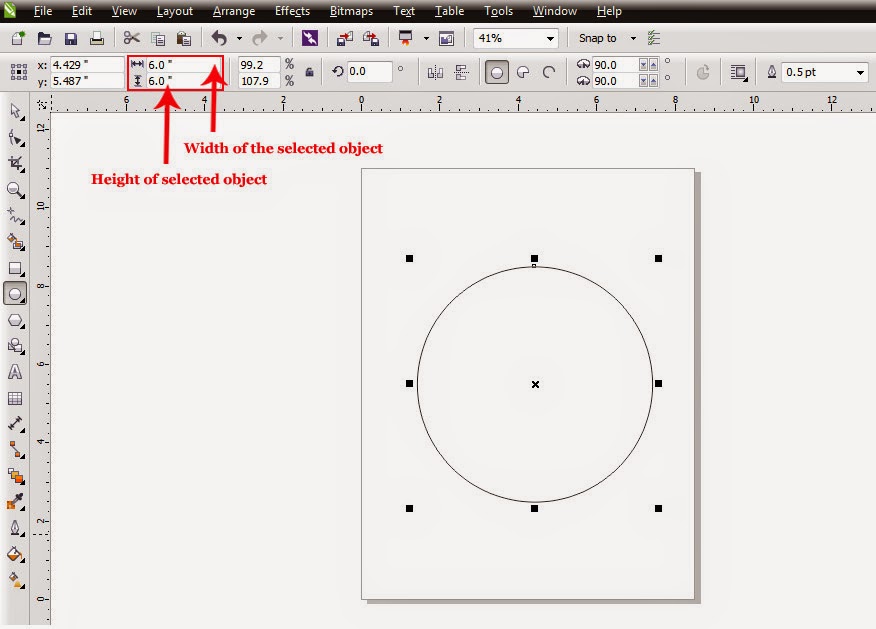
Then, in order to transform that newly drawn ellipse into a perfect
circle, set it’s width and height equal to each other. For that purpose select
that ellipse with the help of
Pick Tool to
have it’s properties including it’s width and height in the
Property
Bar. Then set the width and height of the selected shape equals to
6.0 by typing the values in the
relevant boxes and hitting the
Enter Key
on the keyboard. As soon as your will hit the
Enter Key, the selected shape will assume the same width and height
and will be transformed into a perfect circle.
 |
| Perfect circle on the document |
After that, select that circle
with the help of
Pick Tool and make
a duplicate of it either by getting inside the
Edit Menu and selecting the option
named
Duplicate given in the
menu or by hitting
CTRL + D on the
keyboard.
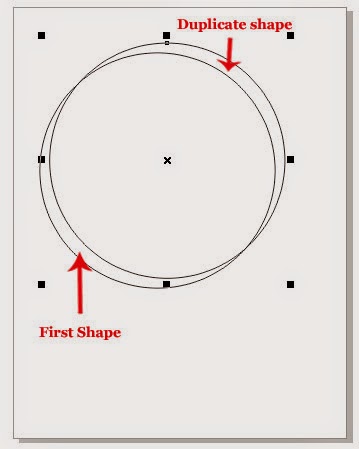
As soon as you will select the option
Duplicate or hit
CTRL +D, a
duplicate circle will be appeared on the document.
 |
| Recently appeared duplicate circle along with the first shape |
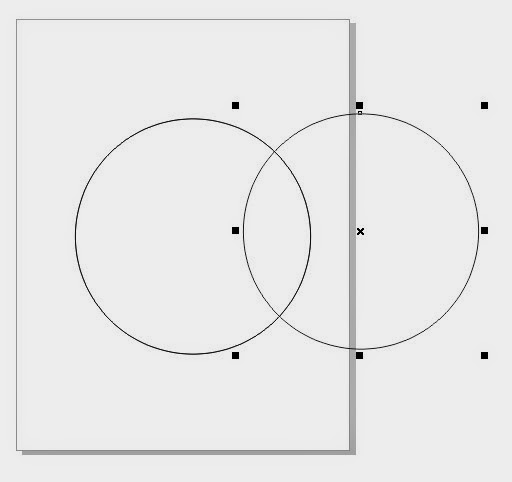
Then, with the help of
Pick Tool put the duplicate shape on
the first shape in a way that it’s left part could overlap the right part of
the first shape according to the picture below.
 |
| Right place for two circles |
After that select both the
shapes on the document by hitting
CTRL +
A on the keyboard. As soon as you will hit
CTRL + A both the shapes will be selected and the shaping options
including
Weld,
Trim,
Intersect,
Simplify,
Front minus back,
Back minus
front and
Create boundary will
be appeared on the Property Bar. Out of those shaping options , the option
which is supposed to selected here is none other than
Intersect.
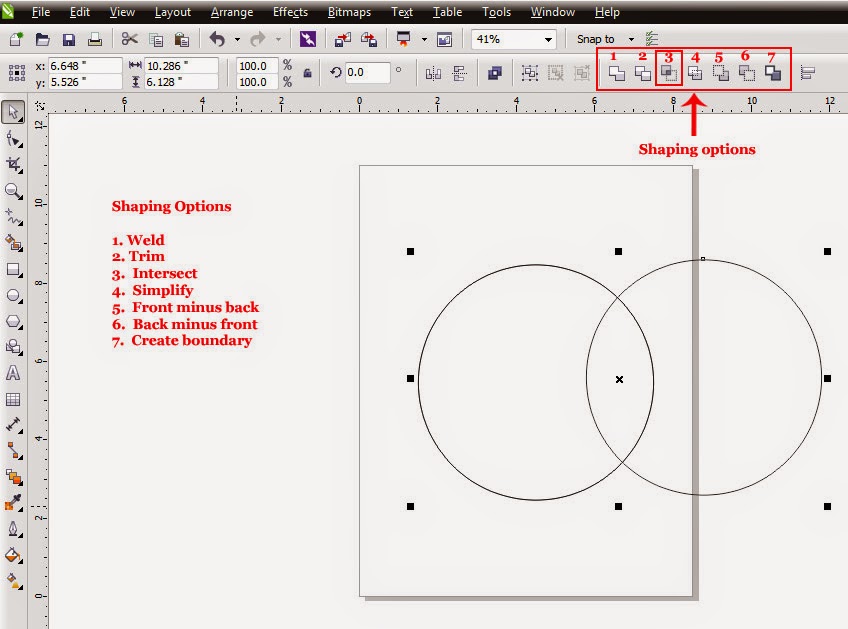 |
| Intersection of two shapes |
As soon as you will select that option, a leaf shaped object will be created from the
area where two circles overlap each other. Then select both the circles one by one and delete them either by getting
inside the
Edit Menu and selecting
the option named
Delete or by hitting
Delete Key on the keyboard.
After that, select that leaf shaped object with
the help of
Pick Tool and fill green
color inside it by selecting the thumbnail representing green color in the Color Palette with left mouse click. Then, in order to fill
the same green shade in the selected shape’s outline, select the same thumbnail
by hitting the right button of your mouse.
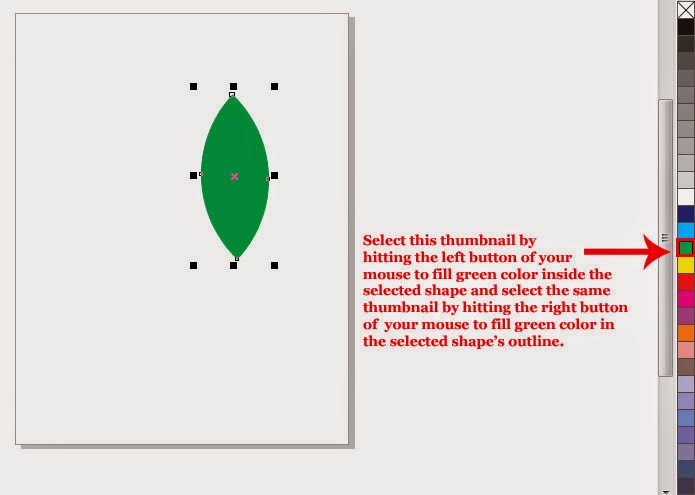 |
| Leaf shaped object with green color filled inside |
After that, make a duplicate of
that leaf shaped green object either by getting inside the
Edit Menu and
selecting the option
Duplicate or by hitting
CTRL + D on the keyboard. As soon
as you will do so, a duplicate leaf shaped object will be appeared on the document. Then select that duplicate with the help of
Pick Tool by clicking on it. As
soon as you will select that object, it’s properties will be appeared on the
Property Bar. Out of those properties,
the property that is supposed to be altered here is it’s
Angle of rotation. So set the
Angle of rotation for the duplicate leaf shaped object equal to
320o by typing the value in the relevant box and hitting
the
Enter Key. As soon as you will
hit the
Enter Key, the selected
duplicate shape will assume the same angle.
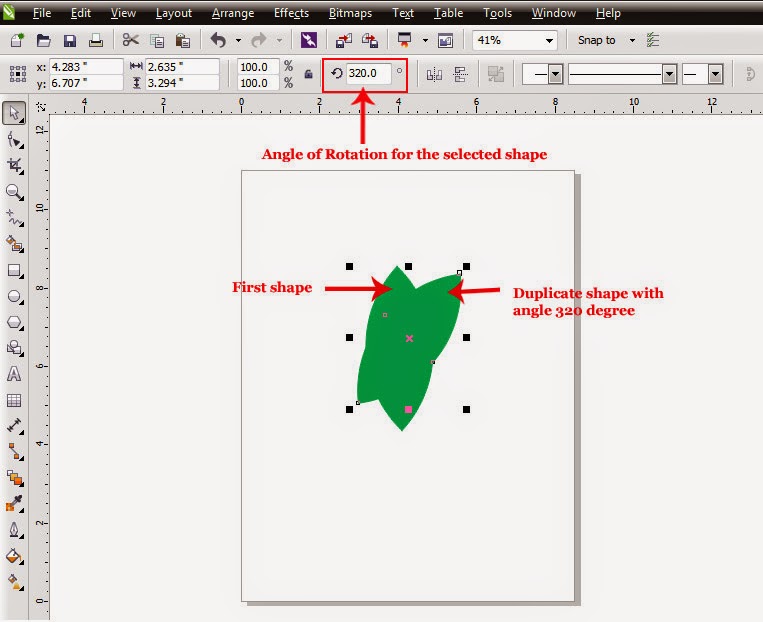 |
| Duplicate shape with 320 degree angle |
After that, with the help of
Pick Tool put that rotated duplicate
shape beside the first shape according to the picture below.
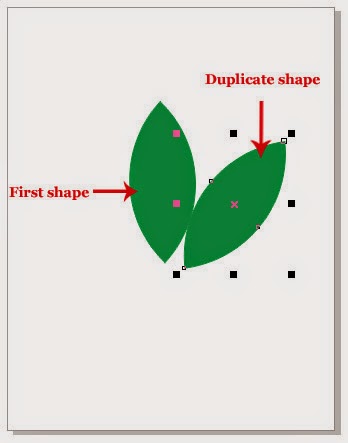 |
| Two leaf shaped object placed together on the document |
After that, select
the first shape again with the help of
Pick Tool and make another duplicate of
it either by getting inside the
Edit Menu and selecting the option
Duplicate or by hitting
CTRL + D on the keyboard. As soon as
you will do so, another duplicate of that green leaf shaped object will be
appeared on the document. Then select that new made duplicate with the help of
Pick Tool to have it’s properties on
the Property Bar. Then set the
Angle of rotation for the selected
shape equal to
40o by
typing the value in the relevant box given in the Property Bar and hitting the
Enter Key. As soon as you will hit the
Enter Key, the selected object will be rotated on the same angle.
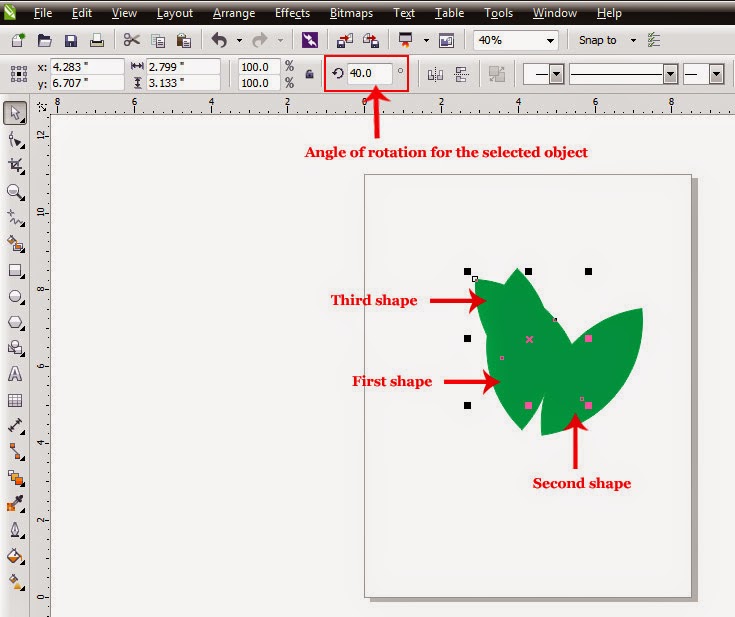 |
| Second duplicate shape with 40 degree angle |
After that , with the help of
Pick Tool put that shape
at the left side of the first shape according to the picture below.
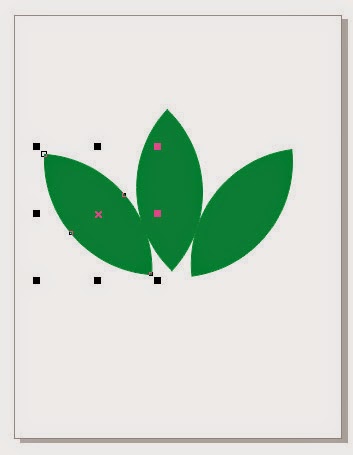 |
| Second duplicate shape placed at the left of the first shape |
Then select
all the shapes on the document by hitting
CTRL + A and group
them together either by hitting
CTRL + G
on the keyboard or by getting inside the
Arrange Menu and selecting the option
named
Group. After that select that group with the help of
Pick Tool and set it ‘s width and
height equals to
6.5 and
4.5 respectively by typing the values
in the relevant boxes and hitting the
Enter
Key on the keyboard. As soon as you will do so, the selected group will
assume the same width and height.
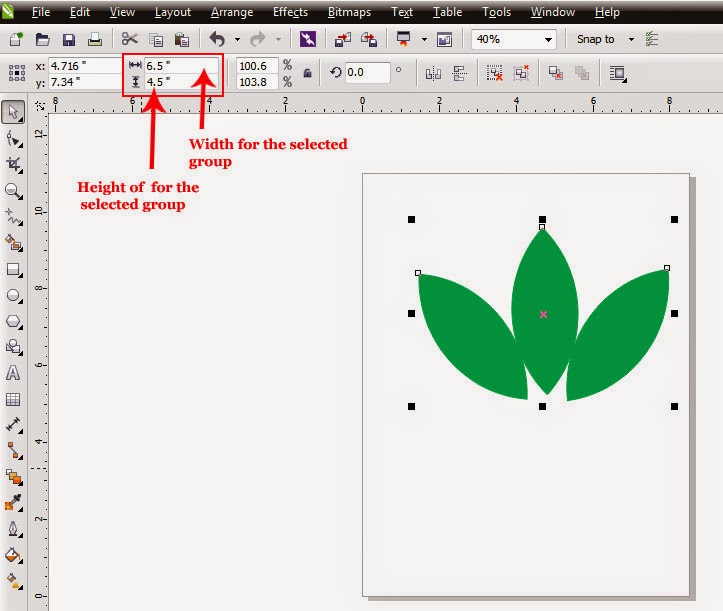 |
| Width and height for the selected group |
Then, select the
Rectangle Tool either by clicking on it in the Tool Box or by
hitting
F6 on the keyboard.
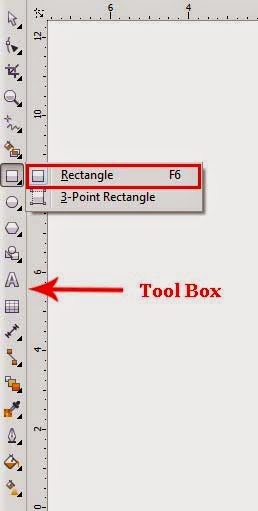 |
| Rectangle Tool in the Tool Box |
As soon
as you will select that tool, pointer of your mouse will assume the shape of a
plus ( + ) sign with a tiny rectangular shape at the bottom-right of it. Then
put that plus sign shaped pointer or your mouse anywhere on the document and
draw a rectangular shape there by dragging your mouse and keeping it’s left
button pressed. Then select that newly drawn rectangle and set it’s width and
height in the Property Bar equals to
7.0
and
0.255 respectively by typing the
values in the relevant boxes an hitting the
Enter Key. Then put that shape on the group of three green leaf
shaped objects according to the picture below.
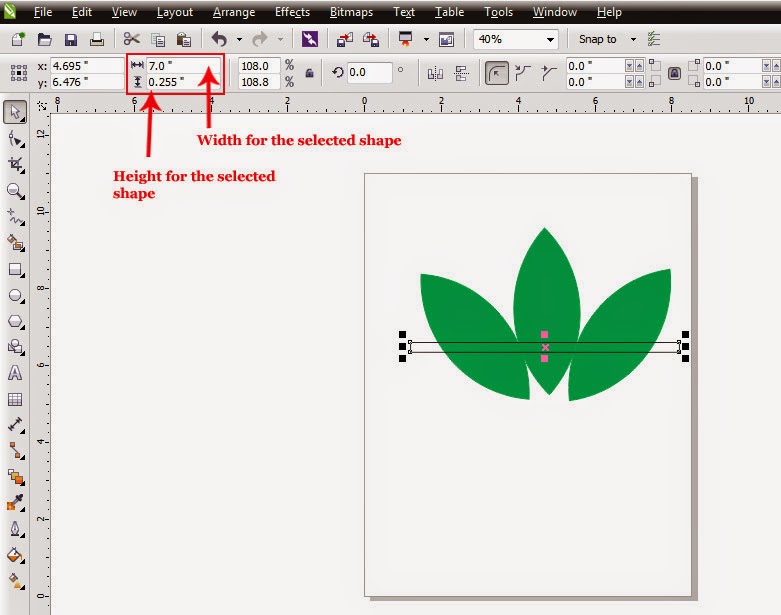 |
| Large thin rectangle placed on the group |
Then, draw another rectangle by
using
Rectangle Tool and set it’s width and height equals to
7.0 and
0.244 respectively by typing the values in the relevant boxes given
in the Property Bar and hitting the
Enter
Key. Then with the help of
Pick Tool put that recently made rectangular shape on the
previously made group of three leaf shaped objects right beneath the first
rectangular shape leaving a little distance between the two shapes according to the picture below.
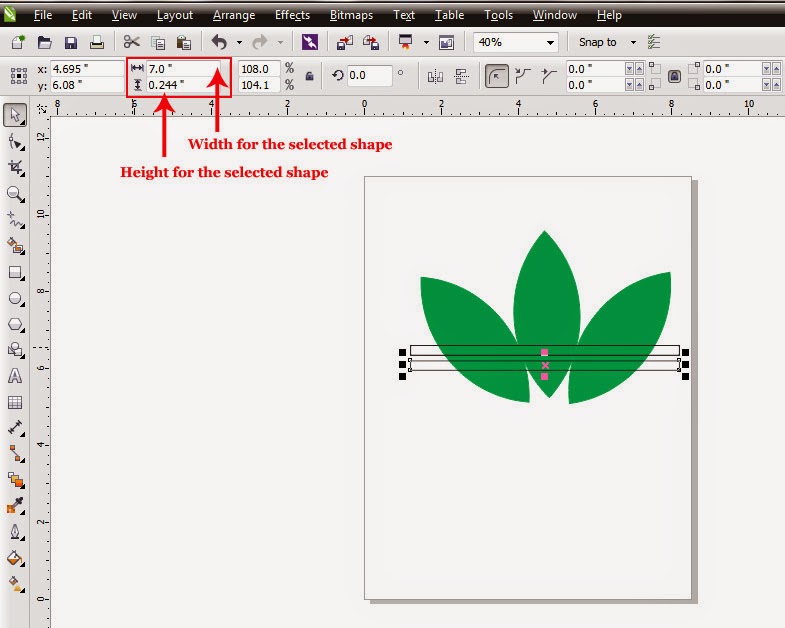 |
| Second rectangular shape placed right beneath the first shape on the group |
After
that, draw the third rectangular shape using
Rectangle Tool and set it’s width and height equals to
7.0 and
0.233 respectively by typing the values in the relevant boxes given
in the Property Bar and hitting the
Enter Key on the keyboard. Then, put that shape too on the group of three leaf
shaped objects right beneath the second rectangular shape leaving some distance
between both the shapes according to the
picture below.
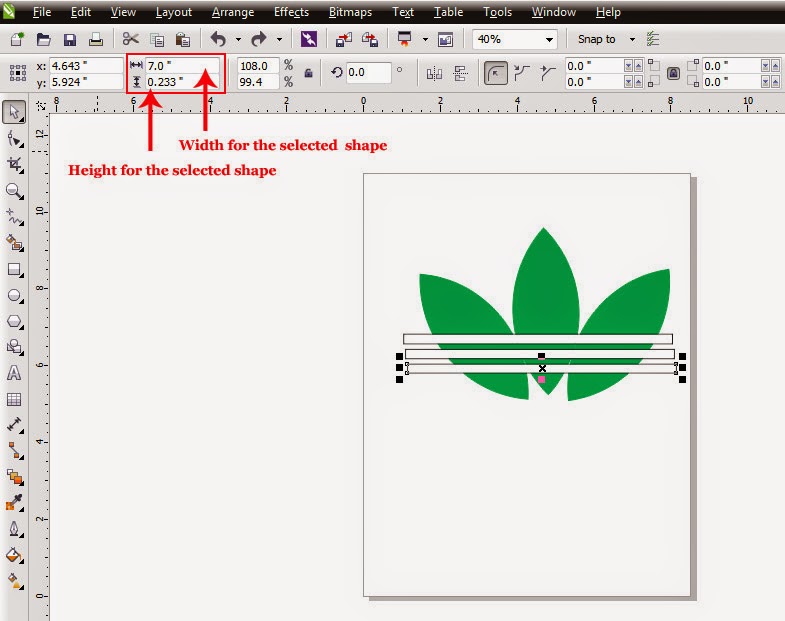 |
| Three rectangles placed on the group |
After that, select all the objects on the document including the
group of three leaf shaped objects and three remarkably thin rectangular shapes placed on that group by hitting
CTRL + A on the keyboard. As soon as you will hit
CTRL + A, all the
shapes on the document will get selected
and the shaping options will again be appeared on the Property Bar. Out
of those shaping options, select
Trim by
clicking on it.
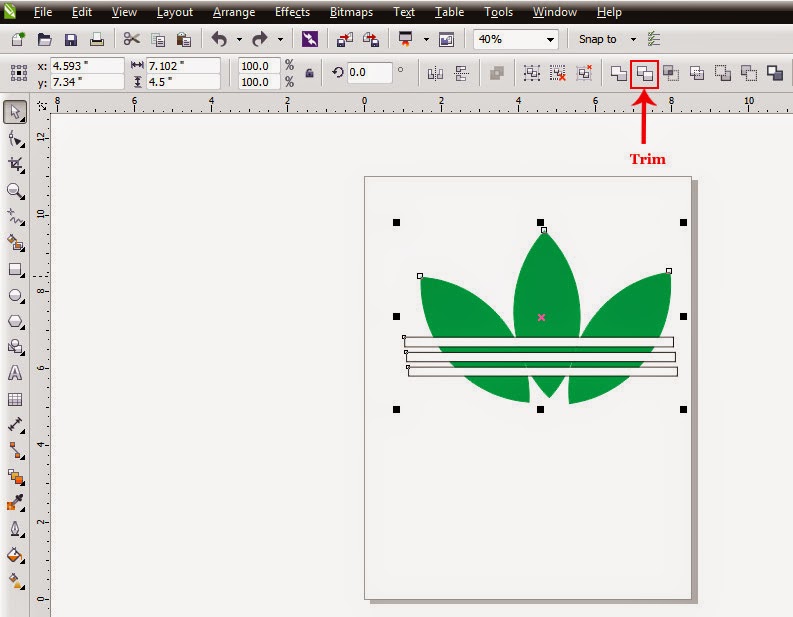 |
| Trim and other shaping options in the Property Bar |
As soon as you will select that option, the part of the group on which three
rectangular shapes are placed will be nicely trimmed off or deleted leaving empty rectangular spaces behind. Having
trimmed the part of the group, select all the rectangular shapes one by one
with the help of
Pick Tool and delete them either by getting inside the
Edit
Menu and selecting the option named
Delete or by hitting the
Delete Key on the
keyboard. After that select the
Text Tool either by clicking on it in the Tool
Box or by hitting
F8 on the keyboard.
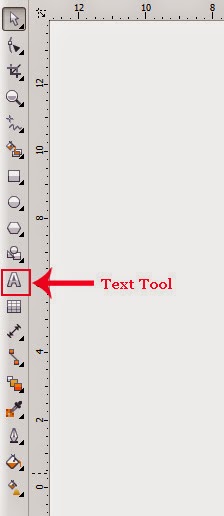 |
| Text Tool in the Tool Box |
As soon as you will select that tool, pointer of your
mouse will assume the shape of a plus sign with a prominent letter
A at the bottom-right of it. Then put
the pointer of your mouse right beneath the almost finished logo and type the
word
“adidas” there. Then select that recently typed word with the help of
Pick
Tool to have it’s properties in the Property Bar. As soon as the word will be selected, it’s properties
including
Typeface and
Font Size etc. will be appeared on the Property Bar.
Select
Century Gothic as typeface for the selected text out of the
different options given in the drop-down menu named
Font List and set the font size for the selected text equal to
120 pt by typing the value in the
relevant box and hitting the
Enter Key. Further, select
Bold as attribute for the
selected text by clicking on the box representing that attribute in the Property
Bar.
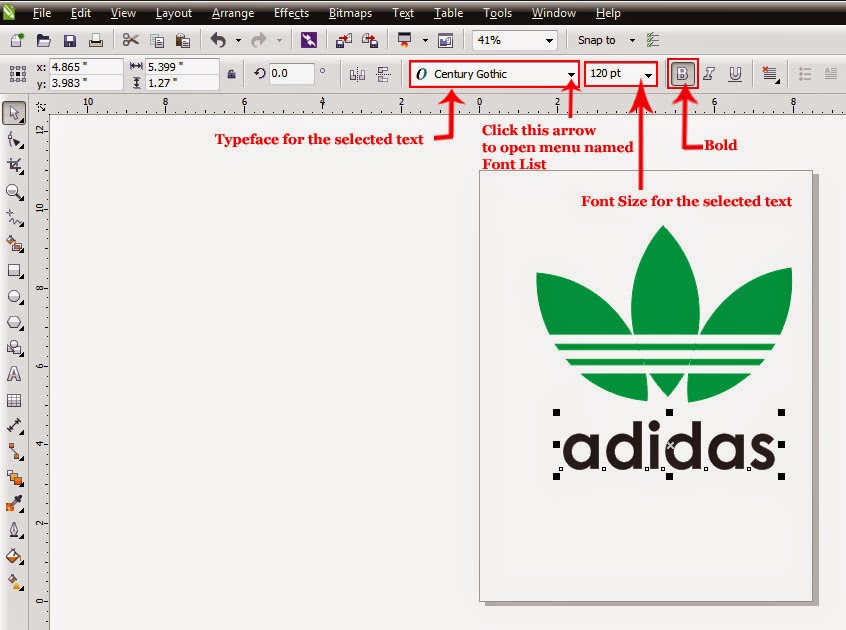 |
| Properties of the selected text in the Property Bar |
After that, select
Rectangle Tool
again either by clicking on it in the Tool Box or by hitting
F6 on the keyboard and draw a large rectangular or square shaped object on the document covering the logo and the text thoroughly. Then fill black
color inside the recently made rectangular or square shaped object by selecting the thumbnail representing black color in the
Color palette with left mouse click. As soon as the color will be filled
inside that shape, the logo and the text will totally be hidden behind the shape according to the picture below.
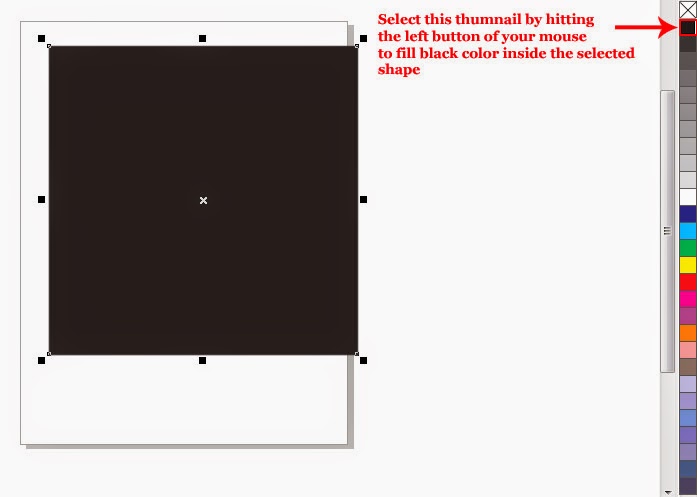 |
| Logo and the text both have been hidden behind the square |
In order to send the selected rectangular shape behind
the logo and the text, hit
Shift + pg dn
on the keyboard or get inside the
Arrange
Menu and select the option named
Order given in that menu. As soon as you will select that option , it's side
menu will be appeared containing a few more options. Out of those options,
the option which is supposed to be selected here is called
To Back of Layer.
 |
| To Back of Layer in the side menu of Order |
As soon as you will select the option named
To Back of Layer or hit
Shift
+ pg dn , the black rectangular shape will be shifted behind the
logo and the text. At the same time,
green colored logo will become clearly visible but the black colored text
will remain out of sight. In order to make the text visible, select it first by
getting inside the
Edit Menu and
selecting the option named
Select All. As
soon as you will select that option, it’s side menu will be appeared containing
some other options including
Objects,
Text,
Guidelines and
Nodes. Out of those
options, select
Text by clicking on it.
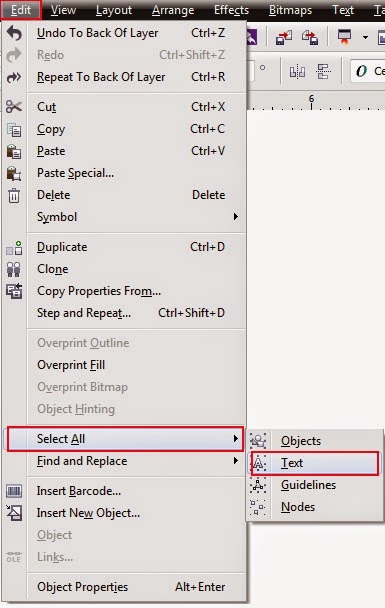 |
| Options referred as Objects, Text, Guidelines and Nodes in the menu of Select All |
As soon as you will select the option named
Text, the invisible text on
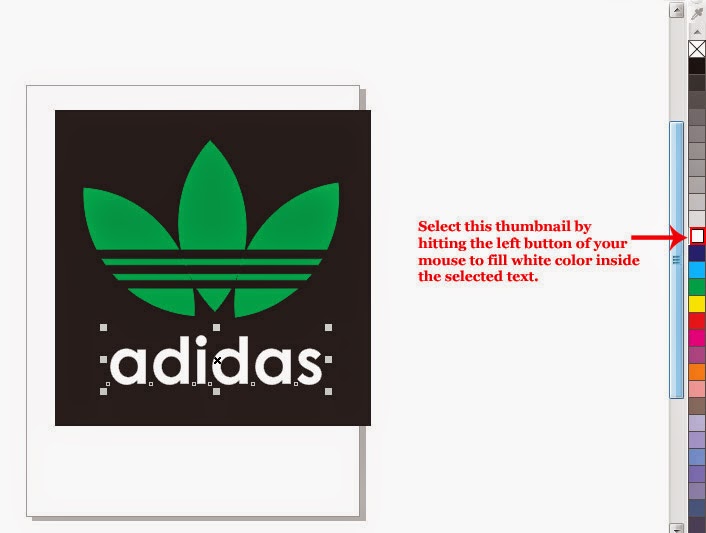
the document will be selected abruptly. Then fill white color in the selected text by
selecting the thumbnail representing white color in the Color Palette with left
mouse click. As soon as you will select that thumbnail by hitting the left
button of your mouse, white color will be filled inside the selected text and
it will become prominently visible against the black background.
 |
| Clearly visible text against the background |
Then the logo
of
Adidas will ready to be saved, so save it in CDR format by getting inside the
File Menu and selecting the option
named
Save given there or by hitting
CTRL + S on
the keyboard. If you want to save the same logo in any format other than CDR,
then get inside the
File Menu and select the option named
Export given in the menu or
hit
CTRL + E on the keyboard.Having saved the logo you can use it anywhere you like with or with alterations.
I hope you will find today’s post simple, easy
and helpful, so have fun with it by kindly don’t forget to subscribe your
comment.


3 comments:
Normally I don't comments but after visiting this site I couldn't stop myself from commenting. Because your site is very helpful for us. Here we can find many information that is really awesome. I am really looking forward to read more. I read a more detailed recommendation in this article and it help me to learn something new. Thanks for sharing that. Thank you so much.
One of my friend is suggesting this below photoshop tutorial. What do you think about this photoshop tutorials. Please check it and let me know if it is effective.
Learn Photo Editing Review
Hi there! This is my first comment here, so I just wanted to give a quick shout out and say I actually enjoy reading your blogs. Would please give me a favor, just recommend me some blogs/websites/forums that deal with the same subjects? Thanks.
With your detailed explanation i must commend your efforts.. even a newbie will find it easy to depict any logo of choice.
Post a Comment