How to change a picture's background ?

Once I came  across a very nice boy on Facebook. I sent him a friend request  and he accepted it. Now he is one of the best friends of mine.We share music, poetry, movies, games and everything that can be shared on Facebook.These days he is running his own real estate business successfully and looks like a fully grown man. But three years earlier, when  he was working as a salesman at a general store, used to look rather  young and carefree.
A few days earlier, when I logged in my Facebook account , I saw a notification that said my friend had changed his profile picture. When I saw his recently added profile picture I couldn't stop myself liking it. That was not his recent photograph, but a bit older,  three years of so. He was looking very young and carefree, wearing a sort of devil- may-care smile on his face.

image-with-ugly-background
Background:Sometime creates very bad effects on a good picture.
 That was of course,  a very nice picture of him, but,  at the same time,  in that picture Arsalan (my friend's name) was the only object deserved to be  praised. The rest of the picture was not showing anything but old and decaying closed shop that was not adding any beauty in my friend's picture. When I expressed my thought by commenting upon the picture, he requested me to do something about the picture's background, and that was on my finger tips.
It is to change a picture's background, of course, not a big deal. If you know how to use selection tools in general and polygonal lasso tool in particular  you can change any picture's background within a few minutes.
First of all I downloaded the picture and saved it on my PC's desktop. Then I opened the same picture in Adobe Photoshop 7.0 which was already installed in my computer.I zoomed that picture in by hitting CTRL + +. Then made the selection of the picture, carefully avoiding the background, by Polygonal Lasso Tool.

Selection making by Polygonal Lasso Tool

It is very easy to make selection  of any part of a picture by Polygonal Lasso Tool. Just select that tool out of the tool window that  can be seen usually at the left side of the Photoshop window. Put the pointer of your mouse at  the  bottom- right arrow of the option called Lasso Tool, then click the left button of your mouse. Your click will reveal all the sub options of this very useful selection tool. Then out of those options select Polygonal Lasso Tool.
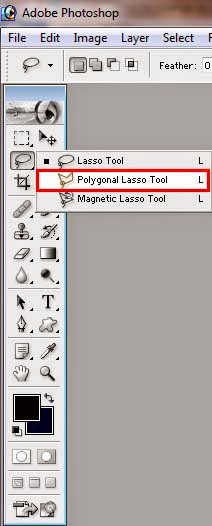
lasso-polygonal-lasso-and-magnetic-lasso
Polygonal Lasso Tool in the Lasso Tool menu
As soon as you will select that option, your pointer will change it's shape and the tool options will be appeared at the top of the window right beneath the menu bar. Out of those options, select New Selection as selection type, leave the check box right beside the option Anti-aliased unchecked and set Feather for the tool equal to 0 px.
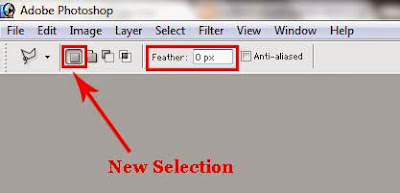
new-selection-as-selection-type
Lasso Tool options
After that, put the pointer of your mouse at any point of the outline of the part of the picture you want to select and  just trace it by dragging your mouse. Wherever any curve come just click the left button of your mouse once and continue.
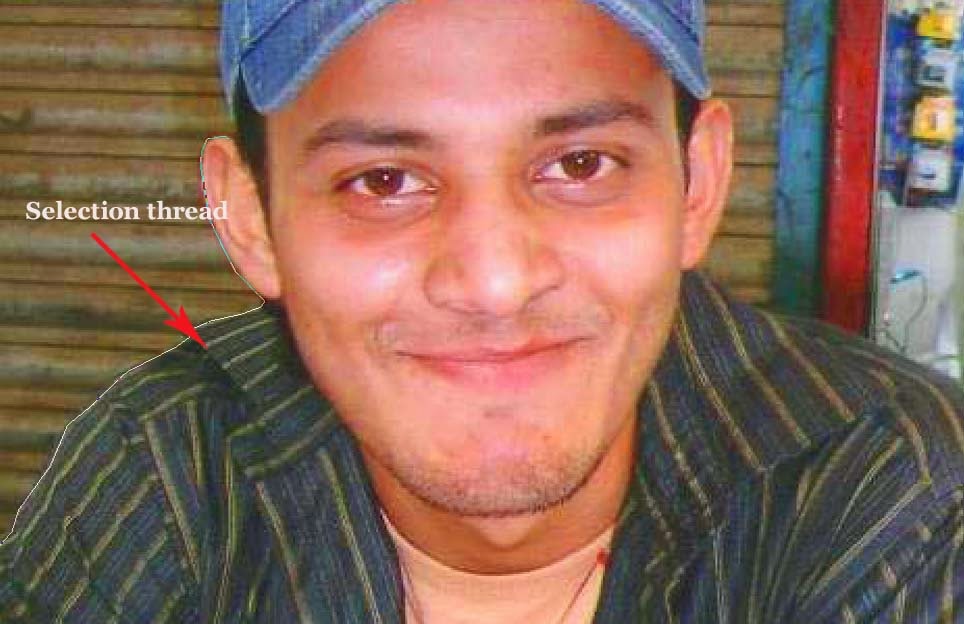
Polygonal-lasso-tool
Image is being selected

Trace the outline of the whole image and hit Enter key. As soon as you will hit the Enter key, the whole part of the picture will be selected within an instant.
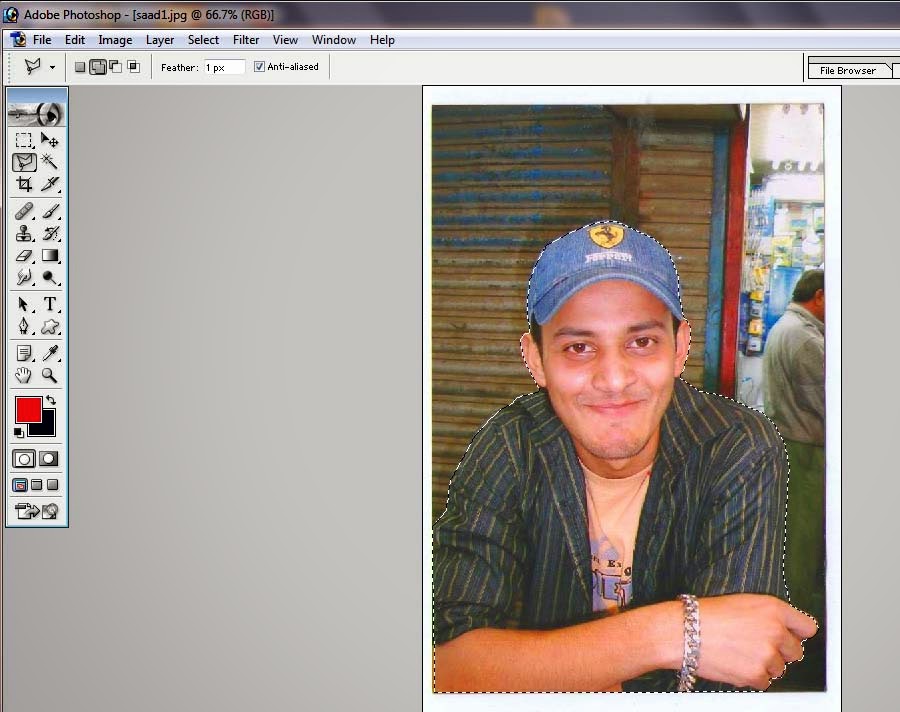
Completely-selected-image
Completely selected image

Inverse Selection and Deletion of background 

I selected the image by following the same method explained above, then out of the menu bar, I clicked  the menu called Select. As soon as I clicked that menu, it's sub menu appeared and out of that, I selected the option Inverse (Shft + CTRL + I).
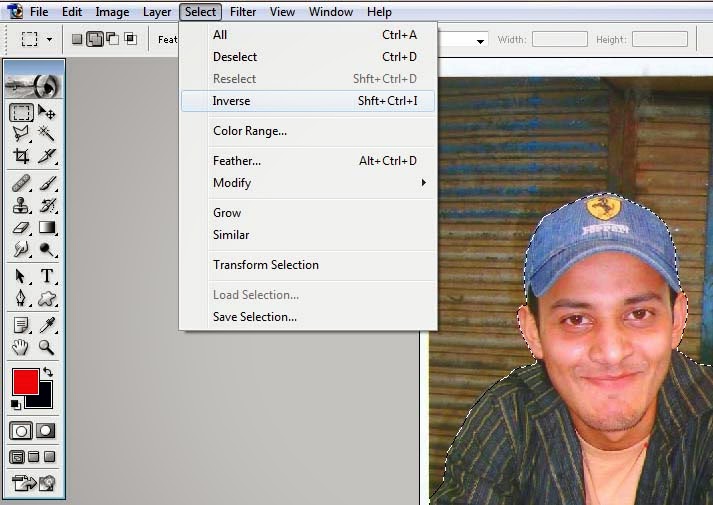
proper-use-of-inverse-selection
Inverse selection: very useful option
This option is used for inverse selection . That is precisely why, when I selected that option, my friend's picture got unselected while the rest of the part of the image, or it's background got selected. Then I hit the Delete key and the whole background was deleted in an instant. And at last, my friend's picture got rid of it's ugly background.
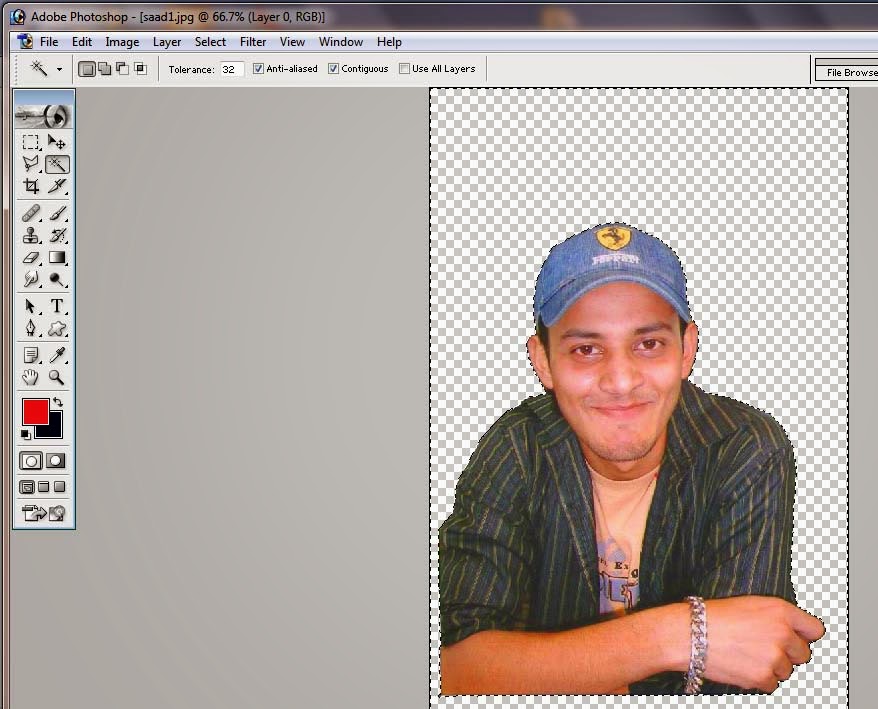
image-without-background
Image: After the removal of it's ugly background

Use of  Blur Tool on the ragged edges of the picture

When I deleted the background, I noticed that the picture had very rough and ragged edges and because of those, it was looking a bit unnatural. In order to make those smooth, I used Blur Tool.
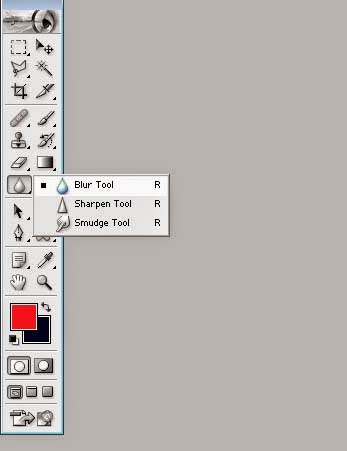
selection-of-blur-tool
Blur Tool in the menu
As soon as I selected that tool (Blur Tool) , pointer of my mouse assumed the shape of a circle, that was Blur Tool's Brush, and the tool options appeared instantly on the top of the window right beneath the menu bar. Out of those options, first of all I opened Brush Picker menu by clicking the small arrow that can be seen right beside the word Brush in the option bar. Then out of the Brush Picker menu, I selected the brush Hard Round 19 px. Then I set it's  Strength equal to 30% and out of the drop-down menu called Mode, I selected the mode none other than Normal. 
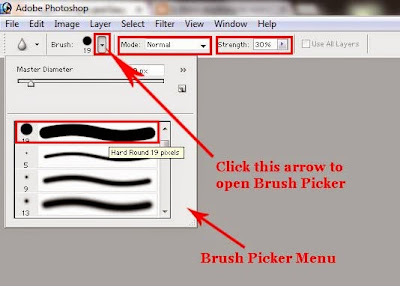
hard-round-19-pixels-for-blur-tool
Brush Picker, Mode and Strength for Blur Tool
After that, I zoomed the picture in, by hitting CTRL + +. Having done so, I  put the circle shaped pointer of my mouse  at the picture's rough edge, kept the left button on my mouse pressed and dragged it on the entire edges of the picture. And after a minute and a half, all the rough edges of the picture got perfectly blurred.
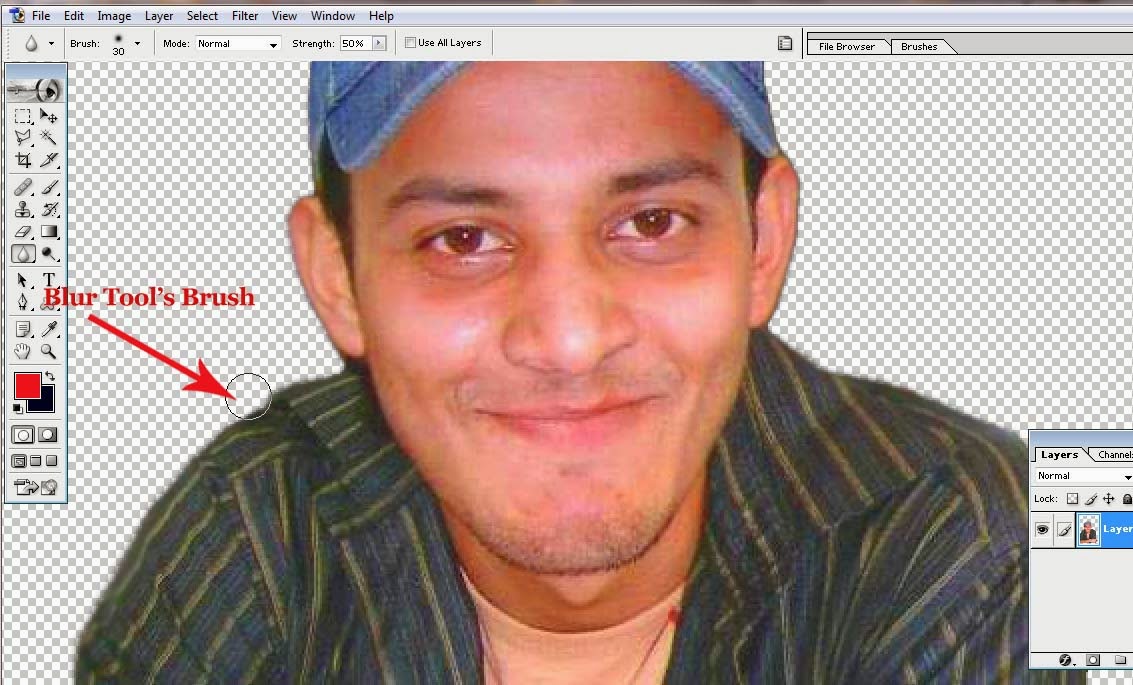
use-of-blur-tool
Circle shaped brush of Blur Tool

Insertion of new background

Use of  Move Tool to move layers

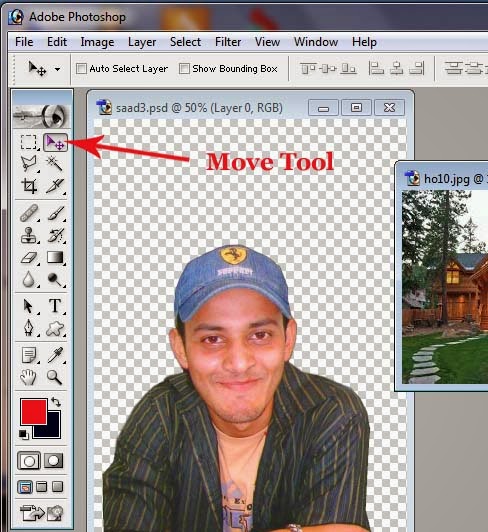
Then I opened another picture in Photoshop to use it as the new background for my friend's picture, and then selected the Move Tool out of the tools' window.
use-of-Move-Tool
Move Tool: Used to move layers left, right, up and down
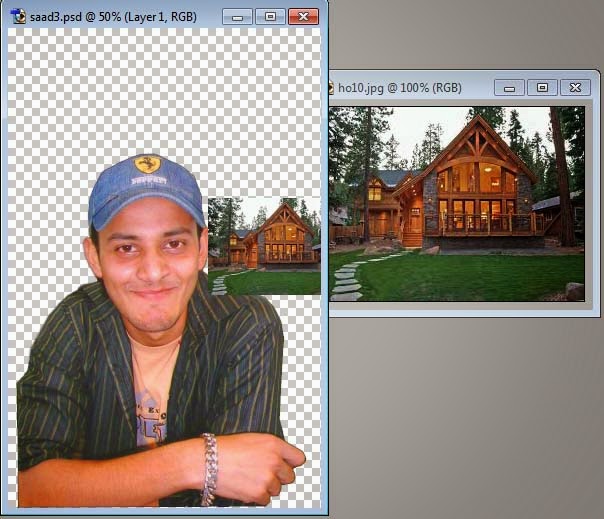
 Then I put the pointer of my mouse on the newly opened picture, kept the left button of my mouse pressed and dragged that image and dropped it on  my friend's picture.
Move-Tool-is-used-for-drag-and-drop
Image: Drag and Drop by Move Tool
 As the image I had chosen to use as the background image for my friend's picture was so small, I had to enlarge it.

Free Transformation of a picture

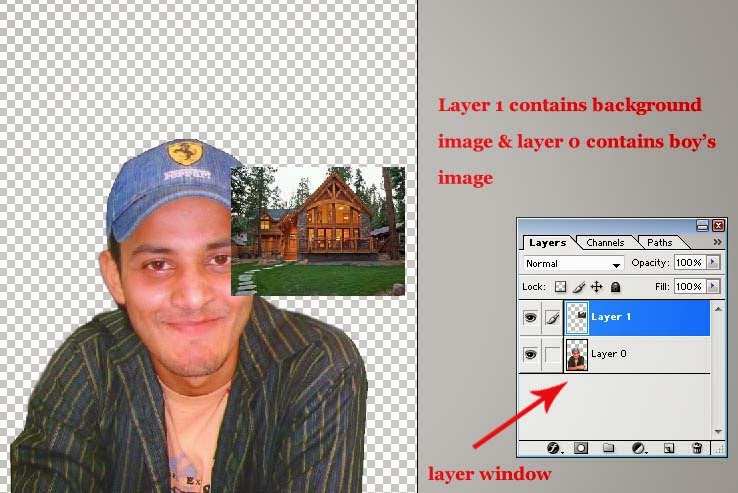
In order to enlarge it, I selected the layer 1 that contained that image (background image) out of the layer window.
layer-window
Layer window: Always select the layer on which you intend to work

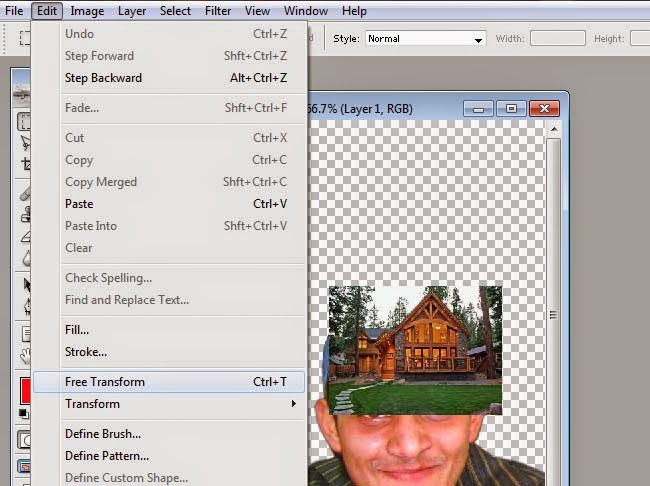
Then out of the Edit Menu, I selected the option Free Transform or (CTRL + T).
free-transform
Free Transform : Change the height and width of your image freely
As soon as I selected that option  a rectangle emerged around the picture,  called Free Transformation Rectangle.
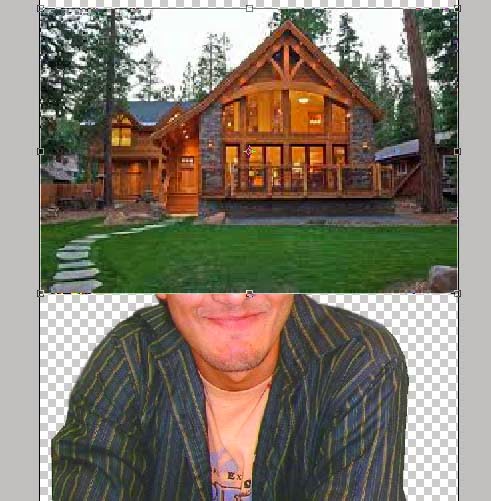
picture-enlargement-by-free-transformation
Image inside the transformation rectangle is being enlarged
Then I put the pointer of my mouse at the edge  of that rectangle and dragged out. The image got enlarged and covered the entire picture of my friend.
Image-after-enlargement
Image: After being enlarged covered the back layer

Setting of layers upward and downward

In order to bring my friend's picture forward, I once again selected the Move Tool and put the pointer of my mouse on  layer 1 in the layer window. As soon as I put the pointer on the layer , it's shape changed into a hand. I kept the left button of my mouse pressed and dragged it downward and released the button.Then layer 0 that contained my friend's picture was above and  the second layer that was layer 1 (contained the background image )  was below.
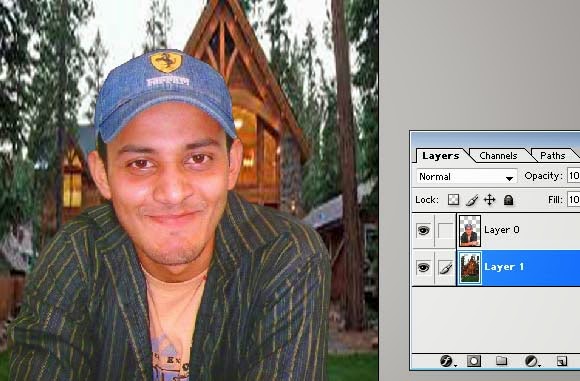
rearrangement-of-layers
Layer rearrangement :Layer that is used as background should remain below the foreground layer
The work was done. I saved the image in JPEG  format and sent it back to my friend.

image-after-complete-background-change
Image: After the change of it's background
Of course, he was very happy when he saw his newly edited image and used it as his Facebook profile picture.


How to change eye color using Photoshp?

I have a friend with very lovely face and very pretty eyes. When we were doing our masters, she was about to get married and like most of the other eastern girls, very excited about the prospect of being a bride.She kept on talking about the beauty tips she was going to apply, and about the dresses and other stuff she was buying or about to buy for her wedding.
At last the day came and we saw her in her bright red and gold bridal outfit. Of course, she was looking extremely pretty like a fairy queen, so everyone praised and complemented. Instead of glasses, she was wearing light brown contact lenses which were looking gorgeous on her fair skin. She and the rest of her family members were looking perfectly happy and satisfied  with themselves because everything in  the wedding took place perfectly well.
After two weeks,  when I went to see her , she told me that there was something wrong with her wedding photos. She dropped the big  and heavy photo album  on my lap. As soon as I opened the album I understood what was the wrong. As I have mentioned earlier that instead of glasses she wore contact lenses at her wedding and was looking gorgeous, but in the photographs her lenses against the flash light creating very bad effects and her eyes were looking more like a cat's eyes than hers.
Eye-picture-before-editing
Eyes: Unnatural effects
She was not at all happy with the photographer's performance and wanted to look in photographs  too, as beautiful as she was looking in reality. Luckily I had the solution.
I asked her if I could take those pictures for editing. Further I explained that how easily could all those pictures be edited flawlessly within a couple of hours.  She agreed and then handed me a potable USB device containing all those pictures.After a few days I handed her USB device back to her with the addition of a new folder in it that was containing all edited images of hers.


Eye-picture-after-editing
Eyes: After the removal of unnatural effects
 When she saw the result of my two days toil, she couldn't  believe upon her eyes. ' That's amazing.....!' , she exclaimed, ' how did you do that?' And the answer was simple.
I had already had adobe Photoshop 7.0 installed in my computer.I simply inserted the USB device in the port  and copied the folder containing Sara's (my friend's) wedding photos and pasted it on my computer's desktop. Then I  removed the device and put it aside.

Use of different options ,menus,tools and short cut keys

File Menu

 I opened the image editor software ( that was adobe Photoshop 7.0) and clicked on the file menu.Out of that menu, I selected the option 'Open'  (CTRL+ O).
File-menu
File menu: Contains many options

Open Window

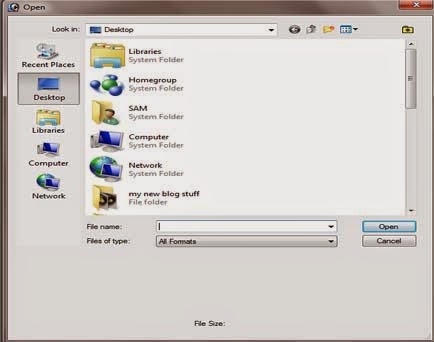
As soon as I selected that option, a window opened. In that window's  Look in  bar, I typed the word 'desktop'  because my image folder was exist on desktop . 

Open-window
Open window: Select the folder or file you want to open
As soon as I typed the word desktop in the bar, all desktop items appeared in the window. I selected my required folder and clicked the button called Open .

Zoom in (CTRL + +)

 As soon as I clicked that button all the photos that folder contained appeared in the window in an instant. I selected one and clicked Open again and the photo was opened in Photoshop. I zoomed the picture in by hitting CTRL + +  ( a picture can be zoomed out by hitting CTRL +  -).

Window Menu

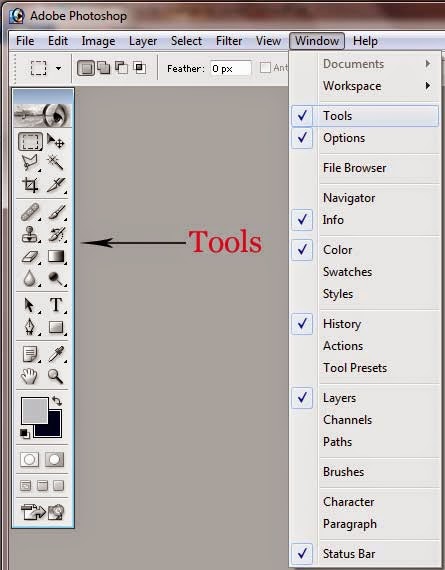
 After that , out of the menu bar of adobe Photoshop 7.0, I selected the window menu. Out of the sub-menu of the window menu, I put check beside the option  Tools. As soon as I put check beside that option, a tool bar appeared at the left side of the Photoshop window.

Useful-Photoshop-Tools
Window menu : Opens all closed window

Lasso Tool

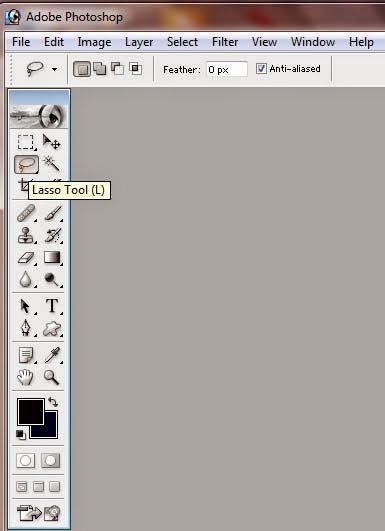
Out of those tools I selected Lasso Tool by clicking on it.

Lasso-tool
Lasso Tool : Used to make selection
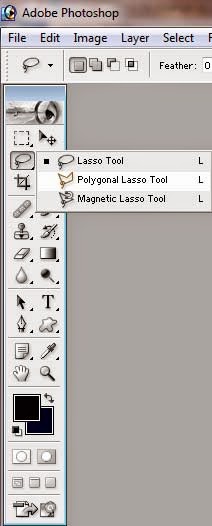
When I put the pointer of my mouse at the arrow  that could be seen at the bottom- right of the option Lasso Tool and clicked the left button of my mouse, the sub-menu of Lasso Tool appeared.

Polygonal-lasso-tool
Types of lasso tool: All are used to make selection but in slightly different way

Polygonal Lasso Tool and Add to Selection

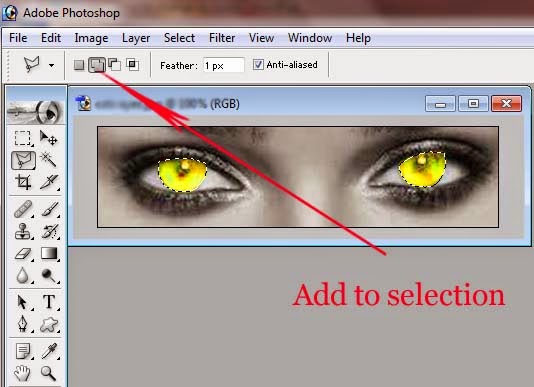
Out of that menu, I selected Polygonal Lasso Tool.Out of the top options, I selected Add to Selection ( we select Add to Selection only when we want to make selection of more than one objects at the same time).Then I made selection of both eyes at the same time .

Add-to-selection
Add to selection: Make selection of more than one object simultaneously

Hue and Saturation Dialogue Box 

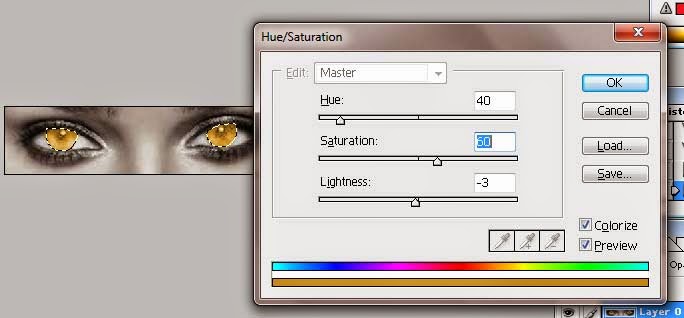
After that I hit the keys CTRL + U. As soon as I did so, appeared  the Hue and Saturation dialogue box. I put checks beside Preview and Colorize then set hue , saturation and lightness according to my wish then clicked  OK.
Hue-saturation-and-lightness
Slides representing Hue, Saturation and Lightness

Removal of  Selection (CTRL + D)

As soon as I clicked OK, the eye color totally changed and the bad effects were removed totally. To remove selection, I hit CTRL + D and the selection removed.

Save As

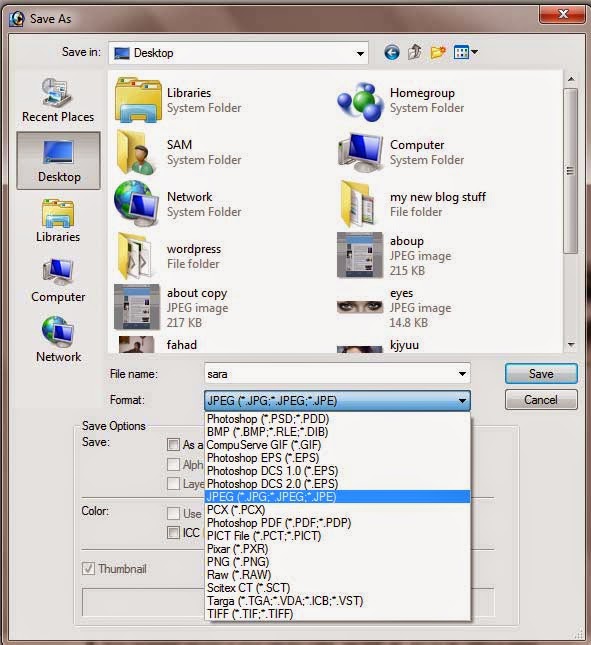
To save the edited image I clicked the file menu again and selected the option save as. As soon as I selected that option  a window called  save as opened.

Save-your-image-in-any-formate
Save As: Save image in any format other than PSD
 I typed the name of my friend's newly edited image in the file name box then selected the format  jpeg  out  of the format drop down menu and clicked the button  save .One by one, I edited all the pictures by the same method and everyone liked them.
I hope my readers will find this post helpful and interesting at the same time. If you want to put forward any objection or  suggestion regarding further improvement, kindly don't forget to subscribe your comments.  

The Most Suitable Resolution, Color Mode and Content For PSD File

A teenager boy was toiling extremely hard to draw something on Photoshop. It was the mid of December, but he kept on wiping sweat out of his wet face. Apart from that boy, there were sitting almost 20 more students in the same room. All of whom were taking their final test for DIT. That was a computer institution in which I was working as a graphics instructor.

I approached that boy, peered over the screen and in an instant, understood the cause of his embarrassment. All I could see was a rectangular selection which he had made definitely using Rectangular Marquee Tool. He was trying to fill some color in that rectangular selection, and clicking again and again on different colors in the color picker window. But, whichever color he selected, turned into either lighter or darker shade of gray, simply because he had selected the  Grayscale  mode by mistake for the document. Meanwhile, he felt my presence behind his chair, turned abruptly and blushed. When I enquired about his lack of practice, he revealed that he had been practicing regularly but didn't come across the issue he was then coping with. I felt a great temptation to help the boy, but that was against the rules because no teacher is supposed to help any student during final tests. At last the time was over, and the boy couldn't get through the test.

Suitable-color-mode-content-and-resolution
Three important things always to be remembered while working with Photoshop
For an experienced graphics designer that issue might be a laughable one, but, If you are a beginner in the field and you don’t know how to create a new Photoshop document properly, you may take the place of that boy anytime.In fact, it is to create a new Photoshop document without getting confused is not a big deal. Everyone, experienced on inexperienced, can do it quiet easily. However, there are a few things to keep in mind to protect yourself from being embarrassed at the eleventh hour.

How to create a new Photoshop document?

In order to creat a new Photoshop document, first of all get inside the File Menu and select the option named New either by clicking on it in the menu or by hitting CTRL + N on the keyboard.

create-new-file
File Menu of Photoshop 7.0
As soon as you will select the option named New or hit CTRL + N, there will be appeared a dialogue box named New.
size-resolution-mode-content
Dialogue box referred as New

  Name, Size and Resolution

Inside that dialogue box,  the first box you can see is referred as Name. In that box type the name for the document which is about to be created. Apart from the box called Name, the rest of dialogue box contains two pans under the heads of Image Size and Contents.
At the top of the pan named Image Size, there can be seen a drop-down menu referred as Preset Sizes.  Out of the different size options given in that drop-down menu you can select any size for your document by clicking on it. As soon as you will select any size, expected width and Height of the document that is about to be created will be appeared inside the boxes referred as Width and Height given  right beneath the drop-down menu named Preset Sizes. If you don't want to select any preset size out of the menu, you can define the Custom size for your document by specifying required values in the boxes named Width and Height. Further, along with the size, measurement unit for the document can also be specified through this dialogue box. If you select any preset size out of the options given in the drop-down menu named Preset Sizes there is left no need to specify width, height or the measurement unit for the document but if you define any custom size, measurement unit for the document too, is supposed to be specified along with width and height. If you want to create a document for the use in web, Pixels as measurement unit should be your choice. If you want to create a document for printing,  Inches or Centimeters as unit of measurement should be your choice.
When it comes to set the Resolution for the document, always keep in mind the purpose of it's creation. If you are going to create it for the use in web and presentations, default resolution, that is 72 px / Inch, is perfectly fine. If you intend to print the document for some ordinary purpose you can set the Resolution equal to 240 px/Inch, but in order to print the document for some professional purpose Resolution less than 300 px/Inch cannot be suitable.

Selection of Color Mode

Right beneath the Resolution, there can be seen another drop-down menu that is called” Mode”. In order to select the right Color Mode, you need to understand what these Color Modes are? And why do we use them? So here I'll explain all the  Modes separately but  briefly .

BITMAP

If you select the Bitmap color mode, you can see your document in only black and white as this color  mode doesn't use any other color or shade to represent the pixels. Further, you cannot add any layer in the document while working with  this color mode other than background layer.
Bitmap-color-mode-shows-only-black-and-white
This color mode shows pixels in only black and white

GRAYSCALE

This color mode is used to represent pixels in only black, white and different shades of gray. You cannot see any other color in your document while using this mode.

grayscale-image
This color mode shows only black, white and different shades of gray

RGB

If we select the RGB color mode, it’s mean that we are going to use different combinations of three primary colors: red, green and blue (R stands for red, G stands for green and B stands for blue). While working with RGB color mode we use 255 shades of Red, Green and Blue each.
red-green-blue
RGB:This color mode shows different combinations of red, green and blue
RGB color mode is suitable for the images which are going to be composed for the use in websites and presentations.

CMYK

In CMYK color mode, C stands for cyan, M stands for magenta, Y stands for yellow and K stands for key or black, because K is the last letter of black.

CMYK-Color-Mode-in-Photoshop
CMYK  is the suitable color mode for the images which are going to be printed on paper
CMYK color mode is not considered an ideal one when it comes to compose or edit images . Generally, in order to compose or edit images, RGB color mode is used. I dare say, you can avoid CMYK color mode until you need to have your document printed. Printers use this color mode to print any image on paper so it’s quiet safe to work on an image using RGB mode then just before having that image printed on the paper, convert it's color mode from RGB  to CMYK.

LAB

This color mode is used only to generate some consistency among different devices e.g displays (CRTs, LCDs) and printers. This color mode is considered to be a device independent color mode because capabilities of different devices to display colors doesn't create any impact on the colors of the images which are composed using this color mode. In LAB, L stands for light, A stands for A ( red-green) axis and B stands for B(blue-yellow) axis. This mode is very rarely used by graphics designers whether experienced of inexperienced.

 Selection of Content

 There are three different content styles are available in Photoshop these are:

White

If you choose White, you will have a Photoshop document with pure white locked background layer to work at.
.

Background color

If you select Background Color, you will have a Photoshop document with the locked background layer of the same color that is currently selected as background color in the tool panel.

Transparent

If you select Transparent, you will have  a Photoshop document with transparent or totally colorless locked  background layer.

Image Resolution: Pixel Distortion Phenomenon

That was my first day in the class, when my teacher explained the two major types of graphics and the difference between them. But unfortunately, most of the students including me, were new comers in the field so we couldn't understand the point thoroughly.That is precisely why, when I enlarged an image and it got completely deformed and blurred, I got a bit anxious about my level of understanding regarding resizing an image. I tried to resize the same image again and again but no improvement made.The next day I went straight to my teacher and told him hesitantly that I couldn't pick his points regarding resizing an image and I need more explanation about the same topic. My teacher asked the rest of the class whether they had any issue concerning the previous lesson too. To my great surprise, almost 80% students admitted that they had the same issue I had been bothering myself with. My teacher smiled and revealed that he had been expecting the same complaint from the class for the very first day.
It’s obvious, if you are a new comer in the field of computer graphics with not enough knowledge, and you are having fun with Photoshop, your instructor teaches you how to enlarge the size of an image, you think it’s quiet easy, but what are you supposed to do when you don’t have the proper result after following the instructions of your instructor?
Well…. In my opinion, there is no need to worry about that .If your image has lost its features after enlargement, it’s not your fault. The only thing you are supposed to do is to understand the cause. And cause is nothing but the resolution of the image. In order to understand the term Resolution it is better to understand the  main types of graphics and the difference between them.

Types of Graphics

There are two main types of graphics:
  1. Bitmap or Raster Graphics
  2. Line Art or Vector Graphics

Bitmap or Raster graphics

Bitmap or Raster graphics are composed of a host of small colorful rectangular dots. These dots are called pixels. Quality of an image that is usually referred as ‘resolution’ depends on how smaller and how closer these dots are. In fact, resolution of an image is measured in dots-per-inch (DPI). It’s mean, more and more smaller and more and more closer the dots, more and more better the resolution of the picture, less and less smaller and less and less closer the dots, less and less better the resolution of the picture. That’s the formula better to be  kept in mind.
Further, in these types of graphics, you must have to be careful while enlarging your images because your action might distort pixels and you are not likely to have a good looking image after resizing it. So it’s always good to have high resolution image for enlargement experiments.

Raster-image-with-distorted-pixels
Raster Image: Gets blurred after enlargement
We come across different image editors when enter the field of computer graphics. There are a few image editors (e.g. Photoshop, Ms Paint, Painter, GIMP and Paint.Net) are used to edit pixels so these are called raster-based image editors.
Most of the monitors and printers which are being used these days are raster devices, meaning DPI can be set before having display or print through these devices. These devices don't create any good or bad effect on the pixels of the image but simply determine the  required number of dots which are to be used to print or display all pixels. DPI is usually recommended to be kept between 72 to 300 because, if DPI is set too high the details of the image might be lost and if DPI is set too low the picture will get blurred and soft.

 Vector or line art graphics

In vector graphics, geometrical primitives e.g. lines, points, different polygonal shapes and curves are used to represent an image. Unlike raster graphics (which are pixel based) vector graphics based on vectors which are often referred as strokes. Each stroke or path has a starting and an ending point. A path or stroke can have any geometrical shape (it can be a line, angle, curve or a polygon).

Vector image after enlargement
Vector image: Retain it's features after enlargement
You can change the size of  vector based images according to your requirement without destroying their features and losing their clarity. Clip arts, monograms and logos are often made by using vector graphics instead of raster, since these can be scaled quiet easily, so these are fit, whether you want to use them on business cards or on billboards. Further, vector graphics are used in many Flash animations (cartoons etc) too.
 There is another benefit associated with vector graphics, that is they take up less space than raster graphics. CorelDraw, Adobe Illustrator, Xfig, Macromedia Freehand etc. are very well known examples of image editors based on of vector graphics.
I hope this post  will be proved helpful for the beginners in the field. if so, kindly don't forget to subscribe your comments.


Do you really want to become an I.T person ?

My cousin has never achieved less than 100% in mathematics. He is a successful civil engineer, 26 years old, works for a UAE based constriction firm and practically rolling in money. Yet, there is another fact associated with the same person is not as much impressive as the first one. He cannot write a single sentence in English without any grammatical mistake and he couldn’t have memorized the names of the seven continent of the world so far.
 According to his father (my uncle), when he was at school, his teachers often used to say about him that he was extremely sharp in mathematics, but at the same time, extremely dull-witted in grammar and geography. Does that explanation settle the matter?  Certainly not……… well, at least in my opinion. However, it seems amazing. How can some people prove themselves the best in one field and the worst in the other?
Last week, I had a chance to have a friendly chat with him, during which he revealed that his brain gets empty whenever it has anything to do with grammar or geography, simply because he has no interest in both. And that settled the matter.

Be rational about your life time occupation

As the world has turned into a Global Village, life is getting more and more difficult with every passing day. Competition is rising and economic and social issues associated with everyone are getting more and stronger. Now it has become a compulsion for all of the people regardless gender, to earn their own living by themselves to have a happy and content carefree life.  Because, as far as the personal views of almost 1000 people (including doctors, teachers, lawyers, bankers etc.) are concerned, 80% problems of your life get resolved quite easily when you have your own money in your hands.

Work-load-stress
Nobody is supposed to sit like that
Unfortunately, most of us are not proved a bit rational whenever it comes to select a life time occupation. Mostly, people prefer an occupation which seems a lucrative one, ignoring the temptation of their own hearts. That seems an utter sacrifice just to achieve economic well being for their families and for themselves. Often, such people succeed, and achieve their economic goals, but generally, that causes a great mental unrest for them.  Situation gets worse when they fail to discover the cause of their psychological issue.Here, I am not going to discuss the ways through which one can earn a lot of money or one can get rid of his or her psychological issues, but I am willing to render a sincere advice for all such people who are unable to smile or unable to have a sound sleep for some unknown cause, just caste a quick glance over their professional life and calculate the difference between pain and gain. In case your profession is giving more gain than pain, search the cause of your depression somewhere else instead of rummaging inside your profession. On the contrary, if the ratio of pain is more than gain, then don’t punish yourself any more, leave your current occupation, utilize your brain and follow your hearts advice and rest assured you will be successful.