This is my second post about logo designing and in this post
I am going to explain some remarkably simple tips by following which one can draw an
awesome logo of a worldly famous organization named Blackberry World within a few minutes. For
instance in the following image you can see a logo that is made in CorelDraw X6 using Rectangle
Tool, Ellipse Tool, Fill Tool, Text Tool and a very important shaping option named Trim.
 |
| Logo of Blackberry World made in CorelDraw X6 |
If you read the following step by step procedure with a good amount of concentration, you will be able to draw a perfect logo of Blackberry World within five minutes of so without getting involved in any big or small difficulty.
How to draw an awesome logo of Blackberry World using CorelDraw X6?
Having created a new document, first of all select the
Ellipse Tool either by clicking on it in the Tool Box or by hitting
F7 on the keyboard.
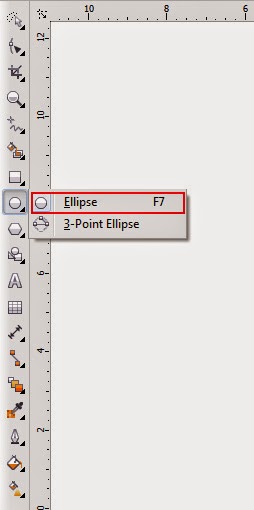 |
| Ellipse Tool in the menu |
As soon as you will
select that tool, pointer of your mouse will assume the shape of a plus sign ( +
) with a small shape of an ellipse at the bottom-right of it. Then put that
plus sign shaped pointer of your mouse anywhere on the document and drag your
mouse in any direction to draw a shape of an ellipse there. Then in order to
convert that ellipse into a perfect circle, select it with the help of
Pick Tool and set it’s width and height
equals to
7.0 in the Property Bar
and hit
Enter. As soon as you will hit the
Enter
Key, selected object will assume the same width and height and will be
transformed into a perfect circle. After that, select that circle with the help
of
Pick Tool and fill light grey
color inside it by selecting the thumbnail representing light grey color in the
Color Palette with left mouse click and then, select the same thumbnail again (this time with right mouse click) to fill the same color in the selected shape’s outline
too.
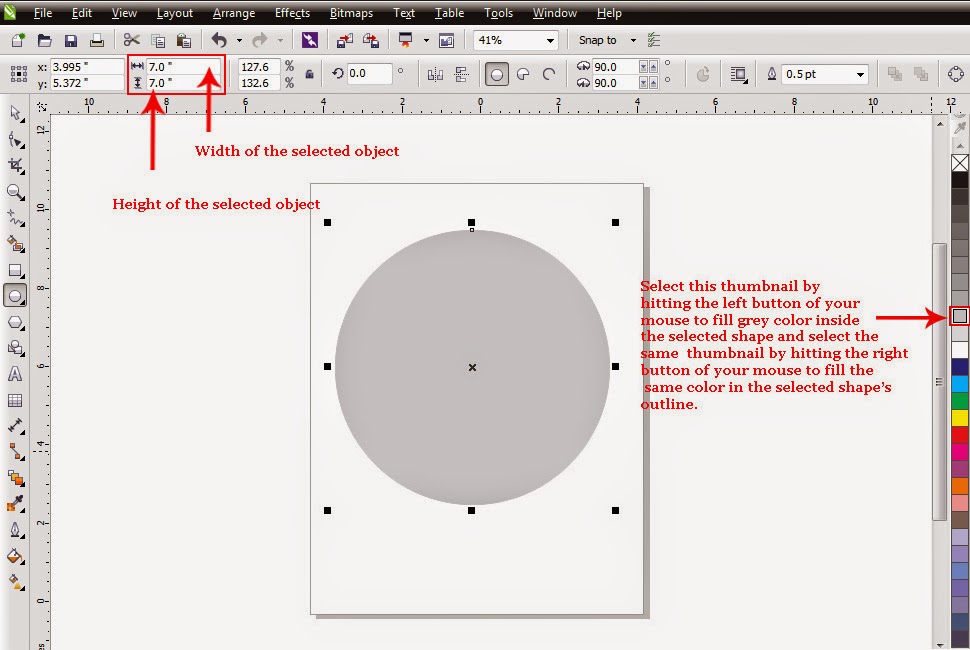 |
| Width, height and color for the selected shape |
After that, make a duplicate of that shape either by getting inside the
Edit Menu and selecting the option
Duplicate or by hitting
CTRL + D on the keyboard. As soon as
you will do so, another grey circle of the same width and height will be
appeared on the document.
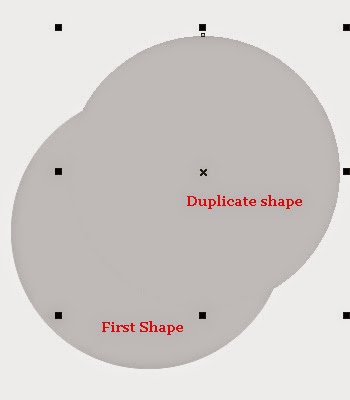 |
| Duplicate shape appeared on the document |
Select that duplicate circle with the help of
Pick Tool and then click the small
arrow that can be seen at the bottom right of the
Fill Tool to open a menu containing
Fill Tool's options. Out of those options, the option which is supposed to be selected
here is none other than
Fountain Fill (option
referred as
Fountain Fill can also
be selected by hitting
F11 on the
keyboard ).
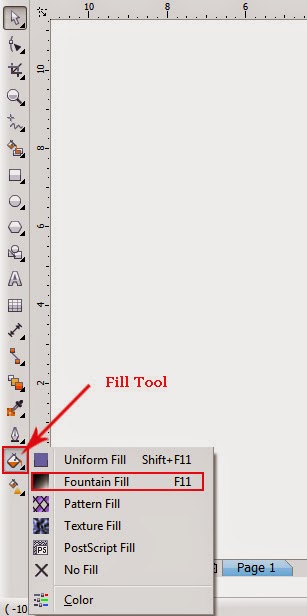 |
| Menu containing Fill Tool's options |
As soon as you will select that option, a dialogue box called
Fountain Fill will be appeared. In
that dialogue box there will be seen a drop-down menu called
Type containing different types of
gradient including,
Linear, Radial, Conical and Square. Out
of those types select none other than
Linear , set
the
Angle of it equal to
0o and
Edge Pad equal to
0%. Further, in the same dialogue box there will be seen two radio
buttons named
Two Color and
Custom under the head of
Color Blend . By default, you will find the radio button named
Two Color selected in that dialogue box
with all it’s setting options visible beneath the two radio buttons when you
will open it by selecting
Fountain Fill
out of the options given in the
Fill
Tool Menu.
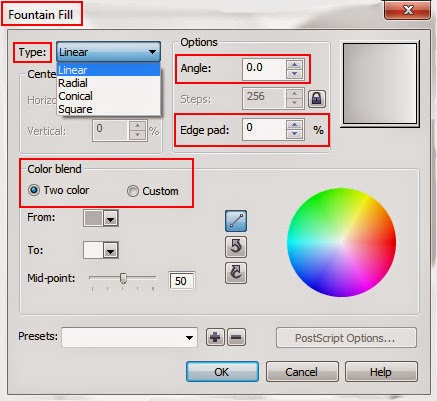 |
| Type, Angle, Edge pad and Color blend in the dialogue box called Fountain Fill |
As here the radio button named
Custom is supposed to be selected, so select it by clicking on it. As soon as you
will select that button, the setting options of
Two Color will be replaced by the setting options of
Custom including a Color Palette, a
rectangular shape with two tiny squares at the top-right and top-left corners
of it ,an inactive box named
Position and
a drop-down menu called
Preset.
You will notice that
the tiny square at the top-left corner
of rectangular shape will be black (or selected) by default indicating the selected left part of the shape. It means that any color can be filled in that part of the shape with a single
left mouse click on any color given in the Color Palette. As black color is supposed to be filled in
that part of the shape, select the thumbnail representing black color in the
color palette with left mouse click. As soon as you will do so, black color
will be filled inside the left part of the shape.
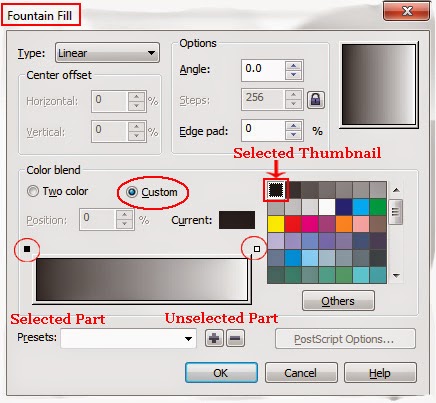 |
| Radio button named Custom under the head of Color blend |
Then, select the
square at the top-right corner of the shape by clicking on it to have the right part of the shape selected, then fill black color
in that part of the shape too by selecting the thumbnail representing black
color in the Color Palette with left mouse click again. As soon as you will do so black color will be
filled inside the right part of the shape too, and the shape will become
totally dark black.
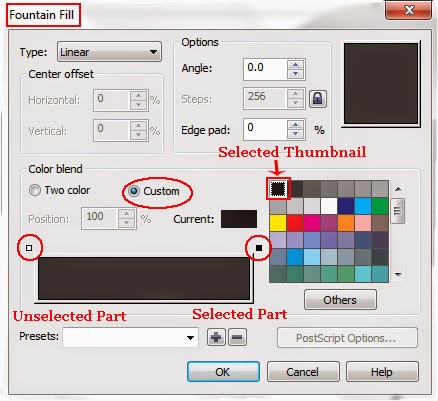 |
| Black color has been filled inside the right part of the shape |
After that put the pointer of your mouse anywhere on that dark black rectangle and hit the left button of your mouse twice. As soon as you will do so, a
slide will be appeared right above the totally black rectangular shape with a
small black arrow pointing toward the selected part of the shape and the formerly inactive option called
Position (showing the position of black
arrow
) will be activated. Set the
position of black arrow equal to
50 in
the box called
Position and select the
thumbnail representing white color in the Color Palette with left mouse click to fill white color in the middle of the shape.
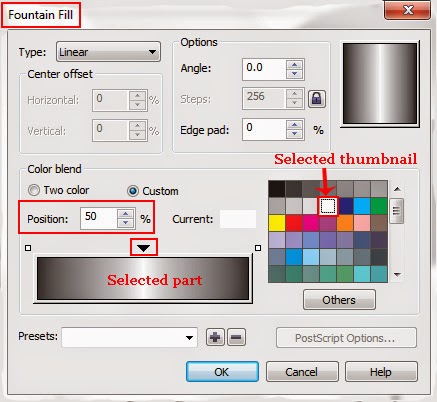 |
| Whit fill in the middle of the shape |
After that,
click
OK to apply this setting on
the selected circle on the document. As soon as you will click
OK, the setting in the dialogue box
called
Fountain Fill will be applied
on the selected circle.
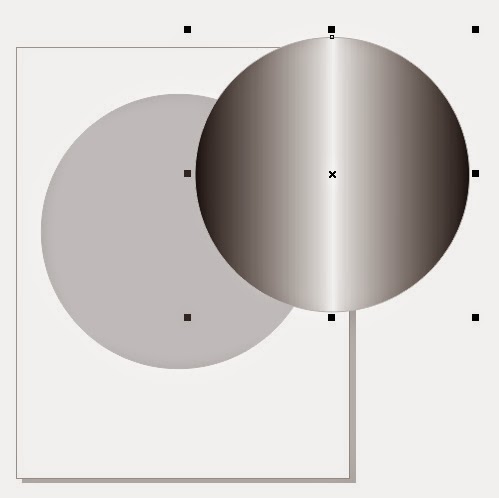 |
| Two circles on the document |
After that, select both the circles on the document by
hitting
CTRL + A and then, in order to put both the
circles on the same place, get inside the
Arrange Menu and select the option
Align and Distribute. As soon as you
will select that option , it’s side menu will be appeared containing a few more
options including
Align Centers
Vertically and
Align Centers Horizontally . Select
Align
Centers Vertically or hit
C on
the keyboard to align the centers of both the circles vertically on the
document and then select
Align Centers
Horizontally or hit
E on the
keyboard to align the centers of both the circles horizontally on the document.
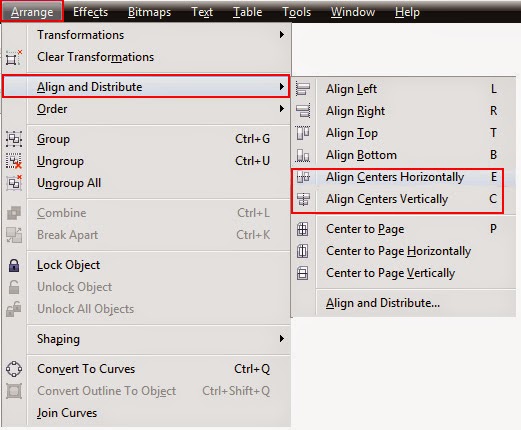 |
| Side menu of the option Align and Distribute in the Arrange Menu |
Having done so, you will have both the circles on the document nicely placed on
the same spot and the grey circle totally hidden behind the black one.
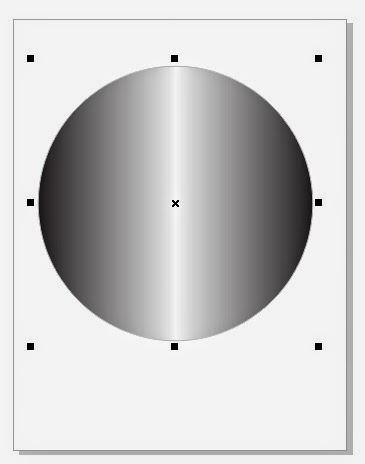 |
| Circle that has hidden the other circle on the document |
After
that, select
Rectangle Tool out of the Tool Box by clicking on it or by hitting
F6 on the keyboard.
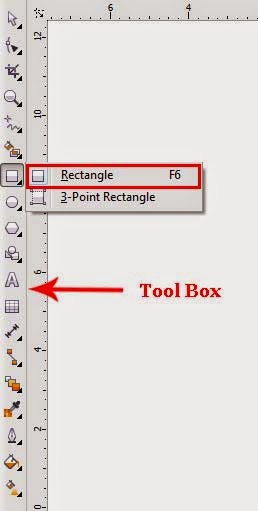 |
| Rectangle Tool in the menu |
As soon as
you will select that tool, pointer of your mouse will assume the shape of a plus
sign ( + ) with a small rectangular shape at
the bottom-right of it. Then, draw a large rectangle anywhere on the
document by dragging your mouse and
keeping it’s left button pressed and with the help of
Pick Tool put that newly made rectangle on the half upper part of
the circle. Then, holding down the
Shift
Key on the keyboard, click the left button of your mouse on the rectangle and on the black and white shaded
circle one by one to have both of these selected at the same time (don’t hit
CTRL +A because we don’t want to select
the hidden light grey circle). As soon as the rectangle and the black circle will be selected, shaping options including
Weld, Trim, Intersect, Simplify, Front minus back, Back minus front and
Create boundary will be appeared on the Property Bar. Out of those shaping options, select
Trim to have the half upper part of the black circle nicely trimmed off.
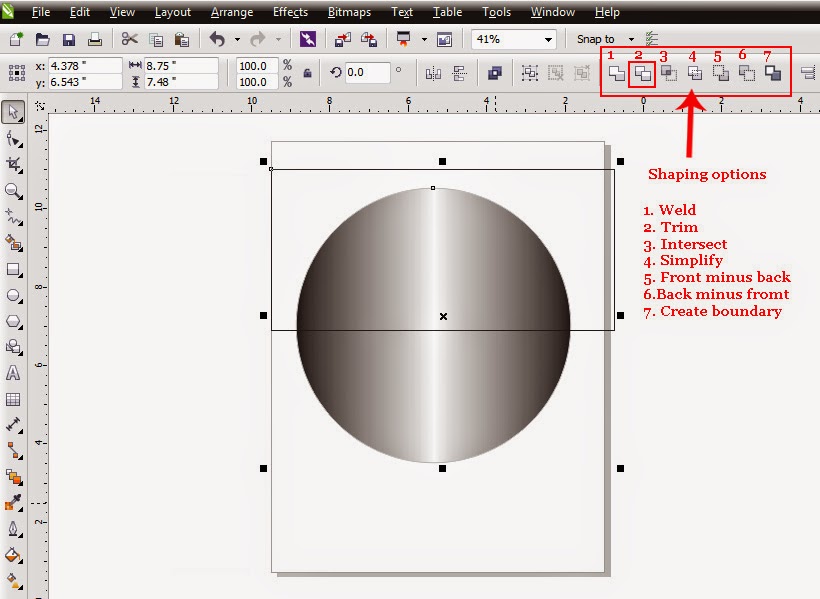 |
| Shaping options in the Property Bar |
As soon as , you will select
that option the half upper part of the black circle will be disappeared and the formerly hidden half upper part of
the grey circle will become clearly visible. Then select the rectangle with the help of
Pick Tool and delete it either by getting inside the
Edit Menu and selecting
the option
Delete or by hitting the
key named
delete on the keyboard. After
that, select both the shapes (a full circle and a half circle) on the document
by hitting
CTRL + A and group them
together either by getting inside the
Arrange
Menu and selecting the option
Group, or by hitting
CTRL + G on
the keyboard.
Then, select the
Ellipse
Tool again out of the Tool Box and draw an ellipse shape again on the
document by dragging your mouse and keeping the left button of it pressed as I have explained earlier.
Having drawn the ellipse shape, select it with the help of
Pick Tool and set it’s width and height equals
6.0 on the Property Bar and hit
Enter. As soon as you will hit the
Enter Key the selected shape will assume the same width and height.
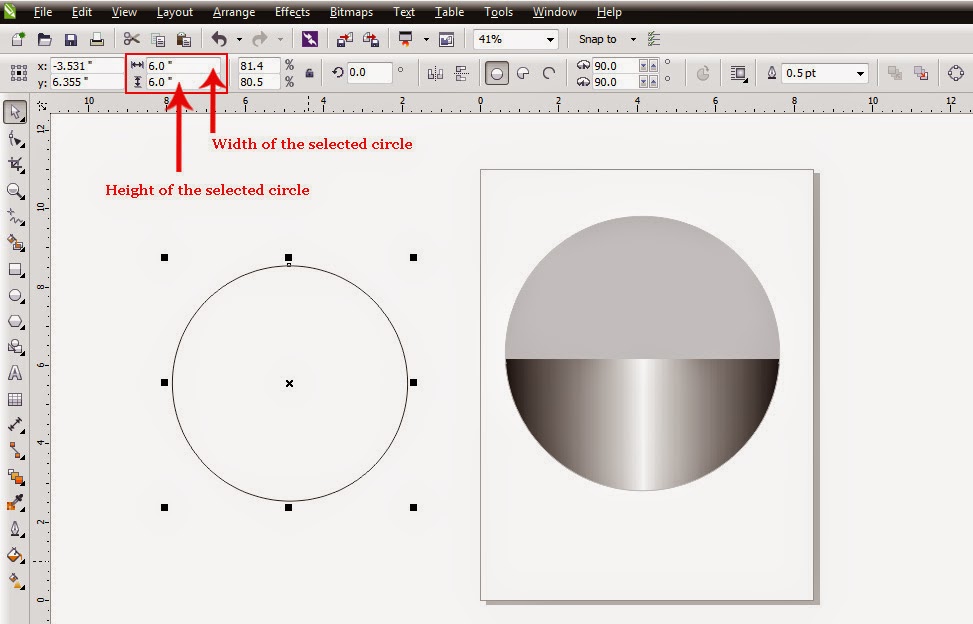 |
| Newly made circle |
Then once again select the option named
Fountain
Fill given in the menu of
Fill Tool or hit
F11 on the keyboard to open
a dialogue box named
Fountain Fill
as I have explained earlier. Having opened that dialogue box, select
Radial out of the options given in the
drop-down menu called
Type, set the value equal to
35 in the box called
Edge pad, set the value equal to
-45 in
the box called
Horizontal and set the value equal to
35 in the box called
Vertical. After that click
OK to apply that setting on the newly drawn selected circle with
6.0 width and height.
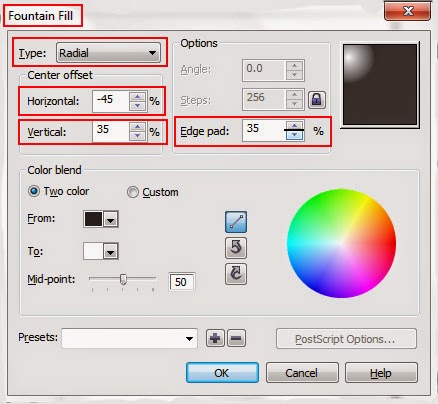 |
| Type, Center offset and Edge pad in the dialogue box called Fountain Fill |
Then select all
the shapes on the document including previously made group of two shapes and the newly drawn
circle by hitting
CTRL +A and then
hit
C and
E respectively on the keyboard to place the central points of all
the shapes on the document at the same spot.
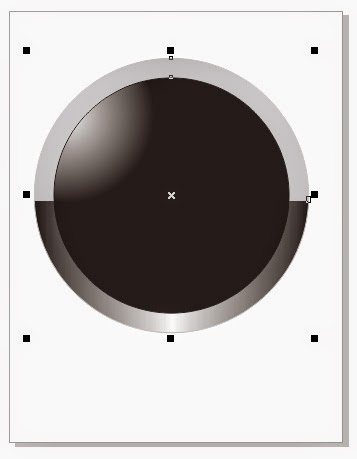 |
| New mad circle placed on the previously made group |
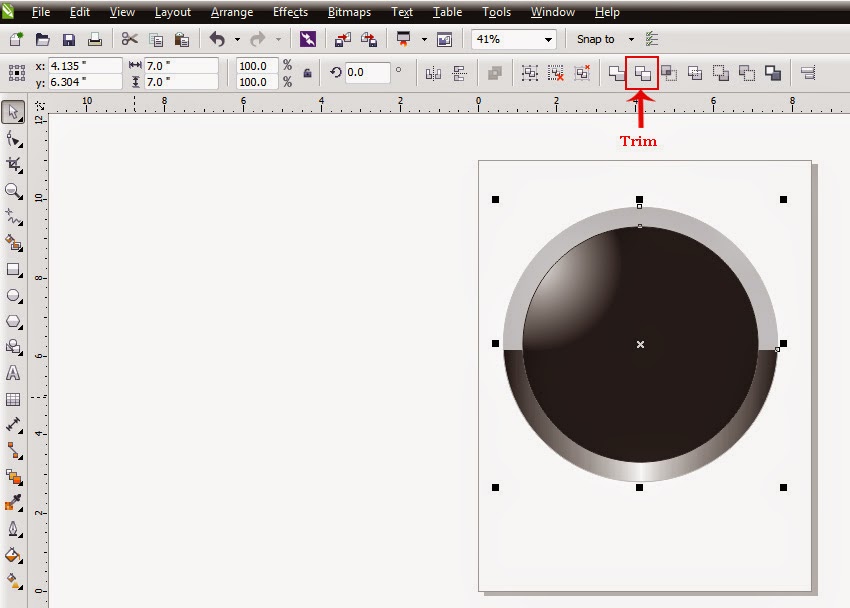
After that, select all the shapes
on the page again by hitting
CTRL +A. As soon as you will hit
CTRL + A, shaping options will again be appeared
on the Property Bar. Out of those, select the option called
Trim again to have the
hidden part of the group behind the black circle nicely trimmed off.
 |
| Parts of two or more than two grouped shapes can also be trimmed |
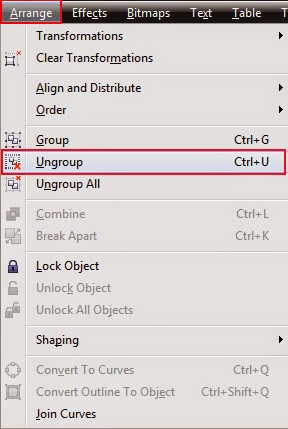
Having
trimmed the hidden part of the group, select that group with the help of
Pick
Tool and ungroup both the objects in that group by getting inside the
Arrange Menu and selecting the option
called
Ungroup.
 |
| Option called Ungroup in the Arrange Menu |
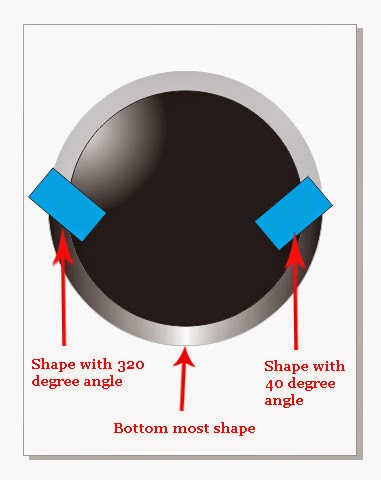
Having ungrouped both the shapes, select
Rectangle Tool out of the Tool Box and draw a small rectangle anywhere on the
document and to make it clearly visible, fill any bright color in it by
selecting any thumbnail in the color palette with left mouse click . Then set the
Angle of
Rotation for that rectangle equal to
40o
by typing the value in the box and hitting the
Enter Key on the keyboard as I have explained in the previous post
CorelDraw Tutorial: Logo of Microsoft Windows XP . Then with the help of
Pick Tool put that
rectangle on the top right corner of the bottom most shape on the document so
that it could hide some part of the shape. Then , make a duplicate of it either
by getting inside the
Edit Menu and
selecting the option
Duplicate or by
hitting
CTRL + D on the keyboard. Then
select that duplicate shape with the help of
Pick Tool and set the
Angle of
Rotation for that duplicate shape equal to
320o in the Property Bar by typing the value in the relevant box and hitting the
Enter Key. Having set the
Angle of Rotation for the duplicate
shape, put it on the top left corner of the bottom most shape on the document
so that it could hide some part of it.
 |
| Rectangles on the right place |
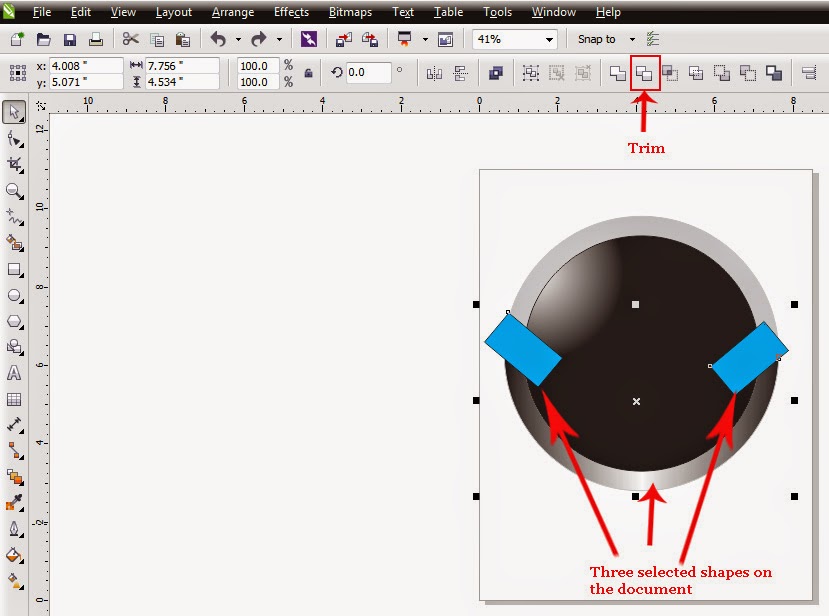
Then, select both the newly made bright colored rectangles and the bottom
most shape with the help of
Pick Tool by clicking on each shape one by one and
keeping the
Shift Key on the keyboard pressed. As soon as you will have all the
three shapes on the document selected, shaping options will again be appeared
on the Property Bar. Out of those options select the option called
Trim again
to have the hidden part of the bottom most shape (behind the two bright colored
rectangles) nicely trimmed off.
 |
| Corners of bottom most shape ready to be trimmed |
As soon as you will select the option
Trim,
parts of the bottom most shape hidden behind the two rectangles will be trimmed
off. Then select and delete both the rectangles one by one by selecting the
option
Delete given in the
Edit Menu
or by hitting
delete on the key board.
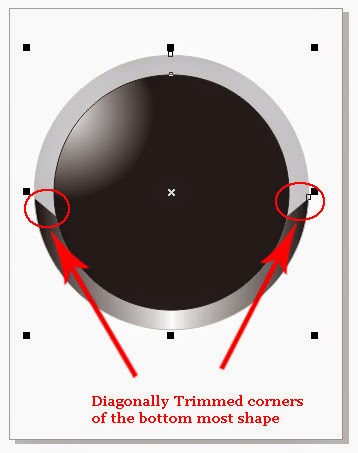 |
| Corners of the bottom most shape after the deletion of rectangls |
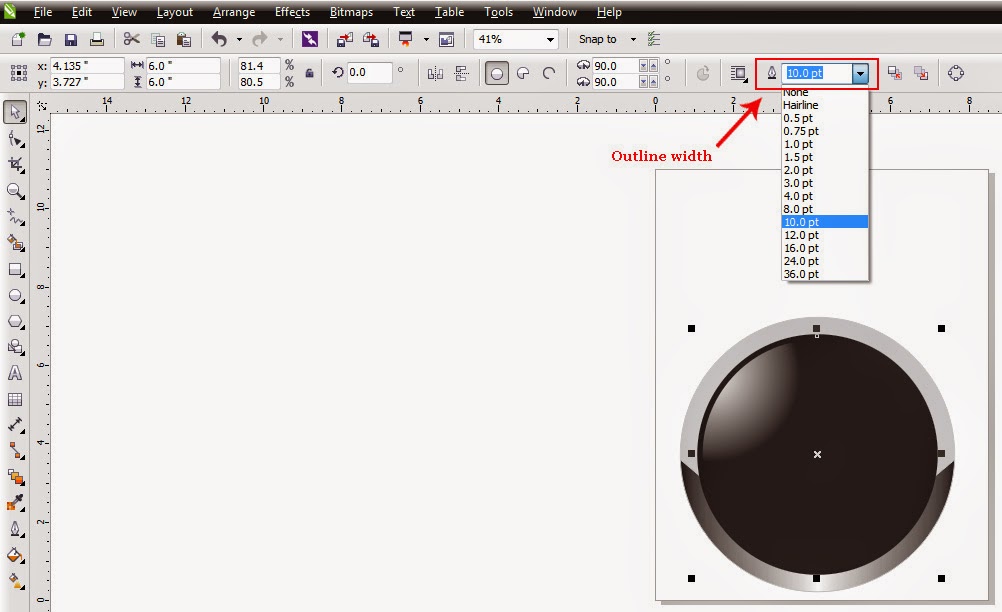
Then select the black circle with the
help of
Pick Tool and set the width of
it’s outline equal to
10.0 pt in the Property Bar.
 |
| Option referred as Outline width in the Property Bar |
After that, select all the
shapes on the document by hitting
CTRL + A and grouped them together by
hitting
CTRL + G. Then , select
Rectangle Tool out of the Tool
Box and draw a rectangular shape anywhere on the document by dragging your
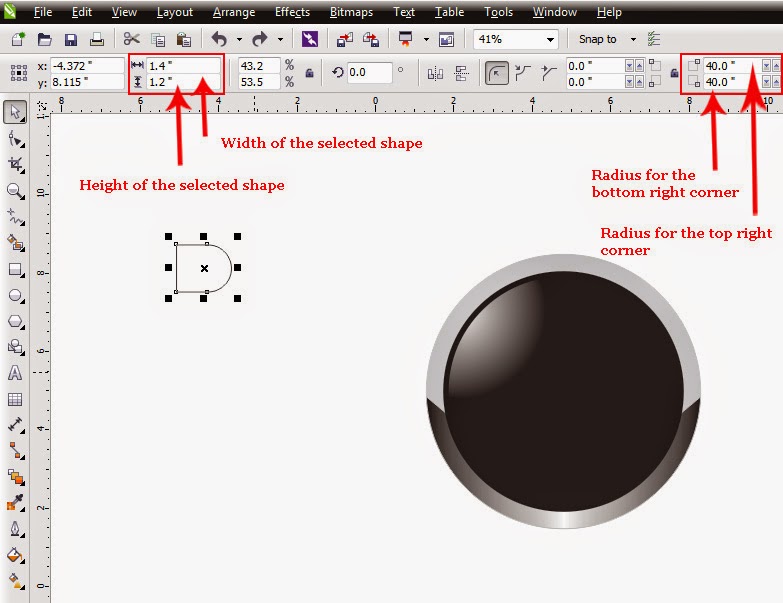
mouse and keeping it’s left button pressed. Then select that rectangle with the
help of
Pick Tool and set it’s width
equal to
1.4, it’s height equal to and
1.2 and the
Radius of the top-right
and bottom-right corners of the same shape equal to
40.0 by typing the values in the relevant boxes in the Property Bar and hitting the
Enter Key on the keyboard.
 |
| Width, height and Corner Radius for the selected shape |
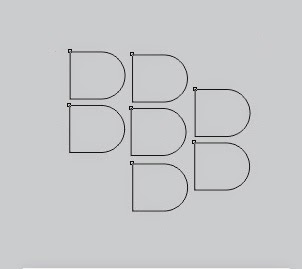
After
that, make six duplicates of that shape by hitting
CTRL + D six times on the keyboard. Then place those duplicates
beside each other with the help of
Pick
Tool according to the picture below.
 |
| Right place for each shape |
After that, select all these shapes by
clicking on each one by one and holding
down the
Shift key on the keyboard
and group them together either by hitting
CTRL
+ G on the keyboard or by getting inside the
Arrange Menu and selecting the option
Group. Having made a group
of all the shapes put the pointer of your mouse on that group and hit the left
button of it twice. As soon as you will do so, that group will be encircled by
a few small black double sided arrows. Then put the pointer of your mouse right
beneath the arrow that can be seen at the bottom of the group.
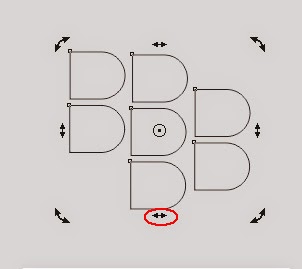 |
| Double sided black arrows around the group |
As soon as you
will put the pointer right beneath that arrow, the pointer itself will be turned into a
double sided arrow. Then drag your mouse horizontally toward the left side
keeping the left button of it pressed to render that group a slightly diagonal
look.
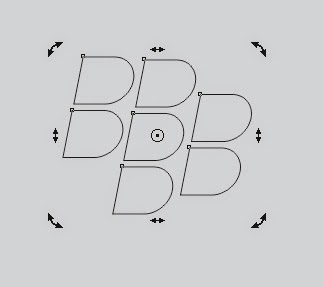 |
| Grouped shapes after the horizontal mouse drag toward the left side. |
Then, fill light grey color inside the selected by selecting the thumbnail representing light grey
color in the Color Palette with left mouse click.
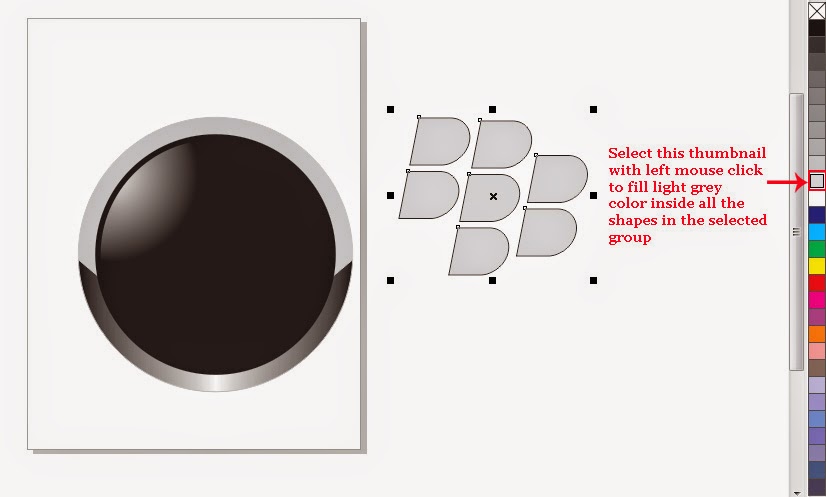 |
| Grey fill in all the shapes of the selected group |
After
that , select both the groups on the
document by hitting
CTRL + A and then align the centers of both the groups
vertically and horizontally by hitting
C
and
E respectively on the keyboard .
 |
| Two groups with horizontally and vertically aligned centers |
After that,
select the
Text Tool out of the Tool Box by clicking on it or by hitting
F8 on the keyboard.
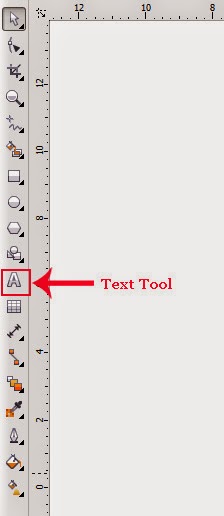 |
| Text Tool in the Tool Box |
As soon as you will
select that tool, pointer of your mouse will assume the shape of a plus sign( + ) with letter A at the bottom-right of it. Then put that plus sign shaped pointer of your mouse at the
right side of the logo and type the phrase
‘Blackberry World’ there. Then select
that phrase with the help of
Pick Tool
to have it’s properties in the Property Bar to be altered .Having selected the recently typed text, out of the options
given in the drop-down menu called
Font-List
select
Arial as
Typeface for
the selected text and out of the options given in the drop down-menu called
Font-Size , select
150 pt. Then with the help of
Pick Tool, put that selected text at
the right side of the logo.
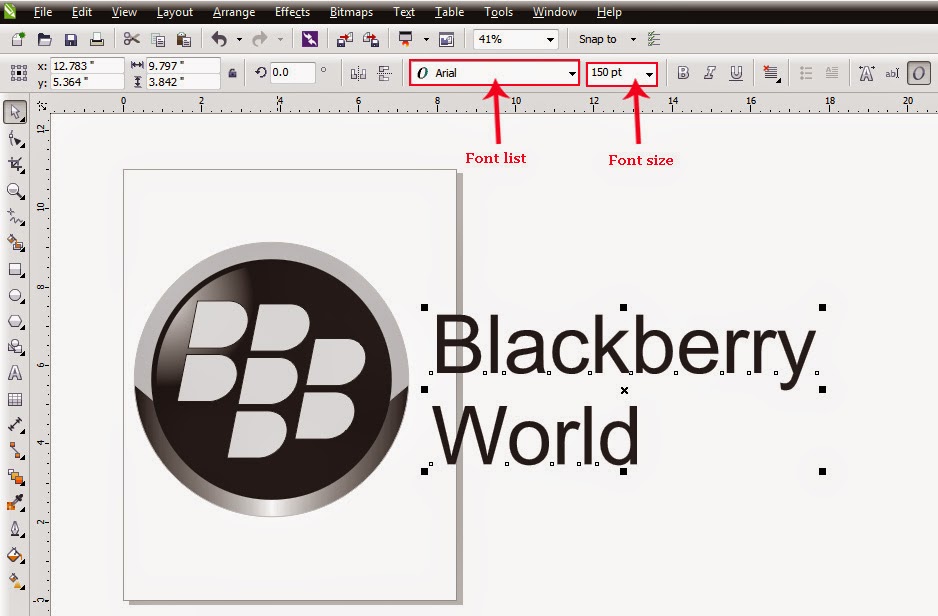 |
| Font Size and Font List in the Property Bar |
Then select all the objects including the logo and the text by hitting
CTRL + A and grouped them together by hitting
CTRL + G. Then, the logo of
Blackberry
World will be ready to be saved, so save it in CDR format either by getting
inside the
File Menu and selecting
the option
Save or by hitting
CTRL +S . If you want to save the same
image in any format other than CDR, so
again get inside the
File Menu and
select the option
Export or hit
CTRL + E on the keyboard. Having saved the logo in your required format, you can use it anywhere you like by putting any suitable background behind it.
I hope you will find
this post helpful so have fun with logo designing in CorelDrarw X6, but in case
of any question, suggestion or complain, kindly don’t forget to subscribe your
comment.


