How to set the default font in Microsoft Word?

While typing text on Microsoft Word, the font style that we find automatically applied on our document is called default font . In Microsoft Word we usually find Calibri (Body) as default font face and 11pt as default font size. At the same time, we don’t find any attribute e.g. Bold, Italic and Underline, or any effect e.g. Strikethrough, Subscript, Superscript etc., applied on the font by default. Usually most of us feel nothing wrong with the font that Microsoft has set for us as default font and we can prepare documents of our choice with remarkable ease without making any change in it. But in case of any exception, it  possible to change the default font quiet easily. 

changing-of-default-font-in-ms-word
It is not very difficult to make changes in the default font 

In order to change the default font,  first of all you need to open the dialogue box named Font. To open that dialogue box all you need to do is to hit CTRL + D on the keyboard or to  click the small arrow that can be seen on the bottom-right of the pan named Font in the Home tab of Microsoft Word.
opening-of-the-font-dialogue-box-called-font
To open the dialogue box named Font, click the small arrow that can be seen on the bottom-right corner of  Font pan

 In the dialogue box named Font, there can be seen two tabs referred as Font and Character Spacing


Font-dialogue-box
Dialogue box that is going to be used for new default font setting

Font

In case, you switch on the first tab named Font in the dialogue box, there will be seen the following options.

Font

Out of the various options given in the box named Font, you can select any font face of your choice as default font face e.g. you can select Arial Black or Impact or Georgia as default font face instead of Calibri (Body).

Font Style

Out of the options given in this box, you can select any style for your font as default font style (e.g. Regular, Bold, Italic and Bold-Italic etc).

Size

In this box you can find various font sizes e.g. 10pt, 12pt and 20pt etc. Out of these sizes you can select any size as default font size instead of traditional 11pt.

Font Color

Here you can select any color e.g. red or green or blue as default font color instead of Automatic.

Underline Style

If you want to have your font to be underlined  by default , you can select any style  out of the various options given in the drop down menu named  Underline Style.

Underline Color

Whenever you select any Underline Style for new default font, Microsoft Word provides another option named Underline Color to select the color in which the default font is supposed to be underlined.

Effects


Under the head of Effects there can be seen a good number of check boxes in the same dialogue box. Each check box represents a unique effect that can be applied on default font.  You can put checks inside as many check boxes as you like at the same time. For instance you can put checks inside the check boxes named Strikethrough, Engraved and Shadow at the same time to apply all these effects on the default font simultaneously.

Character Spacing


Using the same dialogue box you can set the character spacing for the default font too. For that purpose you need to switch on the tab named Character Spacing first. In that tab you will find the following options:

Scaling

This option is used to increase or decrease the width of characters. Though the normal width for characters is considered to be 100%, but by setting the value of Scaling  more or less than 100%, you can increase or decrease the width of characters.

Spacing


Through this option, you can expand or condense the space between characters. Inside the drop-down menu named Spacing, there can be seen three options referred as Normal, Expanded and Condensed. 

  • By selecting the option Normal, you can keep the space between characters perfectly normal. 
  • By selecting the option Expanded, you can expand or increase the space between the characters.
  •  By selecting the option Condensed, you can condense or decrease the space between the characters.
Note : By entering any value inside that box named By that can be seen beside the drop down menu named Spacing, you can tell Microsoft Word that to which extent you want to expand or condense the space between the characters.

Position

This option is used to determine the position of default font.  The drop-down menu named Position contains three options referred as Normal, Raised and Lower.

  • The option named Normal is supposed to be selected when you want to keep your default font on it’s normal position. 
  • The option named Raised (above the text baseline) is supposed to be selected when you want to raise your default font from it’s normal position (text baseline). 
  • The option named Lower is supposed to be selected when you want to lower your default font from its normal position (text baseline).
Note : Beside the drop-down menu called Position, there can be seen a box named By. By entering any value in that box you can tell Microsoft Word that to which extent you want of raise or lower the default font from its normal position.

Kerning for fonts

By putting check inside this check box you can order Microsoft Word to adjust automatically the character spacing for specific combinations of letters.

Having done the required setting of all these option, if you hit the button named Default given in the same dialogue box, that setting will be applied on your default font. For instance the setting you can see in  the images given below.

setting-one
Setting of font face, font style, font color, underline style, underline color and effects

setting-two
Setting of Scale value, Spacing and Position

changed-default-font
Default font after applying the new setting
That is all about the changing of default font in Microsoft Office Word. I am sure this post will be proved helpful for all the students of Information Technology, if you find it so, kindly don't forget to subscribe your comments.

Subscripts and Superscripts in Microsoft Word


Microsoft word is a software program that provides various useful ways to type and manipulate text and to prepare various sorts of documents  with remarkable ease.  As it is impossible to cover all the topics related to this highly useful software program in a single post, so I have decided to explain only one topic today and at the same time, I intend to save rest of the topics for my oncoming posts.

As most of us are fully aware of the fact that each subject has its own specific language that is supposed to be written or typed in a specific way. For instance, the formulas of Chemistry and Algebra are always written or typed in a specific way. Microsoft Word helps us to type these formulas in a proper way by offering two very useful commands named Subscript and  Superscript.

subscript-superscript
Subscript and Superscript are two very useful commands introduced by Microsoft Word
Inside the Home tab of Microsoft Word there can be seen a few pans e.g. Clipboard, Font, Paragraph, Style and Editing. Each pan contains a few options to manipulate the  text typed on the document of Microsoft Word.  If you look inside the pan named Font, there will be seen two small tabs side by side displaying the symbols X2 and X2
part-of-home-tab-of-ms-word
Options referred as Subscript and Superscript in  Home tab of Microsoft Word

Symbol  X2 represents the option referred as Subscript while the symbol X2 represents the option referred as Superscript.

Subscript


This option is used to make the text typed on the document of Microsoft Word, smaller below the text baseline. By using this option, you can type different Chemistry formulas in a proper way without any mistake and confusion. For instance, if you type the formula of water (H2O) without applying the feature called Subscript upon the digit 2 , the formula (H2O) will not be considered as much accurate as the first one. There are a few more examples given below in the table:

Proper Way
Not so Proper Way
H2O
H2O
NH4CL
NH4Cl
CO2
CO2
O2
O2
SO2
SO2
C2H4O
C2H4O

In order to apply the option Subscript upon  the typed text all you need to do is to select the text and then to click upon the tab displaying the symbol X2 prominently upon it (representing the feature Subscript) in the pan named Font. Further, in order to apply the feature Subscript upon the typed text you can use the short cut keys CTRL + = too.

Superscript

Superscript and Subscript are considered to be the opposites of each other. Unlike Subscript, Superscript is used to make the selected text smaller above the line of text. By using this option you can type different formulas of Algebra in a perfectly correct way. As a matter of fact, if you ignore the use of Superscript while typing the different Algebraic formulas, those formulas will never ever be accepted as correct formulas. For instance a2b can never ever be considered an equivalent of  a2b simply because:
a2b = a * b + b    While     a2b = a * a * b


In order to apply the feature named Superscript upon the typed text,  all you need to do is to click the tab named Superscript  inside the  pan named Font just once after selecting the required text, or you can hit CTRL + Shift + + too to apply this feature on the selected text.

I am sure all my readers will find this post helpful, if so, kindly let me aware of that by subscribing your comments.

Magic Wand Tool : Selects the Pixels of Same Color

Magic Wand Tool is one of the most popular and useful selection tools of Photoshop. This tool is used to select the same colored area inside the image within an instant by a single click. 

magic-wand-tool-of-adobe-photoshop
Magic Wand : An easy to use selection tool

This tool can be seen in the Tool Panel right beneath the Move Tool.  In order to select that tool you can not only click on that tool in the tool panel but you can also hit W on the keyboard.

magic-wand-tool-in-the-tool-panel
Magic Wand Tool can be selected by hitting W on the keyboard

Whenever you select Magic Wand Tool, pointer of your mouse assumes the shape of the icon that represents Magic Wand Tool in the Tool Panel and setting options for the same tool appear instantly in the option bar. These options are consist of different selection types or modes( e.g. New Selection, Add to Selection, Subtract from Selection and Intersect with Selection),  Tolerance, Anti-aliased, Contagious, and Use All Layers.

option-setting-of-magic-wand
 Selection types, Tolerance, Anti-aliased, Contiguous and Use All Layer

Types or Modes of Selection

New Selection

Whenever this mode is on, you cannot apply Magic Wand Tool on the same image twice and whenever you make a new selection after making the first one, the first selection gets removed all by itself.

Add to Selection

When this mode is on, you can make selection on the same image two or more than two times quiet easily. With this mode selected, Photoshop doesn't remove the first selection when you make the second one.

Subtract from Selection

This mode is used only when you want to deselect only some part of the selected area but not the entire selection at the same time.

Intersect with Selection

This mode  selects the combine or intersecting parts of the two selected areas.

Tolerance

This option is used to increase or decrease the range of selection made by the Magic Wand Tool. For instance if you set the value of Tolerance equal to 0 and click on white  (#FFFFFF) color , Magic  Wand Tool will select all the pixels of exactly the same color in the image and it will not include the pixels of any color in the selection other than the ones containing pure white (#FFFFFF) color . But if you set some higher Tolerance value e.g. 10, you will notice that the Magic Wand Tool will increase it’s selection range and it will include the pixels with colors similar to white in the selection rang along with the pure white pixels.

Anti-aliased

We always put check inside the check box named Anti-aliased when we want smooth edges of the selected area.

Contagious

We always put check inside the check box named Contagious when we want to select only those areas of the image which are joined together.

Use All Layers

We put check inside the check box named Use All Layers when we want to apply the Magic Wand Tool on all the layers of the document at the same time.

This is all about the Magic Wand Tool of Photoshop. I am certain, this post will be proved helpful to all my readers, if so, kindly let me aware of that by subscribing your comment.


Functionality of Check Spelling in Photoshop

While working with Photoshop whenever we type some text on the document, Photoshop provides a tool to correct spelling mistakes. This tool is found in the Edit Menu of  Photoshop and referred as Check Spelling.

title-image-check-spelling
Prepare a document with no spelling mistake

How to correct spelling mistakes in Photoshop using the command Check Spelling?


In order to understand the correct use of the tool referred as Check Spelling, follow the instructions given below:
Create a new Photoshop document with RGB Color Mode and White Content specified.

document-with-no-image-or-text
Photoshop document with RGB Color Mode and White Content
 Then select the Text Tool or Type Tool either by clicking on it in the Tool Box or by hitting T on the keyboard. 

text-tool-in-the-tool-panel
Select Text Tool to type some text on the document
As soon as you will do so, pointer of your mouse will assume the shape of letter T encircled by a dotted rectangular shape. Further, setting options for the selected tool including Font Family, Font Style, Font Size, Color and Alignment etc  will be appeared in the option bar. Though using these options, you can render different styles to typed text but as our current topic is not concerning different styles of text  so you can leave all these options set to default according to the picture below.

courier-medium-12pt-text
Option bar for the Type Tool
Then put the pointer on the left side of the canvas and hit the left button of your mouse once. As soon as you will do so, a new layer will be added in the document and a thumbnail representing that newly added layer will be  appeared in the layer palette with a prominent letter T clearly visible on it, and at the same time, cursor will start to blink on the canvas.
Then type some text there and make some spelling mistakes deliberately. For instance the sentences given below.

Sara is viry happy today.
Sadaf was working viry hard.
People of Englond speak English.
Sadaf  looves apples.
Mother is going to Markit.
Mary plays with dooll.
This pictare is viry viry nice.

text-with-a-host-of-spelling-mistakes
Typed text on the document
After that, get inside the Edit Menu and select the option named Check Spelling.

edit-check-spelling-tool
Option referred as Check Spelling given inside the Edit Menu
 As soon as you will select that option, a dialogue box named Check Spelling will be appeared and the first word with wrong spelling typed on the Photoshop document will be highlighted all by itself according to the picture below.

dialogue-box-named-check-spelling
Suggestion Pan in the dialogue box named Check Spelling contains various alternates of the selected word
 In the newly appeared dialogue box named Check Spelling you can find different suggestions to correct the spelling of the highlighted word. Select the word with correct spelling out of the different choices given in the Suggestion Pan and hit the button named Change given in the same dialogue box right beside the Suggestion Pan. As soon as you will hit the button named Change, the selected word will be replaced by the word with wrong spelling and the next word with wrong spelling will be highlighted all by itself according to the picture below.

England-is-the-next-word-with-wrong-spelling
Spelling of different words are being corrected
Then again select the word with correct spelling from the Suggestion Pan and hit the button named Change. In case, you  don't want to make correction in the spelling of any highlighted word e.g.some non-English proper name (Sadaf in this example), the button named Ignore is supposed to be clicked instead of Change. Further in the same dialogue box there can be seen two more buttons referred as Ignore All and Change All. If you have typed a word completely anonymous for English language (Sadaf in this example) two or more than two times on the Photoshop document and you don’t want Photoshop to suggest alternatives for that word again and again, you should hit the button named Ignore All instead of Ignore to tell Photoshop that you are completely satisfied with the spelling of that word and you don’t want of make any change in the spelling of it. On the other hand, if you have typed a word many times on the same document and you have made the same spelling mistake every time (Viry in this example), you can make all the corrections within an instant by selecting the alternate for that word  out of the words suggested by Photoshop in the Suggestion Pan and hitting the button named Change All instead of Change. Further in the same dialogue box you can see another button named Add . You can use this button to add any word in the dictionary for your personal use. Whenever you add any word in the dictionary, Photoshop stops highlighting it as a mistake afterward. For instance in the above example you can add the the word Sadaf  in the dictionary and Photoshop will stop highlighting it as a word with spelling mistake.
That is how you can make correction in the spellings of different words typed on Photoshop document without wasting much time and prepare a document with no spelling mistake.

no-spelling-mistake
Spelling mistakes on the document have been corrected
I hope all my readers will find this post helpful. If so, kindly let me aware of that by subscribing your comments.

Purge (Histories) : Makes Photoshop run Faster

As I have explained in my earlier post­­­s that the command referred as Purge given inside the Edit Menu of Photoshop is used to delete corrupt files saved inside the computer’s memory holding the record of different commands applied on the currently opened Photoshop document. We usually ignore this command when Photoshop runs in its normal speed, but whenever during work we suddenly notice that the program has lost its usual speed and started to run sluggishly, we  can handle this situation and restore the normal speed of the program within a few seconds using nothing but the command named Purge. Whenever we put the pointer of our mouse on the option named  Purge given inside the Edit Menu, there is appeared it's sub menu containing a few options including Undo, Clipboard, Histories and All. In my previous posts Purge (Undo) : Makes Photoshop run FasterPurge (Clipboard) : Makes Photoshop run Faster I have explained the purposes of the options named Undo and Clipboard given inside the menu of Purge and today I am going to explain the third option  that is referred as Histories given inside the same menu.

Title-image-Purge-Histories
In order to restore normal speed of Photoshop you can use the option referred as Histories given inside the menu of Purge

Significance of  Histories in the menu of Purge


By selecting the option named Histories given inside menu of Purge, you can delete the record of all the variations made in the currently created or opened Photoshop document. That record can be seen in the History Palette. In order to understand how to delete the record of all the variations made on the currently opened or created Photoshop document follow the instructions given below:
First of all get inside the Window Menu and put check beside the option named Histories to have History Palette opened on the main Photoshop window.
select-Histories-inside-the Window-Menu
Option referred as Histories given inside the Window Menu
As soon as you will do so, there will be appeared History Palette usually on the right of the main Photoshop window. As you have neither created nor opened any file so far, History Palette will be perfectly empty at this stage according to the picture below.
Blank-History-Palette
History Palette shows nothing when you have no file opened on Photoshop
Having opened the History Palette, open an image file on Photoshop either by getting inside the File Menu and selecting the option named Open or by hitting CTRL + O on the keyboard.
Command-named-Open-in-the-File-Menu
File Menu of Adobe Photoshop containing various options
As soon as the image will be opened on Photoshop, there will be appeared a thumbnail in the formerly empty History Palette  representing the same image and right beneath that thumbnail there will be seen a small symbol showing the step of image opening according to the picture below.


Open-in-the-History-Palette
Small symbol in the History Palette showing the record about the opening of the image in Photoshop
Having opened the image on Photoshop, select the Crop Tool  by clicking on it in the tool panel or by hitting C on the keyboard.


Crop-Tool-in-the Tool-Panel
Crop Tool is being selected
As soon as you will select that tool, pointer of your mouse will assume the shape of the icon that represents Crop Tool in the tool panel and the setting options  for the selected tool including Width, Height and Resolution etc will be appeared in the option bar. Here at this point, you can leisurely ignore these setting options because you can achieve perfect result without even touching them. So leave all the boxes given inside the option bar completely blank according to the picture below.
Option-setting-is-unnecessary-for-Crop-Tool
You can leave all the boxes empty in the option bar for the Crop Tool
After that, put the pointer of your mouse anywhere on the image, keep the left button of it pressed and drag it in any specific direction to select the required part of the image which you want to keep intact in the form of a separate image according to the picture below.
Cropping-of-the-image-by-Crop-Tool
Image ready to be cropped
Having made the selection of the required part, hit Enter to have undesired (unselected) part of the image cropped off permanently. As soon as you will hit the Enter Key, undesired part of the image will be deleted permanently and another symbol indicating the step of cropping of the image will be appeared inside the History Palette right beneath the first symbol according to the picture below.


Open-and-Crop-in-the-History-Palette
Symbol named Crop has been appeared inside the History Palette
Then, get inside the Image Menu and select the option referred as Adjustment. As soon as you will select that option, there will be appeared another menu containing various sub options regarding the   image adjustment. Out of those options, select non other than Brightness/Contrast by clicking on it.
Brightness-Contrast-Adjustment
Brightness/Contrast is one of the many sub options of Adjustment 
As soon as you will select that option, there will be appeared a small dialogue box under the head of Brightness/Contrast. In that dialogue box,  put check inside the small check box referred as Preview and set the brightness and contrast for the image according to your wish or requirement (e.g. Brightness equal to 0 and Contrast equal to 35) according to the picture below.


small-dialogue-box-used-to-set-brightness-and-contrast
Put check inside the check box named Preview and set Brightness and Contrast for the image
After that, click the button named OK given in the same dialogue box. As soon as you will hit the button named OK, the recently done setting in the dialogue box named Brightness/Contrast will be applied permanently on the image and in the History Palette there will be appeared another symbol indicating the variation made in the brightness and contrast of the image according to the picture below.
Brightness/Contrast-symbol-in-the-History-Palette
Newly appeared symbol inside the History Palette is indicating the most recent variation made in the image
In the History Palette you can see the record of all  variations made in the image from it’s opening in Photoshop to the changes made in it by the use of dialogue box named Brightness/Contrast . In case, Photoshop starts to run sluggishly during further work, you can purge this record to restore its previous speed by getting inside the Edit Menu and selecting the option named Purge. As soon as you will select the option Purge given inside the Edit Menu, there will be appeared a side menu containing four options including Undo, Clipboard, Histories and All as I have explained earlier. As here you are supposed to purge the record regarding Histories, so select the option named Histories by clicking on it. 
Purge-the-record-regarding-Histories
Sub options of the command named Purge including Histories
As soon as you will select the option referred as Histories given inside the menu of Purge, there will be appeared a small dialogue box named Adobe Photoshop. In that dialogue box there will be seen nothing but a question “This cannot be undone. Continue ?” and two buttons named OK and Cancel. All you need to do here is to hit the button named OK to purge Histories.


Hit-the-button
Click OK to purge Histories
As soon as you will hit that button , the dialogue box named Adobe Photoshop will be vanished from the sight along with the record of different variations made in the document from the History Palette save from the last one (in this case the record of Brightness/Contrast) according to the picture below. 
History-Palette-after-the-use-of-the-command-Purge-History
Record regarding histories has been purged 
So that is how you can purge Histories to make Photoshop run faster. I hope this post will be proved helpful to all my readers. If you want to put forward any question, complain or suggestion for further improvement kindly don't forget to subscribe your comments.

Purge (Clipboard) : Makes Photoshop run Faster

As I have explained in my previous post that whenever we work on Photoshop and apply different commands on our document, Photoshop keeps the complete record of all those commands in the form of separate files in computer’s memory. When those files get corrupted for some reason or the other, Photoshop starts to run sluggishly. In order to restore its previous speed, all we need to do is to delete those corrupted files out of computer’s memory. In order to delete those files, we are supposed to get inside the Edit Menu of Photoshop and select the option named Purge given there. As soon as the option referred as Purge is selected, there is appeared a menu containing four different commands named Undo, Clipboard, Histories and All. Of course, all the commands given inside the menu of Purge are used to delete different sort of corrupted files. In my previous post Purge (Undo): Makes Photoshop run faster I have explained the functionality of the command named Undo given inside the menu of Purge. Today I have decided to explain the functionality of the command referred as Clipboard given inside the same menu.

Edit-Purge-Clipboard
Purge Clipboard and make Photoshop run faster

Significance of the command named Clipboard given inside the menu of Purge

Clipboard is basically a part of computer's memory that holds the  record of the commands referred as Cut, Copy and Copy Merged. That is precisely why, these commands are also known as clipboard options. By selecting the option named Clipboard given inside the  menu of Purge you can delete all the files holding the record of the commands (Cut, Copy, and Copy Merge) which cause the option referred as Paste available inside the Edit Menu. In order to understand the functionality of this option you can follow the tips given below.

Purge the record of the command named Cut


First of all open an image file on Photoshop either by getting inside the File Menu and selecting the option named Open or by hitting CTRL + O on the keyboard.

Flower-basket-image
Flower basket image opened in Photoshop
 After opening the image file in Photoshop, make the complete selection of it by hitting CTRL + A on the keyboard. Having made the complete selection of the image, get inside the Edit Menu  and select the option referred as Cut or hit CTRL + X on the keyboard.

Edit-Menu-and-Cut-command
Select the option referred as Cut given inside the Edit Menu
As soon as you will do so, the image will be vanished from the canvas and there will be left a canvas filled with Background Color  inside it’s sole locked layer according the picture below.

Canvas-with-no-image
After applying the command Cut there is left no image on the canvas
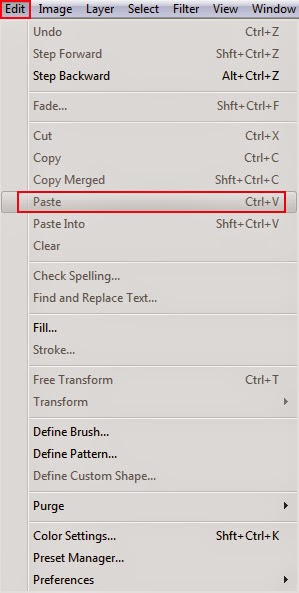
After that, if you get inside the Edit Menu again, you will find the command named Paste available there and ready to be applied anywhere because you have not purged the record regarding the clipboard commands (Cut, Copy and Copy Merged) so far.

Paste-command-inside-Edit-Menu
Paste command is available inside the Edit Menu as the Clipboard has not been purged so far
 In order to purge that record you are supposed to click the option named Purge given inside the Edit Menu to find it’s sub options referred as Undo, Clipboard, Histories and All. Out of those options select Clipboard by clicking on it.  

Edit-menu-Purge-Clipboard
Option referred as Clipboard inside the menu of Purge
As soon as you will select that option, a small dialogue box will be appeared named Photoshop with a one lined massage “This cannot be undone. Continue?” All you need to do here is to click the button named OK given in the same dialogue box.

This-cannot-be-undone-Continue
Dialogue box referred as adobe  Photoshop
As soon as you will hit the button named OK, the file holding the record regarding the Clipboard option named Cut will be deleted. Then, if you get inside the Edit Menu again, you will find the Paste command unavailable, simply because after purging the record of Cut, there will be left nothing to be pasted.
you-cannot-paste-anything
Paste Command  no longer available inside the Edit Menu

Purge the record of the command named Copy


Open an image file on Photoshop, select it by hitting CTRL + A on the keyboard and copy it either by getting inside the Edit Menu and selecting the option referred as Copy or by hitting CTRL + C on the keyboard.

Copy-command-inside-the-edit-menu
Option referred as Copy given inside the Edit Menu
After copying the image, if you get inside the Edit Menu again, you will find the option referred as Paste available there because you have the copied image saved inside the part of computer’s memory (referred as Clipboard) to be pasted anywhere. But if you purge the record regarding the command named Copy by selecting the option Clipboard given inside the menu of Purge, the command  named Paste will get unavailable instantly  as I have explained earlier.

Purge the record of the command named Copy Merged


In order to understand "how to purge the record of the command named Copy Merged?" add a new layer in the document by hitting the small icon that can be seen right beneath the layer palette and says Create a new layer every time having been hovered over. As soon as you will hit that icon, a new transparent and completely invisible  layer will be added in the document represented by a newly appeared thumbnail in the layer palette right above the locked background layer according to the picture below.

Addition-of-new-layer-by-clicking-the-small-icon
Addition  of new layer is necessary to make available the command named Copy Merged inside the Edit Menu
Then select Rectangular Marquee Tool by clicking on it in the tool panel. 

Rectangular-Marquee-Tool-for-selection
Rectangular Marquee Tool is being selected
As soon as you will select that tool, pointer of your mouse will assume the shape of a plus (+) sign and the setting option for the selected tool will be appeared in the option bar. Out of those options, select New Selection as selection type, set Feather equal to 0 and select Normal as  selection Style according to the picture below.

New-Selection-Feather-0-px-Style-Normal
Select New Selection as selection type and set Feather equal to 0
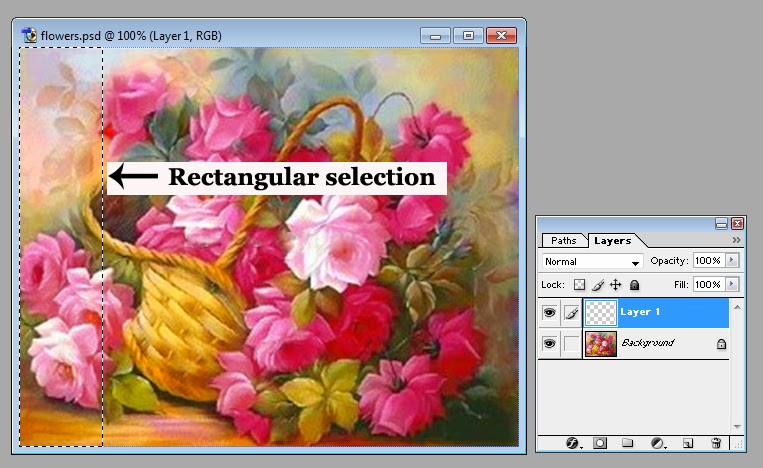
 Then, put the plus sign shaped pointer of your mouse anywhere on the canvas and draw a rectangular selection by dragging your mouse in any direction while keeping its left button pressed according to the picture below.

rectangular-selection-made-at-the-left
Selected area at the left ready to be filled with any color
Having made the selection, fill either Background or Foreground Color inside the selected area  (in order to fill Background Color inside the selected area hit CTRL + Backspace on the keyboard and in order to fill Foreground Color inside the selected area hit Alt + Backspace on the keyboard) according to the picture below.
Red-selected-area
Foreground Color has been filled inside the selected area
Then, you will have pixels on two separate layers (background layer and layer 1) clearly visible on the canvas. In order to  copy those pixels in the form of an integrated image  the command named Copy Merged is supposed to be used. Before applying that command select the entire canvas by hitting CTRL + A on the keyboard. After making complete selection of the canvas,  get inside the Edit Menu and select the option referred as Copy Merged given there (the option Copy Merged can also be selected by hitting Shift + CTRL + C on the keyboard).

Copy-Merged-in-the-Edit-Menu
Option referred as Copy Merged inside the Edit Menu
 Having selected that option, if you cast another glance on the Edit Menu, you will find the option named Paste available there ready to be used as you have not purged the record of clipboard option  (Copy Merged) out of the computer’s memory so far. As soon as you will purge that record by selecting the command named Clipboard given inside the menu of Purge, the option named Paste will get inactive inside the Edit Menu because having purged the record of the command Copy Merged you will have  nothing  inside the part of computer’s memory (clipboard) to paste it anywhere as I have explained earlier.

So that is how you can delete the different files holding the corrupt data regarding the clipboard commands Cut, Copy and Copy Merged. I hope all my readers will find this post helpful, if so kindly let me aware of the by subscribing your comments.