 |
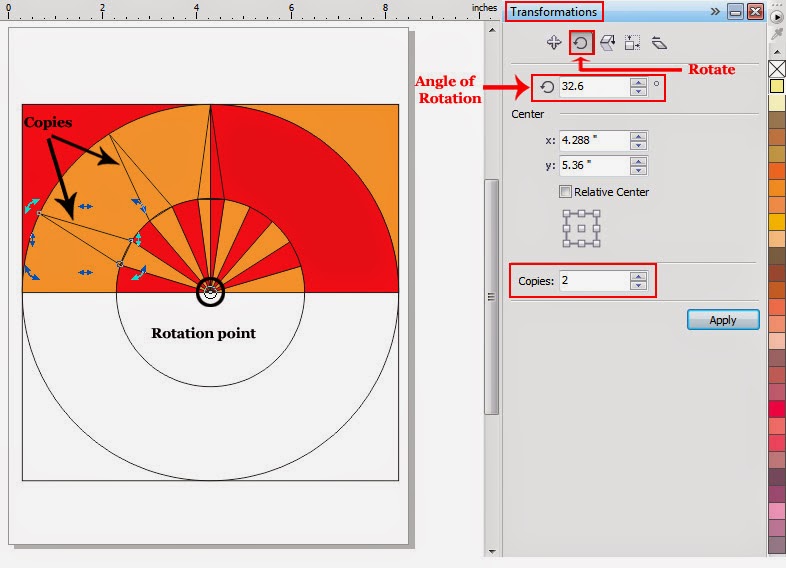
| Two copies of the spike shaped object, each placed at the angle of 32.6o from it's predecessor |
After that put the pointer again on the first spike shaped object (made by the use of
Pen Tool) and hit the left button of
your mouse twice . As soon as you will do so, the spike shaped object will
again be surrounded by a few black double sided arrows with rotation point
highlighted by a small circle. Then set the
Angle of Rotation for that shape equal to
-32.6o by typing
the value in the relevant box given in the already opened window named
Transformations. Then in the same
window, set the number of copies equal to
2 by typing the value in the box named
Copies and hit the button named
Apply as I have explained earlier. As
soon as you will hit the button named
Apply, two more copies of the spike
shaped object will be emerged on the document,
this time, at the right side of the selected shape each set at the angle of
-32.6o from it's predecessor according to the picture
below.
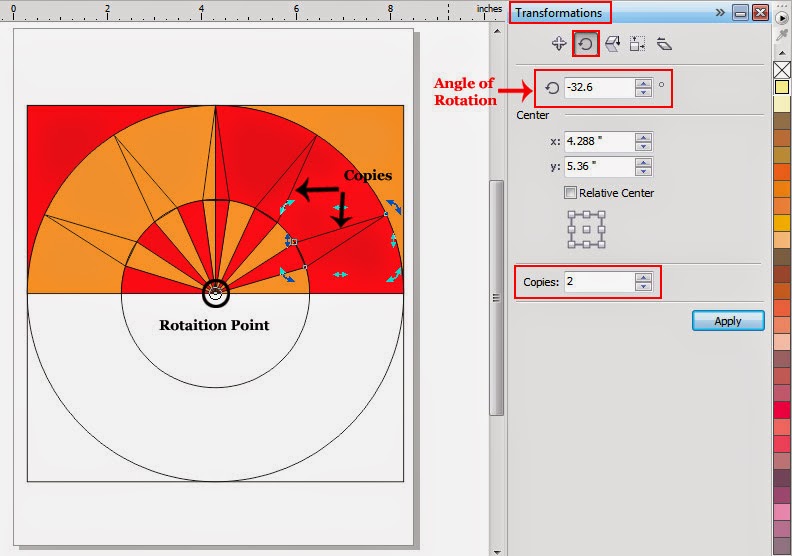 |
| Four copies of the spike shaped object |
After that select the
Smart Fill Tool again by clicking on it
in the Tool Box and set all it's options in the Property Bar according to the same way I have explained earlier. Then put the pointer of
your mouse on the light brown part of the spike shaped object in the middle and hit the left button of your mouse once. As soon as you
will do so, there will be created a separate object of the same shape. Then put the pointer on the red part of the
same object and hit the left button of your mouse again to create a separate
object here too according to the picture below.
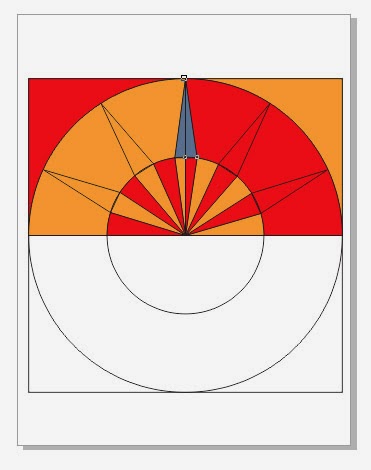 |
| Two objects created on the middle spike ready to be filled with different colors |
After that, select the left
part of the spike shaped object in the middle and two spikes placed at the left side of it with the help of
Pick
Tool by clicking on each one by one while keeping the
Shift Key on the keyboard
pressed. Then fill red color inside all the selected objects by selecting the
thumbnail representing red color in the color Palette.
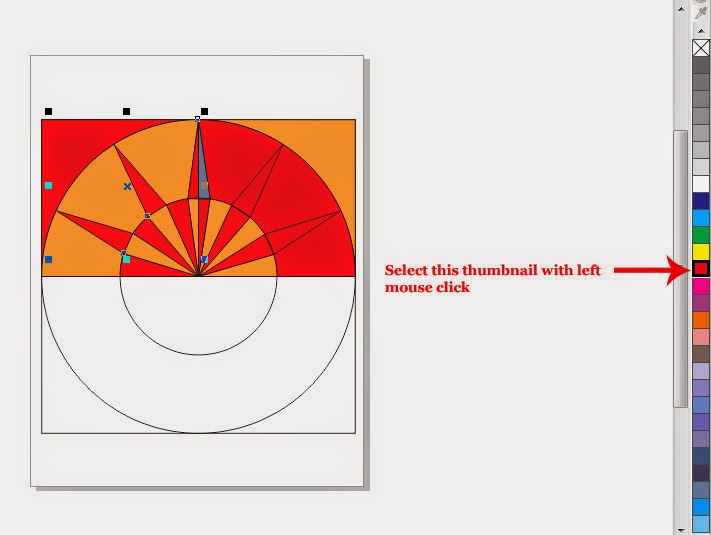 |
| left sided spikes with red fill inside |
Then, select the right
part of the spike shaped object in the middle and the two spikes at the right
side of it with the help of
Pick Tool by clicking on each one by one while keeping the
S
hift Key pressed on the keyboard. Then fill light brown color inside all the
selected shapes by selecting the thumbnail representing light brown color in
the Color Palette with left mouse click according to the picture below.
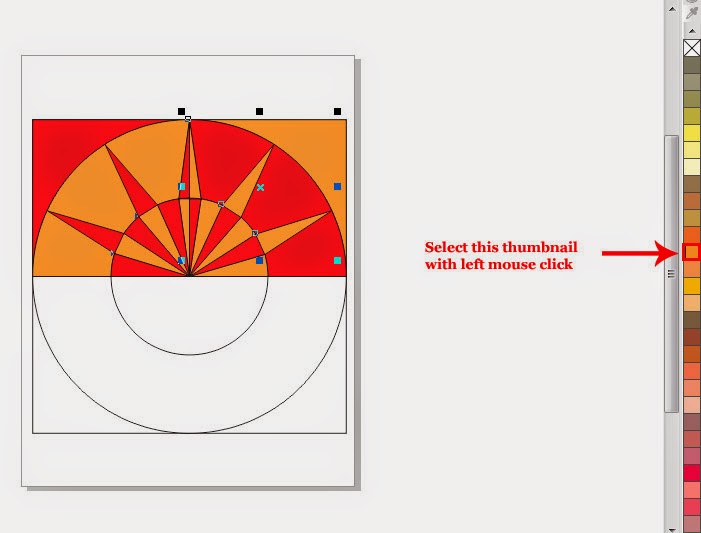 |
| Spike shaped objects place at the right side of the middle spike filled with light brown color |
After that select all the
object on the document by hitting
CTRL + A and group them together by hitting
CTRL + G on the keyboard. Then select
the
Rectangle Tool again either by
clicking on it in the Tool Box or by hitting
F6 on the keyboard. Then with the help of this tool, draw a large
rectangular shape anywhere on the document and, in order to make it clearly
visible, fill any color inside it by selecting any thumbnail given in the Color
Palette with left mouse click. After that put that rectangular shape on the lower halves
of all the shapes ( lower halves of square, bigger circle and the smaller circle) on
the document , so that it could hide those parts of the shapes according to the picture below.
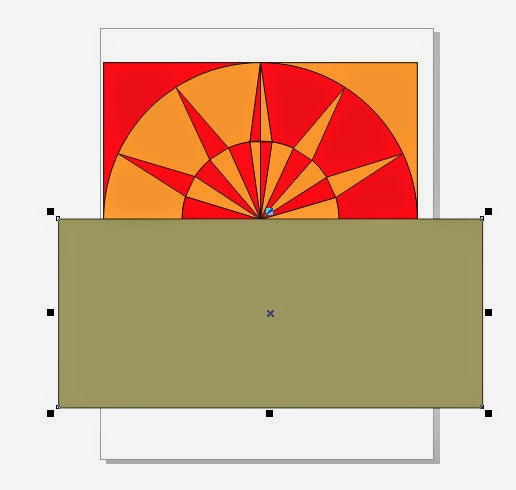 |
| Lower halves of the three shapes hidden behind the rectangle |
After that hit
CTRL + A again to select all the shapes
on the document simultaneously . As soon as you will select all the shapes,
shaping options including
Weld,
Trim,
Intersect,
Simplify,
Front minus back,
Back minus front and
Create
boundary will be appeared on the Property Bar. Out of those options select
Trim to have the hidden lower halves of all the shapes nicely trimmed off.
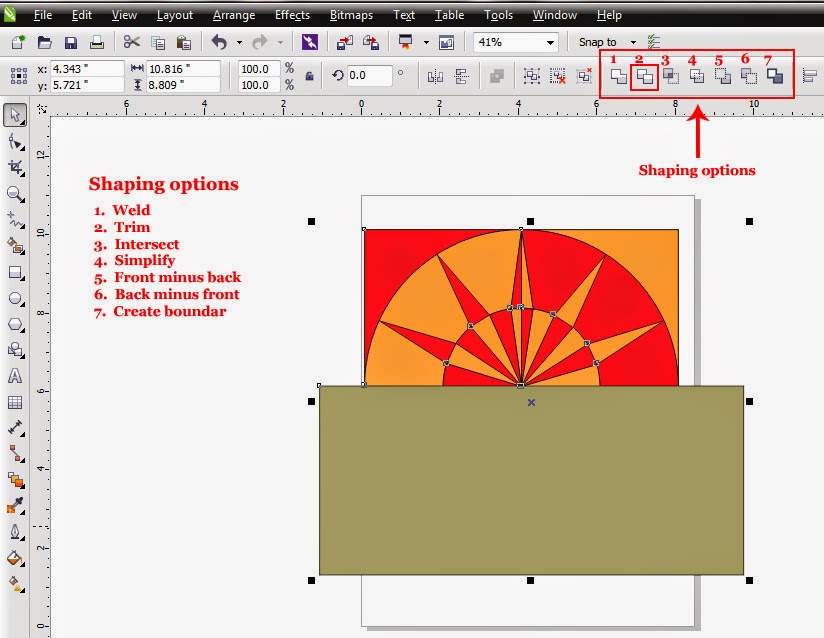 |
| Shaping options named Weld, Trim, Intersect, Simplify,Front minus back, Back minus front and Create boundary |
As
soon as the option named
Trim will be selected, the hidden parts of all the
shapes behind the reclangle will be deleted or trimmed off. After that select the large rectangular
shape beneath the almost finished logo of
Aditya Birla Group of Companies with the help of
Pick Tool and delete it either by
getting inside the
Edit Menu and selecting the option named
Delete or by
hitting the
Delete Key on the keyboard. After that, select the logo with the
help of
Pick Tool and remove the color of it’s outline by selecting the
thumbnail representing
None (No color) in the color Palette with right mouse
click. As soon as you will select that thumbnail black outline of the logo will be vanished from the sight.
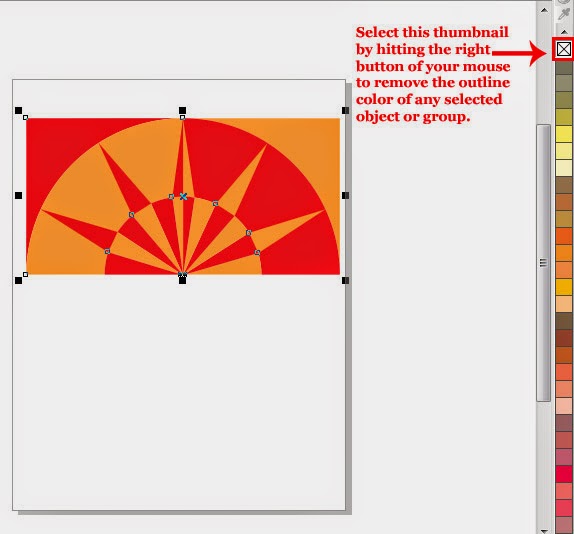 |
| Logo with no visible outline |
After that, select the
Text Tool either by clicking on it in the Tool Box or by
hitting
F8 on the keyboard.
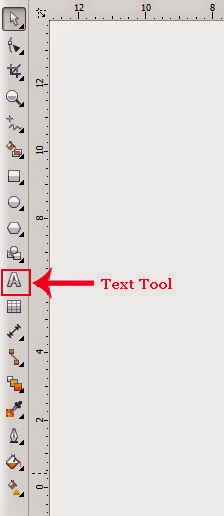 |
| Text Tool in the Tool Box |
As soon as the
Text Tool will be selected, pointer
of your mouse will assume the shape of a plus sign ( + ) with a prominent
letter
A at the bottom right of it. Then put that plus sign shaped
pointer of your mouse right beneath the logo and type the phrase
“ADITYA BIRLA
GROUP” there and select that recently
typed text with the help of
Pick Tool. As soon as the text will be selected,
it’s properties will be appeared on the Property Bar. Then select
Arial as
Typeface for the selected text out of the many options given in the
drop-down menu named
Font-List, set
the
Font Size for the selected text
equal to
50 pt by typing the value
in the box named
Font Size and hitting the
Enter Key and set the attribute named
Bold for the text by selecting the box representing that attribute in
the Property Bar. Having done that setting, fill red color inside the selected
text by selecting the thumbnail representing red color in the color Palette
with left mouse click according to the Picture below.
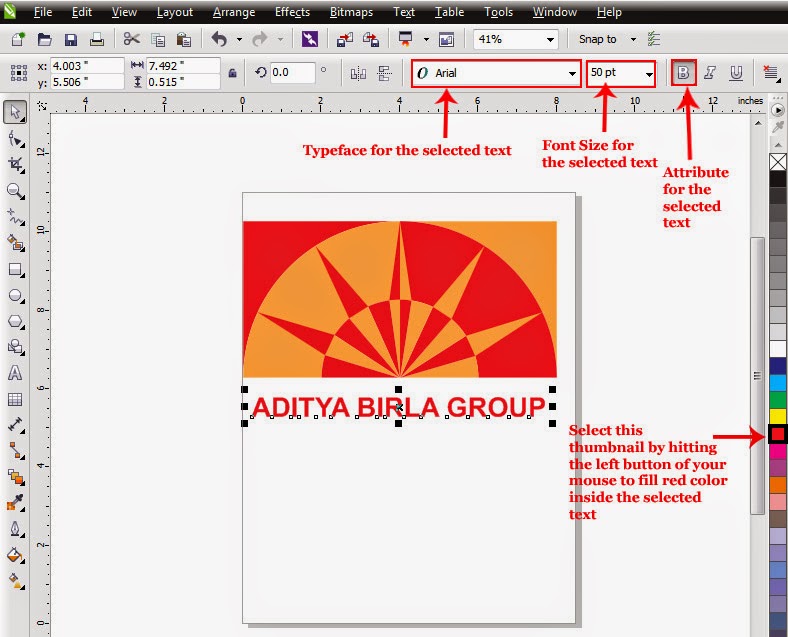 |
| Typed text and it's properties in the Property Bar |
Then the logo of
Aditya
Birla Group will ready to be saved so save it in CDR format either by getting
inside the
File Menu and selecting the option named
Save or by hitting
CTRL +S on the keyboard. In order to save the same logo in any format other than CDR, select the option named
Export given in the
File Menu or hit
CTRL + E on the keyboard instead of selecting the option named
Save or hitting
CTRL + S. Having saved the document use it anywhere you like by putting different suitable backgrounds behind it.
I hope you will find this post simple, easy and helpful, so have fun with it but kindly don't forget to subscribe your comments.




2 comments:
Great article!!!!!!
Thank you so much for sharing your thoughts with us. regarding Logo Designs. Keep sharing.
very informative post very helpul and explained in very easy language, really looking forward to more of your post
Broker for stocks
Post a Comment