Once I came across a very nice boy on Facebook. I sent him a friend request and he accepted it. Now he is one of the best friends of mine.We share music, poetry, movies, games and everything that can be shared on Facebook.These days he is running his own real estate business successfully and looks like a fully grown man. But three years earlier, when he was working as a salesman at a general store, used to look rather young and carefree.
A few days earlier, when I logged in my Facebook account , I saw a notification that said my friend had changed his profile picture. When I saw his recently added profile picture I couldn't stop myself liking it. That was not his recent photograph, but a bit older, three years of so. He was looking very young and carefree, wearing a sort of devil- may-care smile on his face.
 |
| Background:Sometime creates very bad effects on a good picture. |
That was of course, a very nice picture of him, but, at the same time, in that picture Arsalan (my friend's name) was the only object deserved to be praised. The rest of the picture was not showing anything but old and decaying closed shop that was not adding any beauty in my friend's picture. When I expressed my thought by commenting upon the picture, he requested me to do something about the picture's background, and that was on my finger tips.
It is to change a picture's background, of course, not a big deal. If you know how to use
selection tools in general and
polygonal lasso tool in particular you can change any picture's background within a few minutes.
First of all I downloaded the picture and saved it on my PC's desktop. Then I opened the same picture in Adobe Photoshop 7.0 which was already installed in my computer.I zoomed that picture in by hitting CTRL + +. Then made the selection of the picture, carefully avoiding the background, by
Polygonal Lasso Tool.
Selection making by Polygonal Lasso Tool
It is very easy to make selection of any part of a picture by
Polygonal Lasso Tool. Just select that tool out of the tool window that can be seen usually at the left side of the Photoshop window. Put the pointer of your mouse at the
bottom- right arrow of the option called
Lasso Tool, then click the left button of your mouse. Your click will reveal all the sub options of this very useful selection tool. Then out of those options select
Polygonal Lasso Tool.
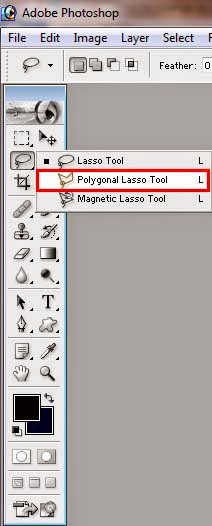 |
| Polygonal Lasso Tool in the Lasso Tool menu |
As soon as you will select that option, your pointer will change it's shape and the tool options will be appeared at the top of the window right beneath the menu bar. Out of those options, select
New Selection as selection type, leave the check box right beside the option
Anti-aliased unchecked and set
Feather for the tool equal to 0 px.
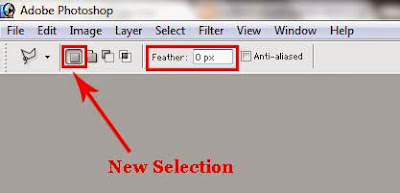 |
| Lasso Tool options |
After that, put the pointer of your mouse at any point of the outline of the part of the picture you want to select and just trace it by dragging your mouse. Wherever any curve come just click the left button of your mouse once and continue.
 |
| Image is being selected |
Trace the outline of the whole image and hit Enter key. As soon as you will hit the Enter key, the whole part of the picture will be selected within an instant.
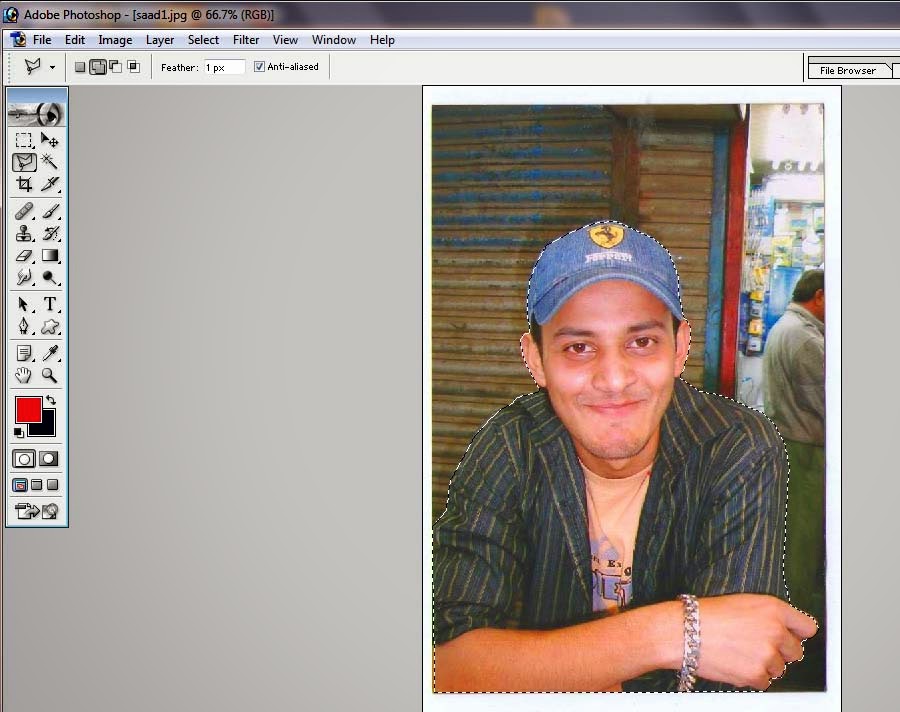 |
| Completely selected image |
Inverse Selection and Deletion of background
I selected the image by following the same method explained above, then out of the menu bar, I clicked the menu called
Select. As soon as I clicked that menu, it's sub menu appeared and out of that, I selected the option
Inverse (Shft + CTRL + I).
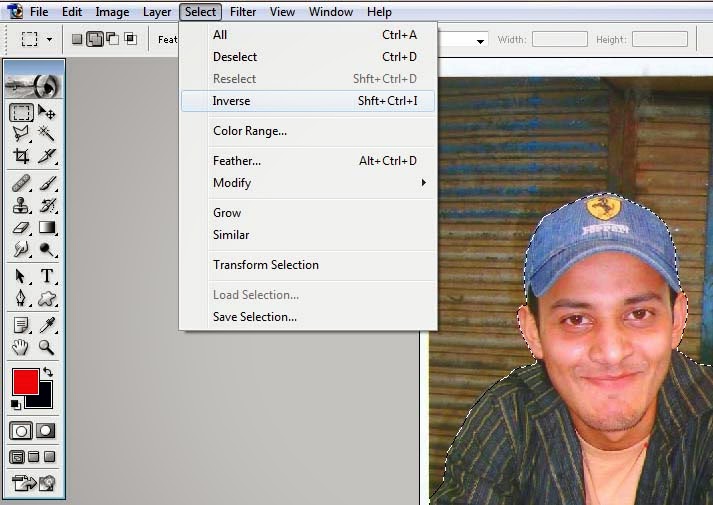 |
| Inverse selection: very useful option |
This option is used for
inverse selection . That is precisely why, when I selected that option, my friend's picture got unselected while the rest of the part of the image, or it's background got selected. Then I hit the
Delete key and the whole background was deleted in an instant. And at last, my friend's picture got rid of it's ugly background.
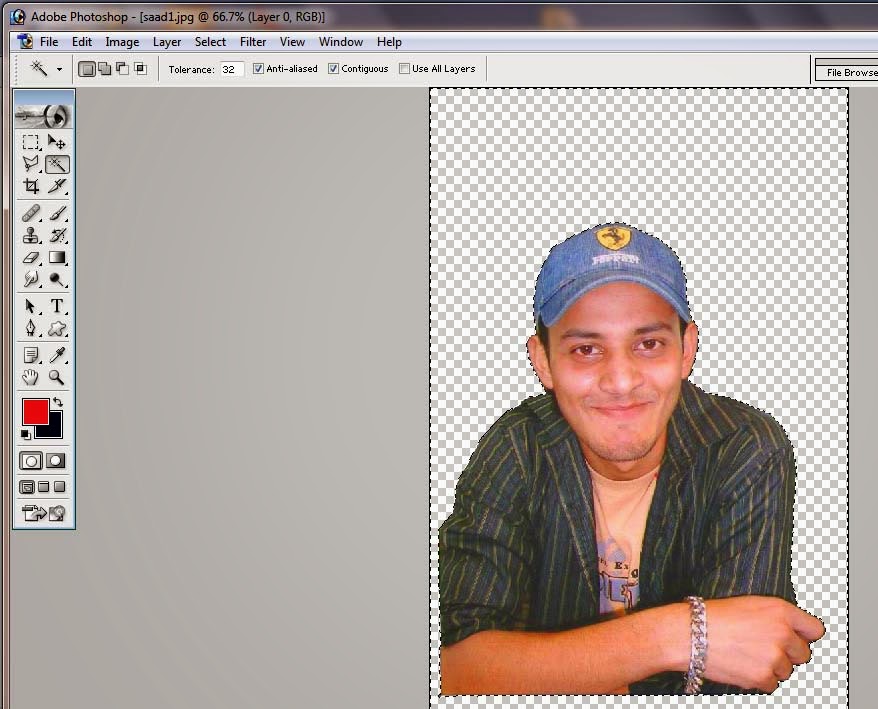 |
| Image: After the removal of it's ugly background |
Use of Blur Tool on the ragged edges of the picture
When I deleted the background, I noticed that the picture had very rough and ragged edges and because of those, it was looking a bit unnatural. In order to make those smooth, I used Blur Tool.
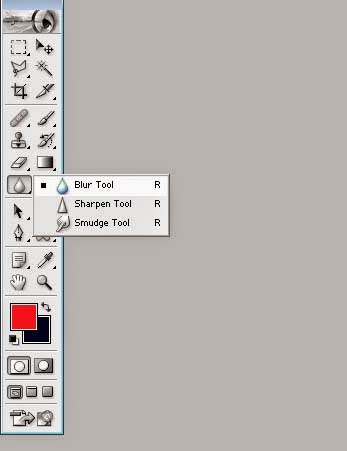 |
| Blur Tool in the menu |
As soon as I selected that tool (
Blur Tool) , pointer of my mouse assumed the shape of a circle, that was
Blur Tool's Brush, and the tool options appeared instantly on the top of the window right beneath the menu bar. Out of those options, first of all I opened
Brush Picker menu by clicking the small arrow that can be seen right beside the word
Brush in the option bar. Then out of the
Brush Picker menu, I selected the brush
Hard Round 19 px. Then I set it's
Strength equal to 30% and out of the drop-down menu called
Mode, I selected the mode none other than
Normal.
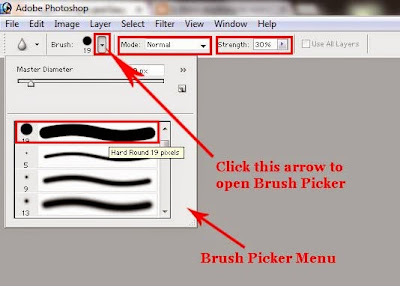 |
| Brush Picker, Mode and Strength for Blur Tool |
After that, I zoomed the picture in, by hitting CTRL + +. Having done so, I put the circle shaped pointer of my mouse at the picture's rough edge, kept the left button on my mouse pressed and dragged it on the entire edges of the picture. And after a minute and a half, all the rough edges of the picture got perfectly blurred.
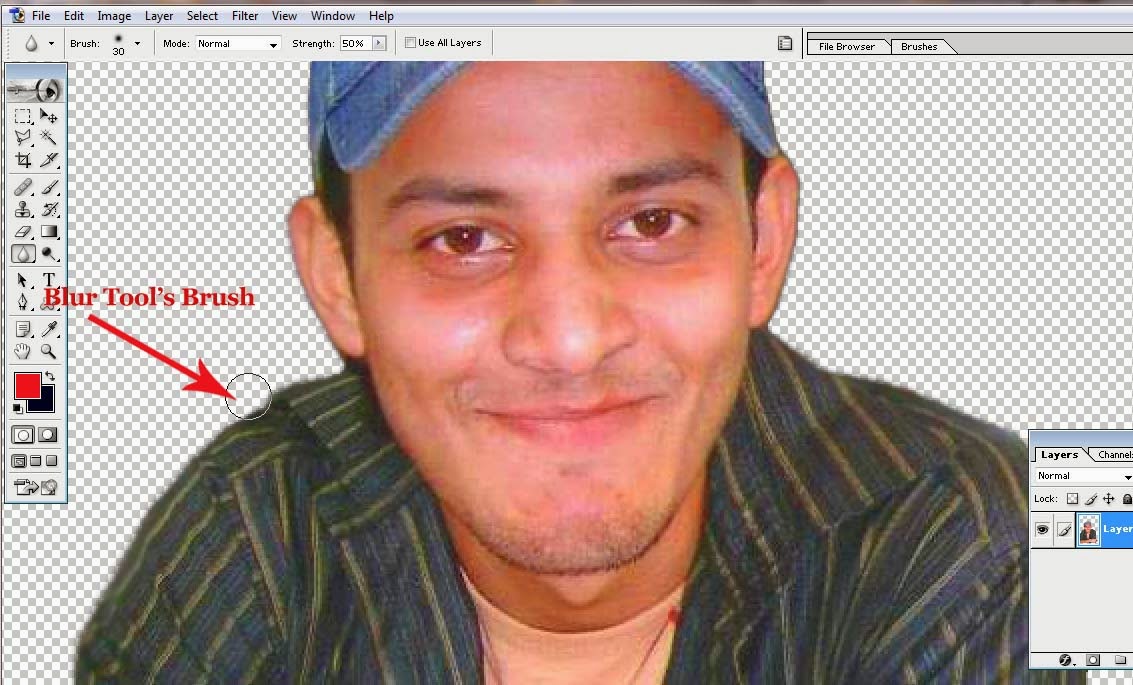 |
| Circle shaped brush of Blur Tool |
Insertion of new background
Use of Move Tool to move layers
Then I opened another picture in Photoshop to use it as the new background for my friend's picture, and then selected the
Move Tool out of the tools' window.
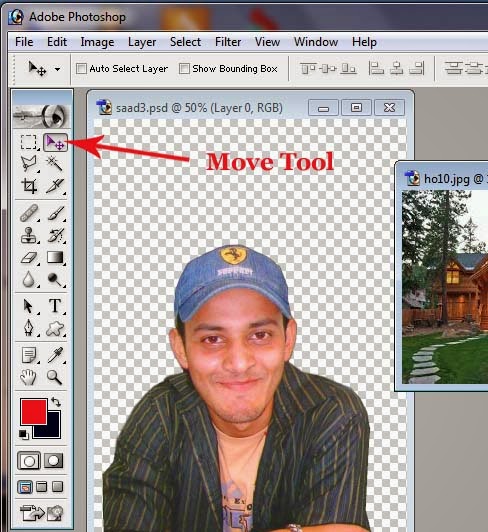 |
| Move Tool: Used to move layers left, right, up and down |
Then I put the pointer of my mouse on the newly opened picture, kept the left button of my mouse pressed and dragged that image and dropped it on my friend's picture.
 |
| Image: Drag and Drop by Move Tool |
As the image I had chosen to use as the background image for my friend's picture was so small, I had to enlarge it.
Free Transformation of a picture
In order to enlarge it, I selected the layer 1 that contained that image (background image) out of the layer window.
 |
| Layer window: Always select the layer on which you intend to work |
Then out of the
Edit Menu, I selected the option
Free Transform or (CTRL + T).
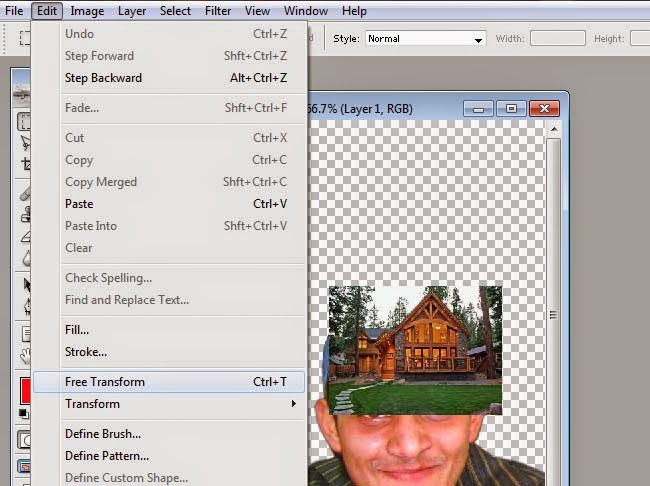 |
| Free Transform : Change the height and width of your image freely |
As soon as I selected that option a rectangle emerged around the picture, called
Free Transformation Rectangle.
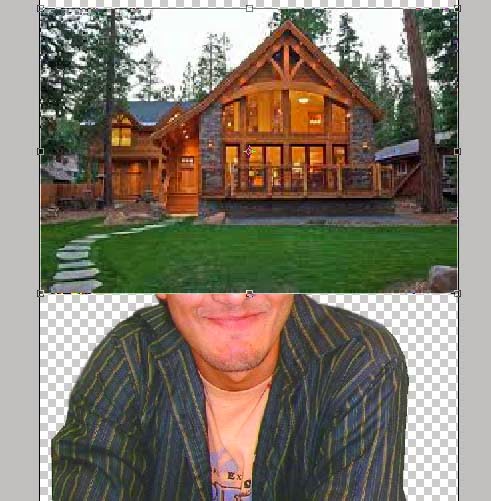 |
| Image inside the transformation rectangle is being enlarged |
Then I put the pointer of my mouse at the edge of that rectangle and dragged out. The image got enlarged and covered the entire picture of my friend.
 |
| Image: After being enlarged covered the back layer |
Setting of layers upward and downward
In order to bring my friend's picture forward, I once again selected the
Move Tool and put the pointer of my mouse on layer 1 in the layer window. As soon as I put the pointer on the layer , it's shape changed into a
hand. I kept the left button of my mouse pressed and dragged it downward and released the button.Then layer 0 that contained my friend's picture was above and the second layer that was layer 1 (contained the background image ) was below.
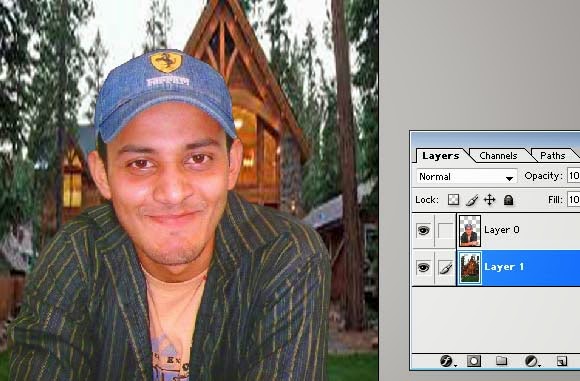 |
| Layer rearrangement :Layer that is used as background should remain below the foreground layer |
The work was done. I saved the image in JPEG format and sent it back to my friend.
 |
| Image: After the change of it's background |
Of course, he was very happy when he saw his newly edited image and used it as his Facebook profile picture.


0 comments:
Post a Comment