Functionality of Fade in Photoshop


Fade is a command that is very commonly used in Photoshop. Using Fade you can not only reset the opacity level for the most recently applied tool, filter or adjustment, but through the same command you can apply any blending mode of your choice or requirement upon the impact of the most recently applied tool,filter or adjustment. Further, this command can only be applied right after the use of any tool, filter or adjustment on Photoshop document. For instance, using any selection tool, if you make selection of any part of a layer and fill any color (background or foreground) inside it and right after that, you choose to apply the command named Fade upon the recently filled color, you can happily do so. But if choose to deselect the recently colored part of the layer first, you will not find the command named Fade available in the Edit Menu.

Edit-MenuFade-Tools-Filters-Adjustements
Fade command  can be applied right after the use of Tools, Filters and Adjustments
In this post I have decided to explain the functionality of Fade command given inside the Edit Menu by applying it one by one on the examples of tools,filters and adjustments and first of all I’ll apply it on the example of tools.

How to Fade the impacts of Tools?

In order to understand how to apply the command named Fade upon tools, follow the instructions given below.

First of all, create a new document with 500px width, 500px height, RGB Color Mode and white Content specified. 
new-blank-Photoshop-document
Newly created Photoshop document with RGB Color Mode and White Content
After that click the thumbnail representing Foreground Color in the Tool Box to open Color Picker window and select red or any other bright color as foreground color according to the picture below.

use-color-picker-and-select-foreground-color
Color Picker window
Having selected the required color in the Color Picker, click OK to have it as Foreground Color in the Tool Box according to the picture below.

tool-box-and-blank-document
Red color ready to be used  as Foreground Color
Then, select the Brush Tool either by clicking on it in the Tool Box or by hitting B on the keyboard.
As soon as you will select the Brush Tool, pointer of your mouse will assume the shape of a circle and setting options regarding the selected tool will be appeared inside Option Bar. Out of those options, first of all click the small arrow that can be seen between the Tool Preset Picker and Mode to open the menu named Brush Preset Picker.

Brush-tool-selected-inside-the-tool-box
 Pointer of your mouse assumes the shape of a circle whenever you select Brush Tool
 Having opened that menu, select the hard and round brush of any size (for instance you can select hard and round 5px) and then, in order to enhance its size, set its Master Diameter equal to 400px, select Normal out of the different options given in the drop-down menu named Mode and set both the Opacity and Flow for the Brush Tool equals to 100% according to the picture below.

Master-diameter-for-brush
Different brush styles given in the menu named Brush Preset Picker
After that, put the large circular shaped pointer of your mouse anywhere on the document and hit the left button of your mouse once. As soon as you will do so, there will be appeared a large bright colored circle on the document according to the picture below.
large-red-circle
Red circle made on Photoshop document by using the Brush Tool

Right after applying the Brush Tool, get inside the Edit Menu and select the option named Fade Brush Tool given there either by clicking on it in the menu or by hitting CTRL + SHIFT + F on the keyboard.
Fade-the-impacts-of-Brush-Tool
Option referred as Fade Brush Tool given in  the Edit Menu
 As soon as you will select the option named Fade Brush Tool or hit CTRL + SHIFT + F, there will be appeared a small dialogue box named Fade. In that dialogue box there will be seen a slide referred as Opacity, a drop-down menu referred as Mode and a small check box referred as Preview. Using the slide referred as Opacity, you can set the opacity for the recently applied Brush Tool up to any desired level and out of the different options given in the drop-down menu named Mode you can choose any mode ( e.g. Difference, Linear Light, Dissolve etc) according to your requirement. Further, by putting check inside the check box named Preview you can see the preview of the expected result of the current setting before applying it finally on the document according to the picture below.

blending-mode-Dissolve-and-50%-opacity
Opacity level equal to 50% and  Dissolve as selected mode for the red circle
In order to apply that setting finally on the document, click the button named OK or hit the Enter key.
If you want to apply the command named Fade on any other Photoshop Tool, you can follow same method explained above.

How to Fade the impacts of Adjustments?

In order to understand how to apply the command named Fade upon adjustments, follow the instructions given below.

First of all open a picture preferably JPEG either by getting inside the File Menu and selecting the option named Open or by hitting CTRL + O on the keyboard.

JPEG-image-ready-to-be-edited
JPEG image before being edited
Having opened the picture in Photoshop,  get inside the Image Menu and select the option named Adjustment. As soon as you will select that option, it’s side menu will be appeared containing a host of adjustment options. Out of those options select Invert either by clicking on it in the menu or by hitting CTRL + I on the keyboard.
image-adjustment-invert
option referred as Invert given inside the side menu of Adjustment

 As soon as you will select the option named Invert the image will assume the aspect of photographic negative according to the picture below.

Photographic-negative-image
Image under the impacts of  the adjustment named Invert
After that, in order to apply the command named Fade upon that image, get inside the Edit Menu and select the option named Fade Invert.
Fade-the-impacts-of-Invert
Option referred as Fade Invert given in the Edit Menu
As soon as you will select that option, the small dialogue box named Fade will be appeared again. Then, once again put  check inside the check box named Preview and set the Opacity level and Mode for the recently applied Adjustment named Invert according to your choice. For instance select Difference out of the different options given in the drop-down menu named Mode and set the Opacity equal to 50%  according to the picture below.

blending-mode-difference-with-50%-opacity
Impacts of Fade upon the Inverted image 
In order to apply that setting upon the picture click the button named OK given in the same dialogue box or hit  Enter on the keyboard.
Following the method explained above you can apply the command named Fade upon all sort of adjustments.

How to Fade the impacts of  Filters?

In order to understand how to apply the command named Fade upon filters follow the instructions given below.
First of all open an image preferably JPEG either by getting inside the File Menu and selecting the option named Open or by hitting CTRL + O on the keyboard.

image-of-Pakistani-actress
Image before editing
After that, using Color Picker window select white as Background Color and black as Foreground Color according to the picture below.

black-foreground-white-background
Black and white as selected Foreground and Background Colors
After that get inside the Filter Menu and select the option named Sketch. As soon as you will select the option named Sketch, it’s side menu will appeared containing a number of other options. Out of those options select Photocopy by clicking on it.

Filters-Sketch-Photocopy
Filter referred as Photocopy given in the side menu of Sketch
 As soon as you will select that option, there will be appeared a dialogue box referred as Photocopy. In that dialogue box along with the preview of expected outcome of the filter , there will be seen two slides referred as Detail and Darkness. Set the Detail and Darkness for the selected filter according to your choice (for instance, set Detail equal to 15 and set Darkness equal to 10) either with the help of slides or by typing the values inside the relevant boxes according to the picture below.

Photocopy-Detail-Darkness
Filter named Photocopy is being applied on the image
Having done the required setting, apply it on the image by clicking the button named OK given in the same dialogue box. As soon as you will hit the button named OK the image will assume the aspect of a Photocopy according to the picture below.

image-of-Pakistani-actress-look-like-a-Photocopy
Formerly colored picture has assumed the features of a Photocopy
Right after applying the filter upon the image, get inside the Edit Menu and select the option named Fade Photocopy.

Edit-Fade-Photocopy
Option referred as Fade Photocopy given in the Edit Menu
As soon as you will select the option named Fade Photocopy, there will be appeared the dialogue box named Fade one more time. In that dialogue box set the Opacity and Blending Mode for the filter according to your choice or requirement (for instance select the Blending Mode named Vivid Light to apply on the picture and set the Opacity equal to 50%) according to the picture below.

Blending-Mode-Vivid-Light-with-50%-Opacity
Impacts of Fade command  upon the impacts or the filter named Photocopy
In order to apply that setting upon the image, click the button named OK or hit the Enter Key on the keyboard.
So, that is how you can fade the impacts of different tools, filters and adjustments applied on different images and by doing so, you can give  entirely different looks to different images.
I hope this post will be proved helpful to all my readers, if so, kindly let me aware of that by subscribing your valued comments.

Functionality of Step Backward in Photoshop

Undo is a command that is most commonly used while working with any software program. Whenever you do any mistake accidentally during work or somehow you don’t feel satisfied with your work, you can simply apply the command named Undo to delete the wrong or undesired work from your document. For instance, you are working on Microsoft Word and you have performed the following tasks:
  • You have pasted a paragraph on the page.
  • Secondly, you have inserted an image.
  • Thirdly, you have added a caption for that image.

Having performed all the tasks described above, if you apply the command named Undo  for the very first time, the caption will be disappeared from the document. If you apply the command named Undo second time,  the inserted image will be vanished from the document. Finally, if you apply the same command third time, the pasted paragraph will be vanished from the page. That is how you can correct all the mistakes and prepare a perfectly accurate document. Though, using the command named Undo you can correct all the mistakes with remarkable ease while working with most of the software programs, but unfortunately, while working on Photoshop, this command may not be proved as much simpler and easier as it seems in the case of Microsoft Word or any other software. 

Whenever you apply the command named Undo on Photoshop document, Photoshop delete the impact of the most recently applied command, whether it be some other command or the command named Undo itself. For instance, while working with Photoshop you have performed the following tasks:
  • You have added a new layer.
  • Secondly, you have filled background color inside it.
  • Thirdly, you have reduced the opacity level for that layer up to 70%.

Having performed all the tasks described above if you select the command named Undo for the very first time ,the opacity level of the selected layer will turn  back from 70% to  100% as the reduction in the opacity level was the most recent work done on the document in that case. But problem is that, if you will apply the command named Undo second time consecutively on the same document, the opacity level of the layer will get reduced again from 100% to 70%. The reason is that, whenever you apply the command named Undo, this command itself becomes the most recent command applied on the document and it delete the impact of itself when you apply it second time consecutively.

Undo-vs-Step-backward-in-Photoshop
Two commands of Photoshop 

In order to resolve that issue, Photoshop introduced another command that is referred a Step Backward. This command helps you to delete the undesired impacts of two or more than two consecutively applied commands on the document.

How does Step Backward work in Adobe Photoshop?

In order to understand the functionality of the command named Step Backward follow the instructions given below:
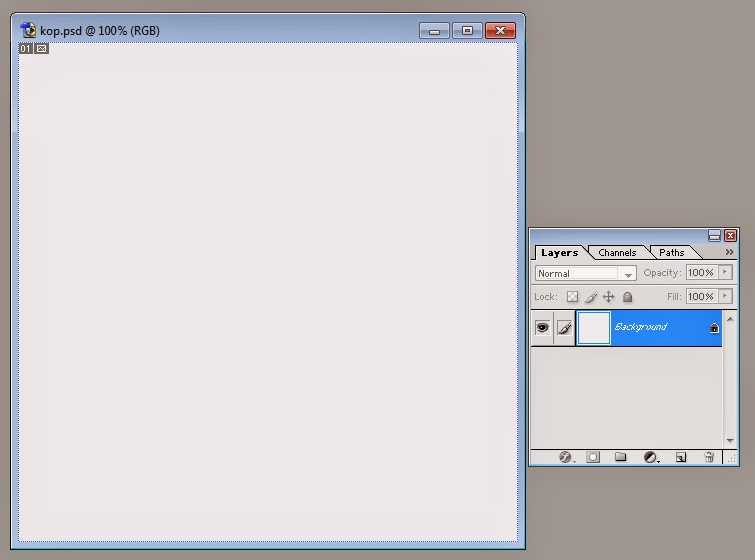
First of all create a new Photoshop document with RGB Color Mode and White Content specified.

RGB-Color-Mode-and-White-Content
Blank PSD file with RGB color mode and White Content
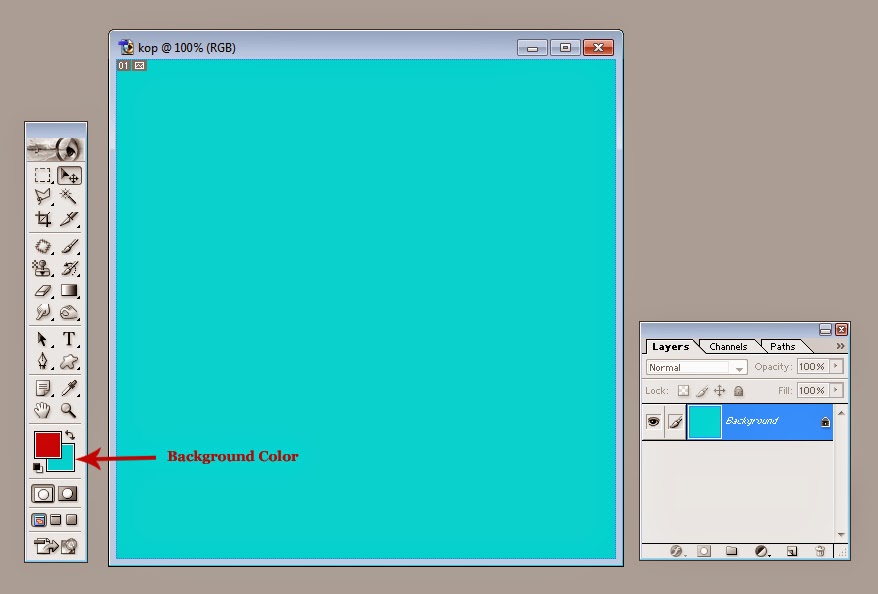
In order to fill Background Color inside the newly created document, hit CTRL + Backspace on the Keyboard. As soon as you will do so, the color that has been selected as Background Color in Tool Box will be filled inside the locked  background layer of the document according to the picture below
.
background-color-in-the-tool-box
Background Color has been filled inside the locked background layer
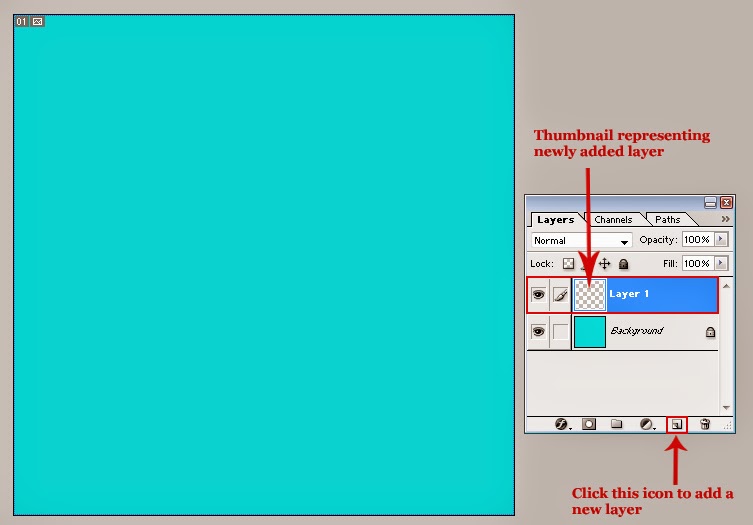
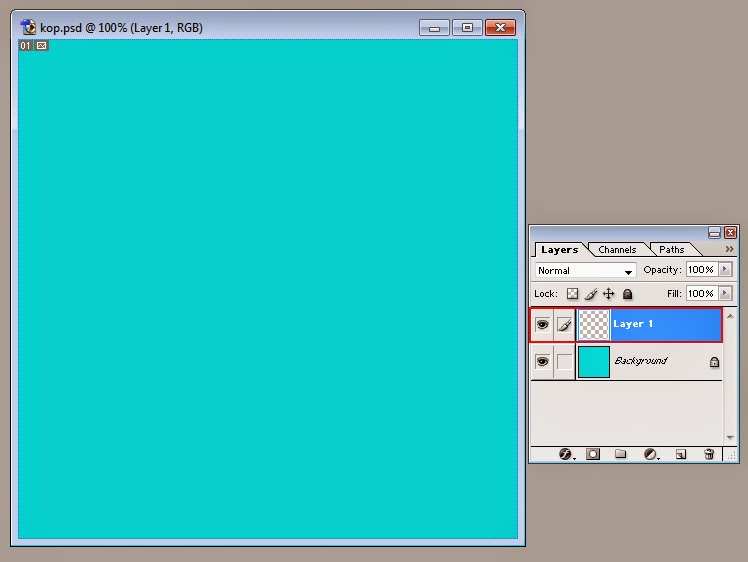
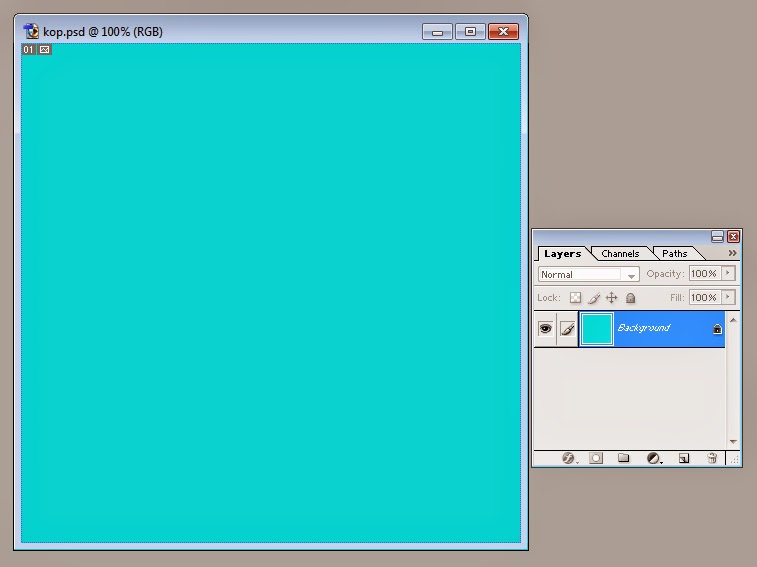
Then add a new layer by hitting the tiny icon that can be seen right beneath the Layer Palette and referred as Create a new Layer. As soon as you will hit that icon, a new layer will be added in the document along with the locked background layer and a new thumbnail representing that new layer will be appeared in the Layer Palette right above the locked background layer. As the new layer will be completely transparent and the background layer will  totally be visible from behind it, the addition of new layer will not cause any change in the overall look of the document. As can be seen in the picture below.
Layer-1-right-above-the-locked-background
Two thumbnails in the Layer Palette indicating the presence of  two  separate layers in the document
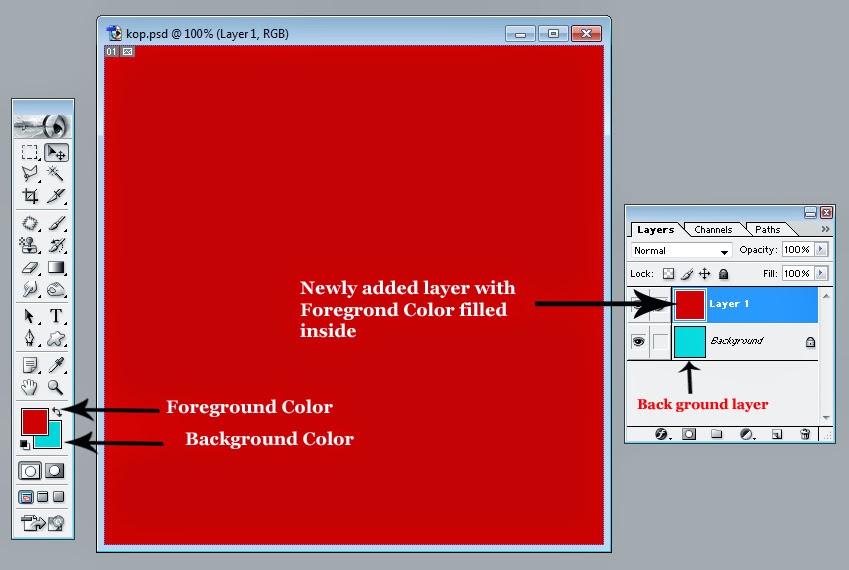
After the addition of a new layer, hit Alt+ Backspace on the keyboard to fill Foreground Color inside it. As soon as you will hit Alt + Backspace, the color that has been selected as Foreground Color in the tool box will be filled inside that layer and it will hide totally the formerly visible background layer according to the picture below.

Foreground-Color-filled-inside-the-layer-1
Foreground color has been filled inside layer 1
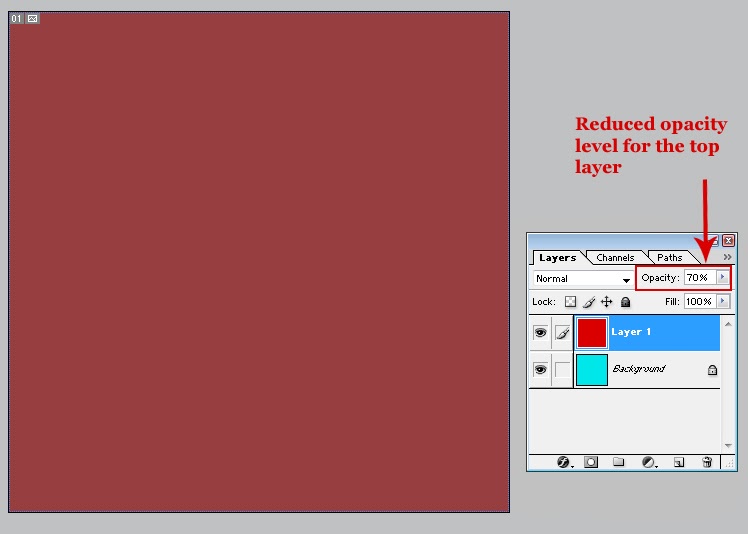
Then reduce the Opacity of the layer 1 from 100% to 70% using the slide named Opacity that can be seen inside the Layer Palette right beside the drop-down menu referred as Blending Modes. As soon as you will reduce the Opacity of layer 1, the color of  background layer will start to reveal itself to some extant  from behind the layer 1 according to the picture below.

Reduction-in-the-level-of-opacity
Layer 1 with reduced Opacity level
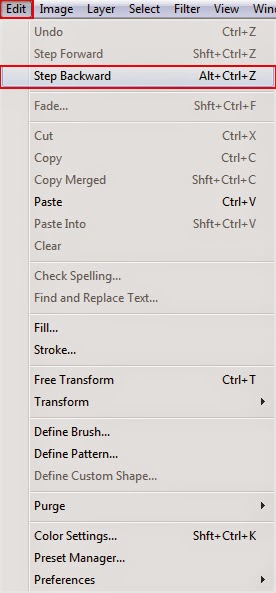
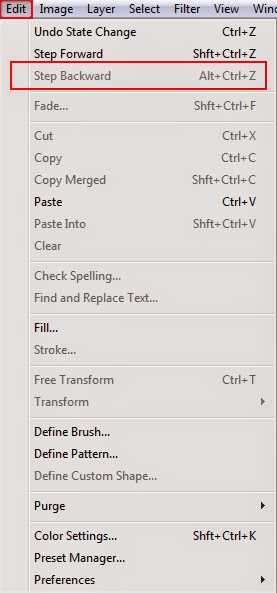
Then get inside the Edit Menu and select the option named Step Backward for the very first time either by clicking on it in the menu or by hitting CTRL + ALT +Z on the keyboard.

Edit-Menu-and-Step-Backward
Option referred as Step Backward given in the Edit Menu
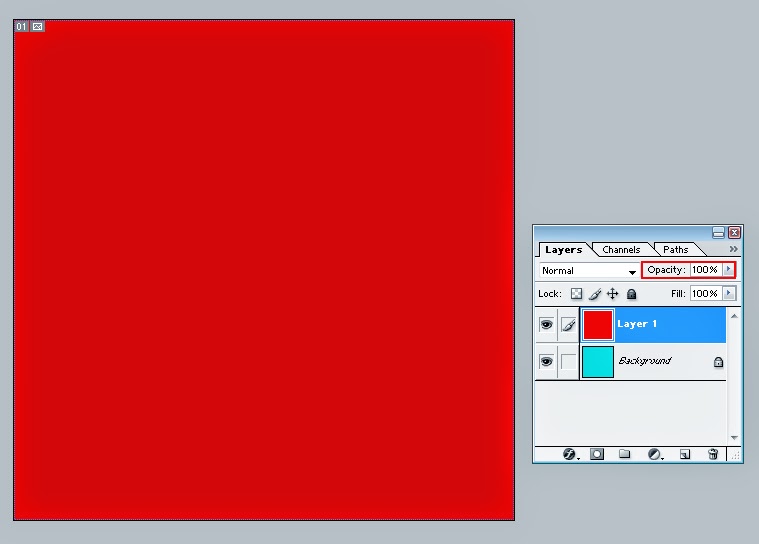
As soon as you will select that option, you will notice that the opacity of   layer 1 will turn back from 70% to 100% all by itself and it will hide the background layer completely according to the picture below.
Undone-reduction-in-the-level-of-opacity
Opacity level has been turned back from 70% to 100% for the layer 1
Then, select the command named Step Backward again. As soon as you will do so, impacts of the  second last command applied on the document  named Foreground Color  will be deleted and the layer 1 will get completely transparent again. Further, the Background layer will become perfectly visible again according to the picture below
.
Layer-with-no-fill
Impact of the command named Foreground Color has been deleted
After that, select the command named Step Backward one more time, and this time the impact of the third last command (Creation of a new layer) will be removed and the layer 1 will be vanished from the Layer Palette according to the picture below.

Locked-background-layer
Layer 1 no longer available
Then select  the command named Step Backward again either by clicking on it in the Edit Menu or by hitting CTRL +  ALT + Z on the keyboard. As soon as you will perform that action, impact of the fourth last command  (Background Color) will be removed and the Background layer will turn pure white again according to the picture below.

impacts-of-all-commands-undon
Background layer turned  pure white again
Having removed the impacts of all the commands applied on the document, if you have a look on the Edit Menu you will notice that the command named Step Backward no longer available there as there is left nothing to be undone anymore.

Step-Backward-cannot-be-used
Option referred as Step Backward can not be used when nothing left to be undone  on the document
So that’s the way through which you can rectify all the mistakes and everything  undesired  done on the Photoshop document during the work.
I am certain this post will be proved helpful to all the readers especially the beginner ones in the field of Information Technology in general and in the field of Computer Graphic in particular. If you want to put forward any question regarding the topic or suggestion for further improvement kindly don't forget to subscribe your comments.


CorelDraw Tutorial : Logo of BMW

 This is my seventh  post about logo designing and in this post I am going to explain the drawing method of the logo of  Bayerische Motoren Werke AG in CorelDraw X6. Bayerische Motoren Werke AG is basically a German organization that manufactures automobiles, motorcycles and engines. This organization was founded in 1916 and most commonly known as BMW. In the following image you can see the logo of BMW drawn by me using CorelDraw X6.

logo-of-bmw
Logo of  Bayerische Motoren Werke AG  (BMW)

While drawing this logo, I have used  some very useful and wonderful tools of Coreldraw X6 including the Ellipse Tool, Convert Outline to Object, Fountain Fill, Power Clip and Fit Text to Path etc. Following are given the steps through which you can draw the same logo within a very short period of time.

How to draw the logo of BMW using CorelDraw X6?

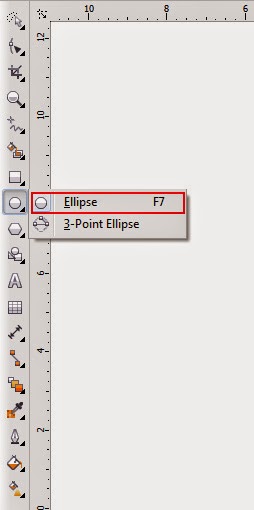
Having created a new document, first of all select the Ellipse Tool either by clicking on it in the Tool Box or by hitting  F7 on the keyboard.

drawing-tool-for-elliptical-shapes
Ellipse Tool in the Tool Box
 As soon as you will select that tool, pointer of your mouse will assume the shape of a plus ( + ) with a tiny shape of an ellipse at the bottom right of it. Then put that plus sign shaped pointer of your mouse anywhere on the document and draw a shape of an ellipse by dragging your mouse in any direction and keeping it’s  left button pressed.
 Having drawn the shape of an ellipse, select it with the help of Pick Tool. As soon as your will select the shape, it’s properties including it’s width, it’s height and it’s Outline width  will be appeared in the Property Bar. In order to convert the selected shape of an ellipse into a perfect circle, set it’s width equal to it’s height ( Width= 8.0, Height= 8.0) in the Property Bar by typing the values in the relevant boxes and hitting the Enter Key. As soon as you will hit the Enter Key, the selected shape will assume the same width and height and will be transformed into a perfect circle. Then fill black color inside that circle by selecting the thumbnail representing black color in the Color Palette with left mouse click and select the outline width for the selected shape equal to 10 pt out of the different options given in the drop-down menu named Outline width according to the picture below.

size-outline-width-and-color-of-a-circle
Black circle with 10 pt wide outline
After that, make a duplicate of that circle by hitting CTRL + D on the keyboard. As soon as you will hit CTRL + D on the keyboard, another circle of the same size ,color and outline width will be appeared on the document. Then select that duplicate black circle with the help of Pick Tool and set it’s width and height equals to 4.5 in the Property Bar by typing the values in the relevant boxes and hitting the Enter Key. As soon as you will hit the Enter Key, the selected duplicate circle will assume the same width and height. Then change it's color from dark black to light grey by selecting the thumbnail representing light grey color in the Color Palette and change the Outline width for the same circle from 10 pt to 8 pt by selecting 8 pt  out of the different options given in the drop-down menu named Outline width according to the picture below.
duplicate-circle-with-altered-properties
Duplicate circle with altered size, color and Outline width
 Then, make another duplicate (this time of the selected grey circle) by hitting CTRL + D on the keyboard. As soon as you will hit CTRL + D, a duplicate of the selected grey circle will be appeared on the document.Then select that newly appeared duplicate circle with the help of Pick Tool and reduce it's width and height from 4.5 to 4.3  by typing the values in the relevant boxes given in the Property Bar and hitting the Enter Key.  After that fill dark grey color in the selected circle’s outline by selecting the thumbnail representing dark grey color in the Color Palette with right mouse click according to the picture below.
duplicate-circle-with-changed-size-and-outline-color
Duplicate grey circle with altered size and outline color
After that select all the shapes on the document by hitting CTRL + A on the key board. Having selected all the objects, the next thing which is supposed to be done right after that is to set them on the same spot. For that purpose, get inside the Arrange Menu and select the option named Align and Distribute. As soon as you will select that option it’s side menu will be appeared containing a few more options( including  Align Left, Align Right, Align Top, Align Bottom, Align Centers Horizontally, Align Centers Vertically, Center to Page, Center to page Horizontally, Center to Page Vertically etc.) .
alignment-of-centers
Side menu of the option named Align and Distribute
Out of these options , select  Align Centers Horizontally or hit E on the keyboard to align the centers of all the selected objects on the document horizontally according to the picture below.
three-circles-with- centers-horizontally-aligned
Three selected shape on the document with horizontally aligned centers
 After that, get inside the Arrange Menu again and again select the option named Align and Distribute by clicking on it. Then, out of the options given in the side menu of Align and Distribute, select Align Centers Vertically by clicking on it or by hitting C  on the keyboard. As soon as you will do so, centers of all the selected objects will be aligned vertically too and you will have all the objects on the document placed on the same spot, according to the picture below.
circles-placed-on-the-same-spot
Circular shapes on the document placed on the same spot
 After  that, select the biggest circle (black circle) on the document by clicking on it with the help of Pick Tool and convert it’s 10 pt wide outline into a separate object by getting inside the Arrange Menu and selecting the option named Convert Outline to Object or by hitting CTRL + Shift + Q on the keyboard. 
Convert-Outline-to-Object
Option named Convert Outline to Object given in the the Arrange Menu
As soon as you will select that option, the outline of the black circle will be converted into a separate object. After that click the small arrow that can be seen at the bottom-right of the Fill Tool in the Tool Box by clicking on it. As soon as you will click that arrow a menu will be appeared containing a few  options regarding fill (including Uniform Fill, Fountain Fill, Pattern Fill, Texture Fill, PostScript Fill, No Fill and  Color). Out of the options given in the menu of the Fill Tool, select Fountain Fill either by clicking on it or by hitting F11 on the keyboard.
Fountain-Fill-and-other-Fill-options
Opened menu of Fill Tool
  As soon as you will do so, a window or dialogue box named Fountain Fill will be appeared. At the top of that window, under the head of Options there will be seen a drop-down menu named Type. Out of the options given in the drop-down menu named Type, select  Linear  by clicking on it. Then set the Angle for the Linear typed Fountain Fill equal to -1200 and set the Edge Pad equal to 8.0 by typing the values in the relevant boxes. Further in the same window, there will be seen two radio buttons named Two Color and Custom  under the head of Color Blend.  By default you will find the radio button named Two Color selected in that window with all it’s setting options visible but here we need to select the other option named Custom.
As soon as you will select the radio button named Custom, the setting options of Two Color will be disappeared and the setting options of Custom will be appeared in the window. These options are consist of a Color Palette, a box named Position (by default inactive), a small rectangle named Current (that shows the color inside the currently selected area), a large rectangle ( used to set the position of different colors in the single object) with two tiny squares at the top left and top right corners of it, and right beneath that rectangle, there will be seen a drop-down menu name Preset.
Further, you will notice that the tiny square at the top left  corner of the large rectangle will be black by default that means that the left part of the selected object remain ready to be filled with any color by default through that window. So fill dark grey color in that part by selecting the thumbnail representing dark grey color in the color Palette given in the same window with left mouse click. As soon as you will select that thumbnail, dark grey color will be filled inside the selected part of the rectangular shape according to the picture below.

Linear-Type
Selected Type, Angle and Edge pad in the window named Fountain Fill
Then, select the tiny square that can be seen at the top right corner of the rectangular shape by clicking on. As soon as that tiny square will be selected, it will turn black and indicate that the right part of the shape is  ready to be filled with any color. Then fill dark grey color in that part of the shape too, by selecting the thumbnail representing dark grey color in the color palette with left mouse click. As soon as the grey color will be filled inside that part of the shape, the shape will turn totally dark grey according to the picture below.

Selection-of-the-grey-thumbnail
Grey color has been filled inside the entire shape
After that, put the pointer of your mouse anywhere inside the dark grey rectangular shape and hit the left button of your mouse twice. As soon as you will do so, a slide will be appeared right above the grey rectangular shape with a tiny black arrow pointing toward  the selected area and the formerly inactive box named Position will become active showing the current position of the recently appeared black arrow in the slide.
Then, set the position of the black arrow equal to 50 by typing the value in the box named Position. As soon as you will type the value 50 in the box named Position, the black arrow will move at the center of the slide pointing toward the central area of the rectangular shape. Then fill light grey color inside the central part of the rectangular shape by selecting the thumbnail representing light grey color in the color Palette with left mouse click. As soon as you will select that thumbnail, light grey color will be filled inside the central part of the rectangular shape according to the picture below.

Position-setting-in-the-window-named-Fountain-Fill
Central part of the shape with light grey color filled inside
 After that click OK to apply that setting on the outline of the black circle according to the picture below.
shaded-outline
Black circle with light and dark grey outline
After that, select the black part of the biggest circle on the document by clicking on it and once again open the window named Fountain Fill either by clicking on the option named Fountain Fill given in the menu of Fill Tool or by hitting F11 on the keyboard as I have explained earlier. Having opened the window named Fountain Fill, first of all, select Radial as the type of Fountain Fill out of the options given in the drop-down menu named Type. As soon as you will select the option named Radial, the formerly inactive boxes named Horizontal and Vertical under the head of Center Offset will get active and, at the same time, the formerly active box named Angle will get inactive. Then, set the Edge pad for the radial typed Fountain Fill equal to 20, set Center offset (Horizontal) equal to 90 and set Center offset (Vertical) equal to -95 by typing the values in the relevant boxes according to the picture below .

Radial-Type-Fountain-Fill
Radial as selected fill Type in the window named Fountain Fill
 After that, in order to apply that setting on the selected black circle, either click the button named OK given in the same window or hit the Enter Key on the keyboard. As soon as you will click the button named OK or hit the Enter Key, the required setting will be applied on the black circle according to the picture below.
glistening-black-circle
Black circle with glistening surface
After that, select the small light grey circle with the help of Pick Tool and change it’s color from light grey to pure white by selecting the thumbnail representing white color in the Palette.
white-circle-with-grey-outline
Selected smaller circle with white fill inside
 After that, select the Rectangle Tool either by clicking on it in the Tool Box or by hitting F6 on the keyboard.
Tool-used-to-draw-rectangles-and-squares-in-CorelDraw
Rectangle Tool in the Tool Box
 As soon as you will select that tool, the pointer of your mouse will assume the shape of a plus ( + ) sign with a tiny rectangular shape at the bottom right of it. Then put that plus sign shaped pointer of your mouse anywhere on the document and draw a rectangular or square shaped object there by dragging your mouse in any direction while keeping it’s left button pressed.
 Then select that newly drawn shape with the help of Pick Tool and in order to convert it into a perfect square, set it’s width equal to it’s height in the Property Bar by typing the values ( width=3.0, Height= 3.0) in the relevant boxes and hitting the Enter Key.As soon as you will hit the Enter Key, the selected shape will assume the same width and height and will be converted into a perfect square. After that, select  the outline width for the selected square equal to 8.0 pt out of the different width options given in the drop-down menu named Outline width and fill dark grey color in that 8 pt wide outline of the selected square by selecting the thumbnail representing dark grey color in the color Palette with right mouse click according to the picture below.
Perfect-square
Perfect square with 8.0 pt wide grey outline
 After that hit F11 on the keyboard to open the window named Fountain Fill again as I have explained earlier. Then in that window select Linear out of the different options given in the drop-down menu named Type, set the Angle equal to 139.9o and  set the Edge pad equal to 24 by typing the values in the relevant boxes.  Then out of the different color options given in the two apparently hidden Color Palettes  named From  and To, select dark cyan color and light cyan color respectively according to the picture below.
From-and-To-in-Fountain-Fill-window
Type, Angle, Edge pad  and hidden color palettes named From  and To in the window named Fountain Fill
After that click OK to apply this setting on the selected square with 8.0 pt wide outline. Then, make a duplicate of that cyan square either by getting inside the Edit Menu and selecting the option named Duplicate or by hitting CTRL + D on the keyboard. As soon as you will do so, another cyan colored square will be appeared on the document. Then with the help of Pick Tool set both the squares in a way that the bottom- right corner of the first square could touch the top-left corner of the duplicate square according to the picture below.
Two-identical-circles
Two squares on the right place
 After that, select the duplicate square with the help of Pick Tool and convert it’s outline into a separate object by getting inside the Arrange Menu and selecting the option named Convert Outline to Object or by hitting CTRL + Shift + Q on the keyboard. Then select the cyan part of the same square by clicking on it reduce it’s width and height from 3.0 to 2.8  by typing the values in the relevant boxes given in the Property Bar and hitting the Enter Key. As soon as you will hit the Enter Key the selected part will assume the same size and white page will begin to peer from the empty area  generated by the reduced size of the selected square according to the picture below.
reduced-size-of-the-square
Selected square with reduced size and outline converted into a separate object
After that, hit F11 on the keyboard to open the window named Fountain Fill one more timeHaving opened that window, the only thing which is supposed to be done is the selection of colors out of the different color options given in the two hidden Color Palettes named  From and To.  So select dark blue color out of the options given in the hidden Color Palette named From and select dark cyan color out of the options given in the hidden Color Palette named To according to the picture below.

Fountain-Fill-Color-blend-Two-color-From-To
Select dark blue as From and dark cyan as To
After that in order to apply that setting upon the selected shape click the button named OK . As soon as you will click the button named OK, the required setting will be applied on the selected shape according the picture below.
cyan-and-blue-shaded-square
Two squares on the document with different colors filled inside
 After that, select both the squares and  the outline of the second square with the help of Pick Tool by clicking on each object one by one while keeping the Shift Key on the keyboard pressed. Having selected these three objects, group them together either by getting inside the Arrange Menu and selecting the option named Group or by hitting CTRL + G on the keyboard. Then, get inside the Effects Menu and select the option named Power Clip given there.  As soon as you will select that option it’s side menu will be appeared containing a few more options. Out of the options given in the side menu of Power Clip select Place Inside Frame. 

Power-Clip-and-the-Effects-Menu
Option named Power Clip with it's side menu
 As soon as you will select that option, the pointer of your mouse will assume the shape of  a remarkably  thick black arrow.
thick-black-arrow
Mouse pointer has been converted into a remarkably thick black arrow
 Then put that thick black arrow shaped pointer of your mouse anywhere inside the small white circle and hit the left button of your mouse once. As you will do so, the selected group of two squares  and the outline of the second square will be placed inside the small white circle according to the picture below.
Use-of-Power-Clip-in-CorelDraw
Selected group of two squares and the outline of the second square has been placed inside the white circle
If you notice anything wrong about the position of the group inside the circle, you can edit it easily. For that purpose, get inside the Effects Menu again and again select the option named Power Clip. Then out of the options given in the side menu of Power Clip select Edit Power Clip.


Edit-Power-Clip
Option named Edit Power Clip given in the side menu of  Power Clip
As soon as you will select that option, the position of the group inside the white circle will get ready to be edited while rest of the objects on the document will get dimmed. Then with the help of Pick Tool place the group at the right position according to the picture below.

Editing-through-Edit-Power-Clip-in-CorelDraw
Place the group on the right position with the help of  Pick Tool
Having placed the group on the right position, in order to finish the editing , get inside the Effects Menu again and again select the option Power Clip. After that, out of the options given in the side menu of Power Clip select Finish Editing this Level.

Finish-Editing-this-Level-in-CorelDraw
Option referred as Finish Editing this Level given in the side menu of  Power Clip
As soon as you will do so, editing will be finished and the group will be appeared inside the white circle at the appropriate position according to the picture below.
finished-editing
Edited  position of the group inside the white circle
 After that select the Text Tool either by clicking on it in the Tool Box or by hitting F8 on the keyboard.
tool-for-typing-in-CorelDraw
Text Tool in the Tool Box
 As soon as you will select that tool, pointer of your mouse will assume the shape of a plus ( + ) sign with a tiny but prominent letter A at the bottom right of it. Then put that plus sign shaped pointer of your mouse anywhere on the document and type   B M W there (hit the Space Bar once  after typing  each letter). Then select that recently typed text with the help of Pick Tool . As soon as the text will be selected , it’s properties will be appeared on the Property Bar.

Then, select Arial Black as Typeface for the selected text out of the different options given in the drop-down menu named Font List, specify the font size for the selected text equal to 120 pt either by selecting 120 pt out of the different options given in the drop-down menu named Font Size  or by typing the value inside the box. Then fill light grey color inside the selected text by selecting the thumbnail representing light grey color in the Color Palette with left mouse click and fill black color in the selected text outline by selecting the thumbnail representing black color in the Color Palette with right mouse click according to the picture below.

properties-of-the-typed-text
Recently typed text and it's properties
 Having set the properties of the text, get inside the Text Menu and select the option named Fit Text to Path given there.
Text-and-Fit-Text-To-Path-in-CorelDraw
Option referred as Fit Text To Path given in the Text Menu
As soon as you will select that option, pointer of your mouse will assume the shape of a (not so thick) horizontal black arrow with a prominent letter A and a tiny twisted line at the bottom right of it. Then put that pointer of your mouse inside the black circle and set the position of the selected text according to picture below.

Text-and-text-path
Selected text is being placed at the accurate path


Have set the position of the selected text inside the black circle hit the left button of your mouse once to put the text permanently at the same position according to the picture below.

Text-placed-inside-the-logo
Logo image almost ready to be saved
Then select all the objects on the document by hitting CTRL + A on the keyboard and group them together by hitting CTRL + G. Then the logo of BMW will ready to be saved, so save it in CDR format either by getting inside the File Menu and selecting the option named Save or by hitting CTRL + S. In order to save the same logo in any other format (e.g. PNG, JPEG, AI, GIF etc.) select Export out of the options given in the File Menu or hit CTRL + E on the keyboard as I have explained in the my post Illustration of Pakistani flag in CorelDraw X6.

I hope you will enjoy this post, so have fun with it but kindly don’t forget to subscribe your comment.