Nepal is one of the seven countries of South Asia. Though it has
never been considered as an economically developed country, but there are associated a few
amazing facts with this country that are enough to make it unique
and famous in all over the world. For instance, this country is famous for
Mount Everest that is the highest point on Earth. Further, in this country
there can be seen some very rare species of animals including Bengal Tigers,
rhinoceros with one horn and 871 species of birds. Nepal is also famous for
being the birth place of Gautama Buddha (founder of Buddhism) and having a
unique shaped national flag with two different sized triangular shapes (pennons) joined
together and adorned with the shapes of suns and a crescent.
 |
| Nepali Flag unique and beautiful at the same time |
Here in this post, I have decided to explain a very simple method
through which one can draw that beautiful but unique shaped flag flawlessly
within a few minutes using CorelDraw X6. The main tools we are going to use here are Rectangle Tool,
Knife Tool, Polygon Tool, Ellipse Tool ,shaping options called Weld and Trim and
positioning options referred as Mirror Vertically and Mirror Horizontally.
Method of illustration of Nepali Flag
Rectangle Tool
First of all create a new document by following
the method I have explained in my earlier post Illustration of Pakistani flag in CorelDraw X6.
Then select Rectangle Tool out of the Tool Box by clicking on it or by
hitting F6 on the keyboard.
 |
| Rectangle Tool in the menu |
As soon as your will select that tool, pointer of
your mouse will assume the shape of a plus ( + ) sign with a small rectangular
shape at the bottom-right of it. Put that plus (+) sign shaped pointer anywhere
on the document and draw a rectangle there by dragging your mouse in any
direction and holding down it’s left button. As soon as that rectangle will be
emerged on the document, it’ properties will be appeared on the Property Bar.
Set the width of that selected rectangle equal to 5.0 and the height of it equal to 5.5 and hit Enter. As soon as you will hit the Enter Key, the
selected rectangular shape will assume the same width and height.
 |
| Newly made rectangle with width and height 5.0 and 5.5 respectively |
After that,
fill red color inside the shape by selecting the thumbnail representing red
color in the Color Palette with left mouse click.
 |
| Rectangle with red color filled inside |
Outline Pen (Set the width of shape's Outline)
After that , click on the
tiny black arrow that can be seen at the bottom right of the tool referred as Outline Pen in the Tool Box. As soon as
you will click that arrow a menu will be appeared containing different styles
of outline. Out of those styles select 10 pt because 10 pt is the most suitable
outline width for the shape of that size. As soon as you will select that
style, an outline of the same width will be appeared around the shape and the Property Bar will start to show the same outline width as the property of
selected shape.
 |
| Rectangle with 10 pt wide outline |
Change the color of selected shape's Outline
The next thing which is supposed to be done right after that is
to change the color of the shape’s outline from default black to custom blue.
In order to do that , select the thumbnail representing blue color in the Color
Palette with right mouse click. As soon as that thumbnail will be selected, the
color of the selected shape’s outline will be changed from black to blue.
 |
| Selected shape with blue outline |
Knife Tool
After
that, select Knife Tool out of the Tool Box by clicking on it.
 |
| Knife Tool in the menu |
As soon as you
will select that tool, pointer of your mouse will assume the shape of a knife. Then,
put that knife shaped pointer at the top-right corner of the shape. As soon as,
that knife shaped pointer will touch the corner of the shape it will get erect
with it’s tip on the corner of the shape. Then click the left button of your
mouse once and after releasing the button, drag your mouse downward diagonally
to the bottom-right corner of the shape.
 |
| Diagonal mouse drag from top-right to bottom-left |
Having reached there, click the left
button of your mouse again to cut the rectangular shape diagonally into two
equal parts. As soon as you will click the button, a blue diagonal line will be
appeared on the shape from it’s top
right corner to it’s bottom-left corner and that will indicate the successful
division of the shape into two equal parts.
 |
| Two parts of divided shape |
Mirror Vertically
After that, select the Pick Tool
out of the Tool Box and select the left part of the shape by clicking on it. As
soon as that part will be selected it’s properties will be appeared on the
Property Bar. Out of those properties, click on the option named Mirror vertically. As soon as you will select that option,
selected left part of the shape will be flipped from top to bottom. After that,
select the same shape again and set it’s width and height in the Property Bar
equals to 5.0 and 4.0 respectively and hit Enter. As soon as you will hit the Enter key on the
keyboard, the selected triangular part of the shape will assume the same width
and height.
 |
| Left part of the shape with altered size and direction |
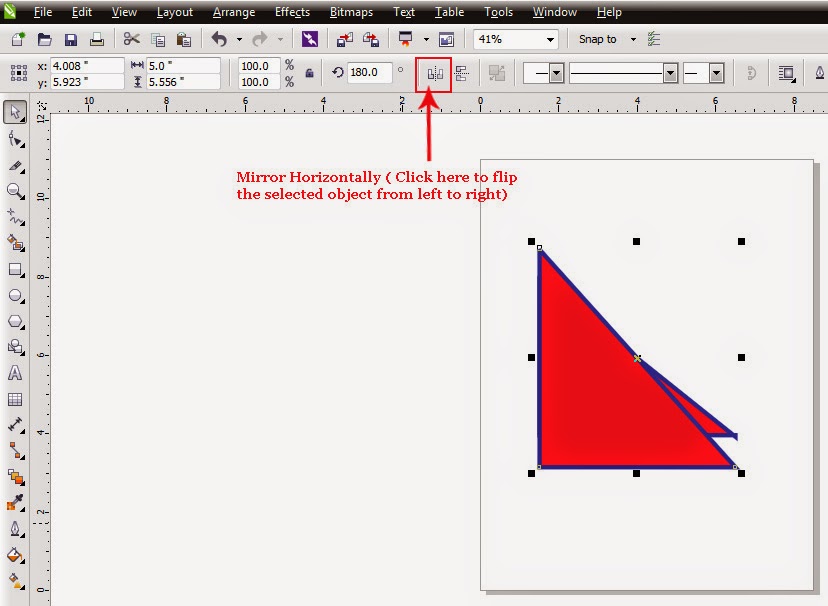
Mirror Horizontally
After that, select the right part of the shape
with the help of Pick Tool and out of it’s properties given in the Property
Bar, select the option called Mirror
horizontally. As soon as your will select that option the selected right
part of the shape will be flipped from left to right.
 |
| Right part of the shape with altered direction |
After that, with the help
of Pick Tool, drag that horizontally flipped part of the shape down to the
middle of the vertically flipped part of the shape and place it there.
 |
| Two rectangles ready to be welded together |
Weld
Having
done so, select both shapes on the page by hitting CTRL + A or by getting
inside the Edit Menu and selecting the option referred as Objects given in the Edit Menu’s option Select All’s side menu. As
soon as you will select both the shape,
shaping options( including Weld, Trim, Simplify, Front minus back, Back
minus front and Create boundary) will be
appeared on the property bar.The option that is supposed to be selected here out of those options is none other than Weld.
 |
| Shaping options on the Property Bar. |
As soon as you will select the option Weld, both the selected shapes will be
welded together and become one shape.
 |
| After being welded two shapes become one |
Then ,select that shape with the
help of Pick Tool and set it’s width equals to
5.5 in the Property Bar leaving the
height of it unchanged and hit Enter.
As soon as you will hit Enter, the selected shape will assume the same width
while it’s height will remain unchanged.
 |
| Shape with increased width |
Star Tool
After
that, select Star Tool out of the
tool box by clicking on it.
 |
| Star Tool in the menu with five other tools |
As soon as you will select that tool, pointer of
your mouse will assume the shape of a plus ( + ) sign with a small five pointed
star at the bottom-right of it. Then, put the pointer of your mouse anywhere on the
document, keep the left button of your mouse pressed and drag it in any
direction to draw a 5 sided shape of a star there. After that, select that shape of a star with the help of Pick Tool by clicking on it. As soon as the star will be
selected it’s properties will be appeared on the property bar. Out of those
properties set the width and height of that star equals to 2.2 , Points or Sides of
the star equal to 14 , Sharpness of these points equal to 35 and Outline width of that star equal to 1.5 by typing the required values in the boxes and hitting the Enter key every time to apply those properties on the shape of star.
 |
| Properties of star in the the Property Bar |
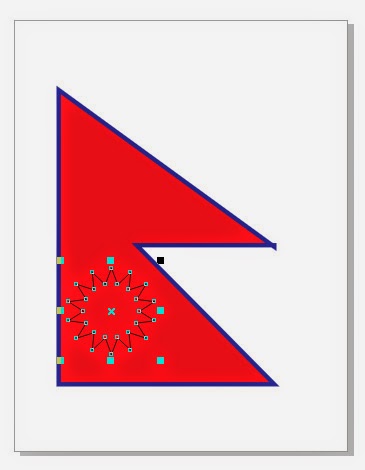
Having done so, with the help of Pick Tool
put that 14 sided star on the center of the lower part of the shape.
 |
| Fourteen sided star placed on the lower part of the shape |
Duplicate
After that, make a copy of that star either by getting inside the Edit Menu and selecting
the option Duplicate or by hitting CTRL + D.
 |
| Option referred as Duplicate in the Edit Menu |
As soon as you will select the
option Duplicate or hit CTRL + D, another identical 14 sided star will be
appeared on the page. With the help of Pick Tool set that duplicate star on the
center of the upper part of the shape. Then select the star on the upper part
of the shape with the help of Pick Tool by clicking on it. As soon as you will
select that star, it’s properties will be appeared on the property bar. Out of
those properties, set the width and height of the star equals to 1.2, set the Points
of Sides for the star equal to 20, set the Sharpness equal
to 25 and Outline width for the same star equal to 1.5 by typing the required values inside the boxes and hitting the Enter key every time on the keyboard.
 |
| Twenty-sided star on the upper part of the shape |
Ellipse Tool
After that, select Ellipse Tool out of the Tool box by
clicking on it.
 |
| Ellipse Tool in the menu |
As soon as you will select that tool, pointer of your mouse
will assume the shape of a plus ( + ) sign with a small shape of an ellipse at
the bottom right of it. Then, put that plus sign shaped pointer of your mouse
anywhere on the document, keep the left button of your mouse pressed and drag
it in any direction to draw an ellipse . Having drawn an ellipse shape, select
it with the help of Pick Tool and set it’s width equal to 2.2 and height equal to 2.0 in the Property and hit Enter. As
soon as you will hit Enter, the selected shape of an ellipse will assume the same width and height.
 |
| Ellipse shape with width and height equals to 2.2 and 2.0 respectively |
Trim
After
that, make a duplicate of that shape either by getting inside the Edit Menu and
selecting the option Duplicate or by hitting CTRL + D on the keyboard as I have explained earlier. As soon
as, you will select the option called Duplicate given in the Edit Menu or hit
CTRL + D, a duplicate of the
selected ellipse will be appeared on the document . Place that duplicate shape
on the first shape leaving the lower part of the first shape uncovered by it's duplicate.
After
that, select both the ellipses by clicking on each one by one with the help of
Pick Tool holding down the Shift key on the keyboard. As soon as you will
select both the ellipses, shaping options will be appeared again on the
Property Bar. Out of those options, select Trim
to have the covered part of the first shape
nicely trimmed off.
 |
| Ellipse shape ready to be trimmed |
As soon as you will select the option Trim, the covered part of the first shape will be trimmed off leaving a nice looking delicate crescent behind .
 |
| Crescent shaped part of the fist shape |
After that, select the duplicate shape with the help of Pick Tool and delete
it either by getting inside the Edit Menu and selecting the option Delete or by hitting the key named delete on the keyboard.
 |
| Option Delete given in the Edit Menu |
Having deleted the duplicate shape, put that crescent with the help of Pick Tool on the upper part of the
flag in a way that it’s upper part could overlap the lower part of the 20 sided
shape of the star (or sun).
 |
| Upper part of the crescent overlapping the lower part of the twenty-sided star |
Then, select all the colorless shapes (including 14
sided star on the lower part of the flag and the shapes of 20 sided star and
crescent on the upper part of the flag) on the document by clicking on each one
by one with the help of Pick Tool holding down the Shift key . Having done so,
fill white color in all the selected shapes by selecting the thumbnail
representing white color in the Color Palette with left mouse click and then
select the same thumbnail again with right mouse click to fill white color in
the outlines of all the selected shapes.
 |
| White color has been filled inside all the selected shapes and their outlines. |
Save or Export
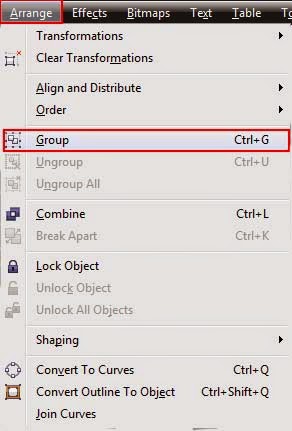
After that select all the shapes
on the document by hitting CTRL + A and then hit CTRL + G to group them together. After that, get inside the File Menu
and select the option Save or hit CTRL + S to save the image in CDR format or
select the option Export or hit CTRL + E to save the image in any format other
than CDR.
 |
| Options referred as Save and Export given in the File Menu |
Having saved that image you can manipulate it in many different ways
using Photoshop. For instance you can
render different effects on it or you can put different backgrounds behind the
image according to your requirement.
I hope this post will be proved helpful to all the
readers and having read this post you will be able to utilize different tools
of CorelDraw X6 properly. If so, kindly let me aware of that. If you want to
express your feeling in any form (suggestion or complain) kindly don’t forget
to subscribe your comments.


